|

Online Reference Guide
|
|
How To / Scan in a Network Environment
Setting up the Client Computer
 Installing the TCP/IP protocol
To allow networking, the client computers in the network require a Network Interface Card and a Network Interface Card (NIC) driver. Install the Network Interface Card and Network Interface Card (NIC) driver in the client computers. For installation procedures, refer to the corresponding manuals included with the card.
Installing the TCP/IP protocol
To install the TCP/IP protocol on the client computers on the network, follow the instructions below.
For Windows XP and 2000 users
 |
For Windows XP users:
Click Start, right-click My Network Places, and then select Properties.
|

For Windows 2000 users:
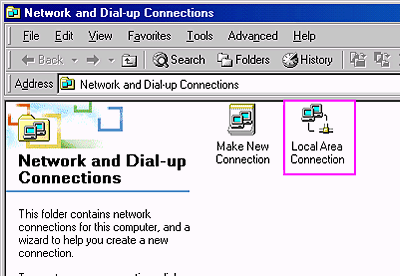
Right-click the My Network Places icon on your desktop and select Properties.

 |
Double-click Local Area Connection.
|
 |
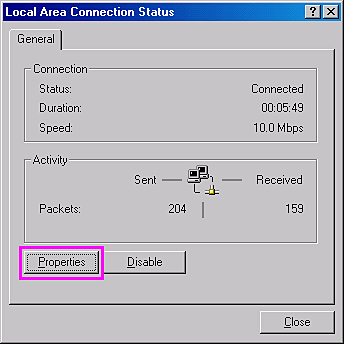
Click Properties.
|
 |
Check that Internet Protocol (TCP/IP) is included in the Local Area Connection Properties list box.
|
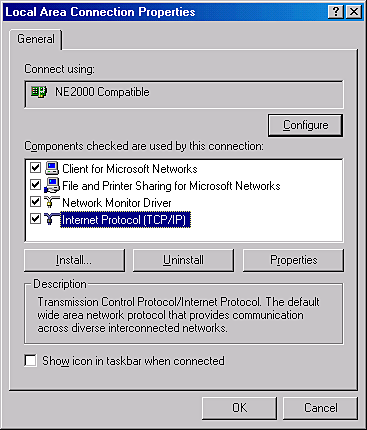
If Internet Protocol (TCP/IP) appears in the list box, proceed to Network Scanning Procedure. Otherwise, proceed to step 5.
 |
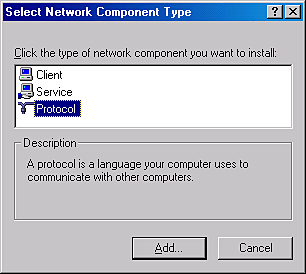
Click Install. The Select Network Component Type box appears.
|
 |
Select Protocol from the list and click Add.
|
 |
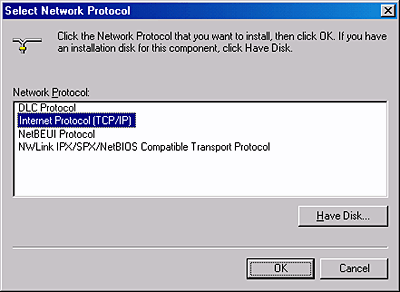
Select Internet Protocol (TCP/IP) in the Network Protocol list box and click OK.
|
For Windows Me and 98 users
|
|
Click the Start button on the Windows task bar and point to Settings, then select Control Panel.
|
The Control Panel window appears.
|
|
Double-click the Network icon in the Control Panel.
|

The Network dialog box appears.
|
|
Click the Configuration tab.
|
|
|
Check that TCP/IP protocol is included in the list box.
|
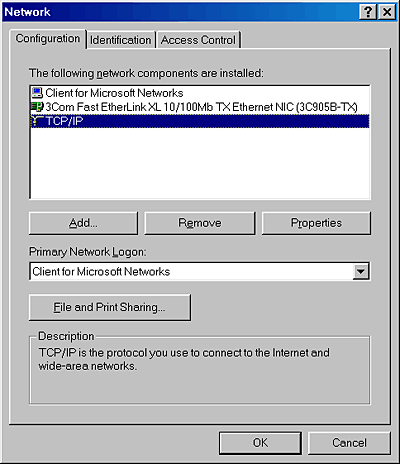
If TCP/IP appears in the list box, proceed to the following section Network Scanning Procedure. Otherwise, proceed to step 5.
|
|
Click Add.
|
The Select Network Component Type dialog box appears.
|
|
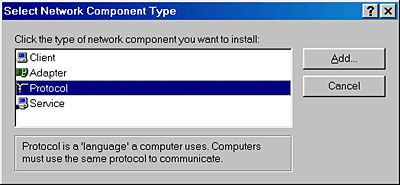
Select Protocol from the list and click Add.
|
|
|
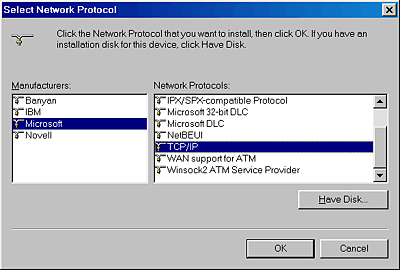
Select Microsoft from Manufacturers box and TCP/IP from Network Protocols, and click OK.
|

[Top]
| Version 1.00E, Copyright © 2003, SEIKO EPSON CORPORATION |

