Printing From Your Computer
When you print from your computer, you can edit, enhance, and organize your photos, using your photo software, such as Adobe® Photoshop.®
Before you start, make sure your PictureMate software is installed as described in the Using PictureMate With a Computer booklet.
Follow the instructions for your computer:
Tip: If your digital camera supports PRINT Image MatchingTM (P.I.M. or P.I.M. II) or Exif Print, you can use these technologies to ensure the most accurate reproduction of your photographs. See Printing Photos Using Film Factory.
Printing From a Windows Computer
You can print your photos from imaging applications in Windows.®
- Open your photo in your program.
- From the File menu, click Print. You see a Print window like this one:
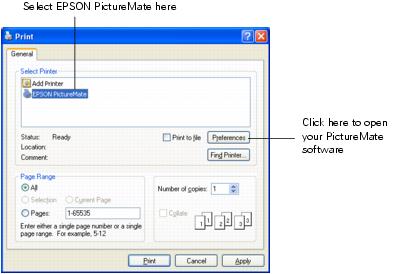
- Make sure EPSON PictureMate is selected.
- Click the Preferences or Properties button. (If you see a Setup, Printer, or Options button, click it. Then click Preferences or Properties on the next screen.)
You see the Printing Preferences or Properties window:
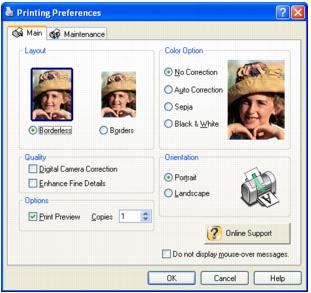
- You can do the following:
- Select Borderless to print a photo without any borders or choose Borders to print with a white border all around.
- If your photo is longer than it is wide, select Portrait orientation; if it is wider than it is long, select Landscape.
- If you want to adjust your photo colors, you can change the Color Option. Select Auto Correction to automatically adjust colors, Sepia to change the colors to brown for an old-fashioned look, Black & White to change a color photo to a black and white one, or No Correction to leave the photo to print with no adjustment.
- If your photo was taken with a digital camera, select Digital Camera Correction to minimize common digital flaws.
- To bring out the fine details of a particularly intricate photo, select Enhance Fine Details (printing may be slower).
Tip: For more information about printer settings, click the ? or Help button.
- Click OK.
- At the Print window, click OK or Print to start printing.
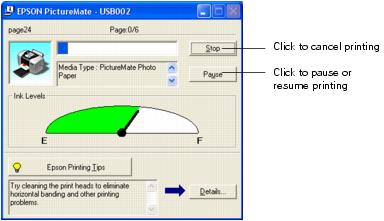
During printing, this window appears and shows the progress of your print job. You can use the buttons to cancel, pause, or resume printing. You can also see how much ink you have left.
See Storing Your Printed Photos for steps on properly storing your printed photos.
Selecting Default Settings
Your printer settings only apply to the program you're currently using. If you want, you can change the Windows default printer settings for all your programs.
- Right-click the
 printer icon in the lower right corner of your screen (taskbar).
 - Select Printer Settings. You see the Printing Preference or Properties window.
- Select the default settings you want to be the default for all your applications, then click OK.
You can still change the printer settings in your individual programs whenever you print.
Printing From a Macintosh Computer
Follow the steps below for the operating system you are printing from:
Macintosh OS X
If you're printing from an OS X compatible application, follow the steps below to print a photo. (If you're using an application that's compatible only with Macintosh® Classic mode, follow the steps in Macintosh OS 9 instead.)
- From the File menu, select Page Setup. You see this menu:
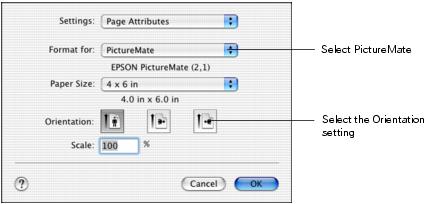
- Open the Format for menu and select one of the following:
- PictureMate (to print your photo without any borders)
- PictureMate (Borders) (to print your photo with a white border all around).
- Select 4 × 6 in from the Paper Size menu.
- Select the direction you want your photo to print as the Orientation setting. Select
 for vertical orientation,
  for horizontal facing right, or
  for horizontal facing left.
 - When you're finished with the Page Setup settings, click OK.
- Select Print from the File menu. You see a screen like this:
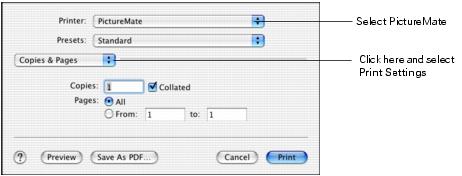
- Open the Printer menu and select one of the following:
- PictureMate (to print your photo without any borders)
- PictureMate (Borders) (to print your photo with a white border all around).
Make sure you pick the same setting you chose as the Format for setting on the Page Setup screen.
- Select Print Settings from the pop-up menu. (In iPhoto, click Advanced options to see the pop-up menu.) You see your printing options:

- Select your print settings as follows:
- To bring out the fine details in your photo, select Enhance Fine Details (printing may be slower).
- To print your photo in color, select Color; to print it in black and white, select Black & White.
Tip: For more information about printer settings, click Help.
- You can also choose these options in the pop-up menu:
- Copies & Pages, to select the number of copies or a page range
- Layout, to select page layout options
- Output Options, to save your print job as a PDF file
- Summary, to view a list of all your selections
- Click Print.
- To monitor the progress of your print job, click the
 PictureMate or
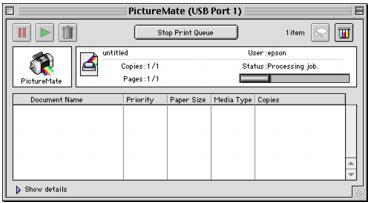
  Print Center icon when it appears in the dock. If you clicked the Print Center icon, double-click PictureMate. You see a screen like this:
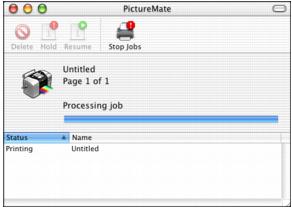
- From this window, you can do one of the following:
- To cancel printing, click the print job, then click Delete
- To pause printing, click the print job, then click Hold
- To resume printing, click a print job marked "Hold" and click Resume
- If multiple print jobs are listed and you want one to print before the other(s), select the job and click the Status arrow to move it up.
- When you're finished, choose File > Quit in the PictureMate or Print Center window.
See Storing Your Printed Photos for steps on properly storing your printed photos.
Macintosh OS 9
- From the File menu, select Page Setup. You see the following:
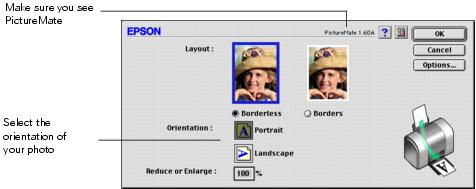
- Make sure PictureMate is selected. If not, you need to select it in the Chooser.
- Select these print settings:
- Select Borderless to print a photo without any borders or choose Borders to print with a white border all around.
- If your photo is longer than it is wide, select Portrait orientation; if it is wider than it is long, select Landscape.
- Click OK.
- From the File menu, select Print. You see a window like the following:
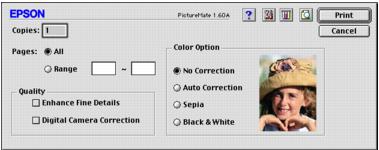
- Select the following print settings:
- If you want to adjust your photo colors, you can change the Color Option. Select Auto Correction to automatically adjust colors, or Sepia to change the colors to brown for an old-fashioned look, or Black & White to change a color photo to a black and white one.
- To bring out the fine details in your photo, select Enhance Fine Details (printing may be slower).
- If your photo was taken with a digital camera, select Digital Camera Correction to minimize common digital flaws.
Tip: For more information about printer settings, click the ? button.
- You can also do the following:
- Click
 to change the Print button to Preview. You can then click it to preview your printout.
 - Click
 to check your ink levels.
- Click Print to start printing.
- If you turned on background printing, you can open the EPSON MonitorIV window by selecting it in the Application menu in the upper-right corner of your screen.
- Monitor the progress of your print job or do one of the following:
See Storing Your Printed Photos for steps on properly storing your printed photos.