 Creating Public Access Printers
Creating Public Access Printers at the Server Console
You can use the EpsonNet NDPS Gateway to create public access printers at the server console by following the procedure below.
CAUTION:
Configuring the remote printer damages the current printing environment. You need to be careful if you do not want to damage the current printing environment when you configure current printers.
- Be sure NDPSM.NLM is loaded. If it is not, type LOAD NDPSM at the server console.
SUGGESTION:
- You can also load a specific NDPS Manager by typing LOAD NDPSM fully distinguished name.
- If a specific NDPS Manager is already loaded, press <Alt> and <Esc> at the same time until the NDPS Manager screen appears.
- Select an existing NDPS Manager.
Selecting an NDPS Manager displays the Printer Agent list containing all the Printer Agents referenced by this NDPS Manager.
- Press <Insert>. The Create Printer Agent box appears.
- Type the name of the new Printer Agent up to 31 characters, then press <Enter>. The Printer Configuration screen appears.
NOTE:
Do not use the following characters for the Stylus COLOR 3000 and Stylus COLOR 1520's Printer Agent name; ~!@#$%^&*()+`={} [] | \ : ; " ' < , >. ? / ` .
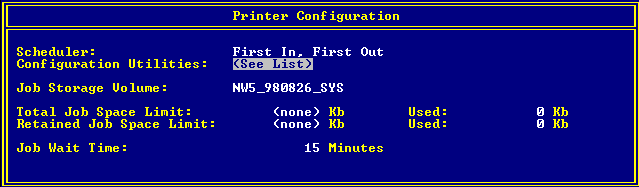
- Select the Configuration Utilities option and press <Enter>. The Gateway Type screen appears.
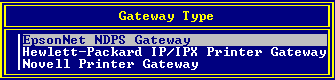
- Select Epson Printer Gateway and press <Enter>. The Configure Port Handler screen appears.

- Select the correct port handler type.
See one of the following for specific information on configuring the printer: