|

Reference Guide
|
|
How To / Using Automatic Roll Paper Cutter
Attaching the Automatic Roll Paper Cutter and the Basket
 Adjusting
the cutting position
If you use the cutter packed with EPSON Stylus Photo 2200, you can automatically cut the picture images printed continuously on the roll paper. Attach the cutter as follows.
 |
Caution:
|
 |
When attaching or removing the cutter, turn the printer off for safety reasons.
|
 |
Pressing the lever that is on the left of the output tray to the right side, then remove the output tray from the printer.
|

 |
Insert the cutter exactly to the proper position.
|

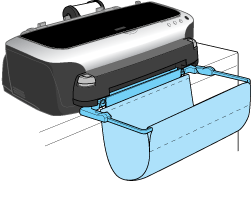
To receive the paper cut off by the cutter, attach the basket. Follow the steps below.
 |
Caution:
|
 |
When using the basket, move the printer to the edge of the desk or table so that the cloth of the basket hangs as shown in the illustration. Be careful not to let the printer fall from the desk or table when moving it. In addition, do not place the printer on an unstable surface.
|

 |
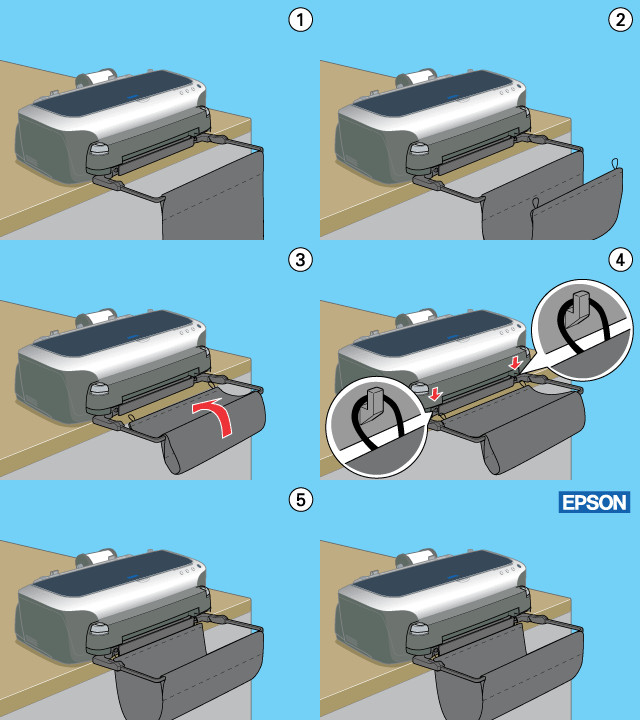
Attach the basket to the cutter. Insert the both sides of the basket's edge into the slot that is at the bottom of the cutter.
|

 |
Hook the rings that are the edge of the cloth.
|

 |
Put the cloth inside and make it like a bag, then remove any slack by pulling the edges of the cloth to left and right.
|

 |  |
Caution:
|
 |  | -
The following specifies the size and amount of the roll paper the basket can hold.
Length range from 55 mm to 178 mm: 40 sheets
Length range from 178 mm to 297 mm: 1 sheet
In addition, remove the basket in case the length exceeds 297 mm. If you use paper in excess of this range, a paper jam may occur or the basket may be damaged.
|
 |  | -
When printing on Premium Semigloss Photo Paper, remove each printout from the basket immediately after printing. Keep your printouts separate while drying, as overlapping them may affect print quality.
|

[Top]
Adjusting the cutting position
After you attach the cutter, make sure to adjust the cutting position to improve its precision.
 |
Note:
|
 | -
Before doing the following, it is necessary to turn the printer on and set the roll paper. Refer to Loading the roll paper for more details about the roll paper setting.
|
 | -
If you want to maintain a precise cutting position, it is recommended that you adjust the cutting position each time you change the type or size (width) of roll paper.
|
For Windows users
 |
For Windows 2000, Me, and 98 users, click Start, point to Settings, then click Printers to open the Printer folder.
|
For Windows XP users, click Start, then click Control Panel, then click Printers and Other Hardware, then click Printers and Faxes to open the Printers and Faxes folder.
 |
For Windows Me and 98 users, select EPSON Stylus Photo 2200 icon then click Properties on the File menu.
|
For Windows XP and 2000 users, select EPSON Stylus Photo 2200 icon then click Printing Preferences on the File menu.
The printer software opens.
 |
Click Utility tab, then click Printer and Option Information. The Printer and Option Information dialog box opens.
|

 |
Click the Auto Cutter Adjustment button. The Auto Cutter Adjustment dialog box opens.
|

 |
After making sure that the roll paper is set, click the Print button. The cutting position adjustment pattern is printed and cut off.
|

 |
By using the cut roll paper, check the most precisely printed number among the color boundaries.
|

 |
Select the number that corresponds to the most precise cut between the two-color squares. Click Finish to enable the adjustment.
|

For Macintosh
 |
Click Print on the File menu of your application. The Print dialog box opens.
|
 |
Click the  Utility icon button. The Utility dialog box opens. Utility icon button. The Utility dialog box opens.
|

 |
Click Printer and Option Information. The Printer and Option Information dialog box opens.
|

 |
After making sure that the Auto Cutter Attached check box is selected, click the Auto Cutter Adjustment button. The Auto Cutter Adjustment dialog box opens.
|

 |
After making sure that the roll paper is set, click the Print button. The cutting position adjustment pattern is printed and cut off.
|

 |
By using the cut roll paper, check the most precisely printed number among the color boundaries.
|

 |
Select the number that corresponds to the most precise cut between the two-color squares. Click Finish to enable the adjustment.
|


[Top]
| Version 1.00E, Copyright © 2001, SEIKO EPSON CORPORATION |
![]()
Adjusting the cutting position


 Utility icon button. The Utility dialog box opens.


