![]()
Reference
Guide
|
|
Index |
|
Search |
|
Glossary | |||||
|
|
TOC |
|
Help |
|
||||||
|
|
|
|||||||||||||||||||||||||||||||||
Printing with Macintosh
Making the Media Type setting
You will find the printer driver settings in the following dialog boxes.
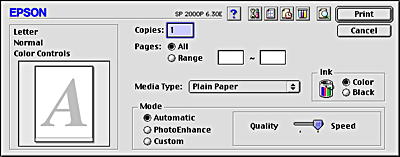
The Mode settings in the Print dialog box are arranged to give you four levels of control over the printer driver, as explained below.
|
Automatic |
This mode provides the quickest and easiest way to start printing. See Using the Automatic mode. |
|
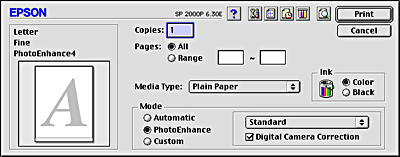
PhotoEnhance |
This mode lets you choose from a variety of image-correction settings specially designed for photos. See Using the PhotoEnhance mode. |
|
Custom |
This mode lets you choose from a list of ready-made or personalized settings suited to the kind of document you want to print. When Custom is selected, the Advanced button is enabled, allowing you to access the Advanced dialog box. See Using the Custom mode. |
|
Advanced |
This button opens the Advanced dialog box, where you can make detailed settings to fit your individual needs. From the Advanced dialog box, you can add your personalized settings to the Custom Settings list. See Using the Advanced settings. |
In addition to making comprehensive Mode settings that affect overall print quality, you can also modify individual aspects of your printout using the settings contained in the Page Setup and the Layout dialog boxes. For information on making Page Setup settings, see Making the Page Setup settings. For information on making Page Layout settings, see Modifying the Page Layout.
The Media Type setting determines what other settings are available, so you should always make this setting first.
In the Print dialog box, select the Media Type setting that matches the paper you loaded in the printer. To find out what Media Type you are using, find your media in the list below, and refer to the corresponding Media Type under which it is grouped (shown in bold). For some media, there are several Media Type settings to choose from.
|
Plain paper |
|
|
Envelopes |
|
|
EPSON Glossy Paper - Photo Weight |
S041347 |
|
EPSON Archival Matte Paper (Super A3/B) |
S041339 |
|
EPSON Premium Semigloss Photo Paper |
S041327 |
|
EPSON Premium Semigloss Photo Paper |
S041329 |
|
EPSON Premium Semigloss Photo Paper |
S041330 |
 | Note: |
| The availability of special media varies by location. |
When Automatic is selected as the Mode setting in the Print dialog box, the printer driver takes care of all detailed settings based on the current Media Type and Ink settings. To make the Ink setting, select Color to print in color, or Black to print in black-and-white or grayscale. To make the Media Type setting, see Making the Media Type setting.
| Note: |
| Depending on the media you choose in the Media Type list (while Automatic is selected), a slider appears to the right of the Mode options that lets you choose between Quality and Speed settings. Select Quality when print quality is more important than speed. |
The PhotoEnhance mode provides a variety of image-correction settings that you can apply to your photos before printing. PhotoEnhance does not affect your original data.
| Note: |
|
|
|
You can select from the following PhotoEnhance settings.
|
Standard |
This setting provides standard image correction for most photos. Try this first. |
|
People |
This setting is best for photos of people. |
|
Nature |
This setting is best for outdoor scenery such as mountains, sky, and oceans. |
|
Soft Focus |
This setting makes your photos look as if they were taken with a soft-focus lens. |
|
Sepia |
This setting applies a sepia tone to your photos. |
If you are printing photos taken with a digital camera, you can also select the Digital Camera Correction check box to give your printed images the smooth, natural appearance of photographs taken with a film camera.
The Custom mode offers ready-made settings designed for printing text and graphs and for applying a color-matching method. You can also create and save your own custom settings. See Using the Advanced settings for details.
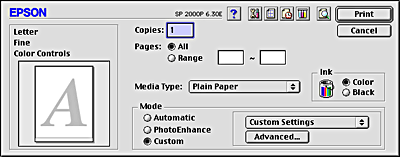
You can select from the following ready-made settings.
|
Text/Graph |
This setting is good for printing presentation documents such as graphs and charts. |
|
Draft |
This setting is best for printing drafts of text. |
|
ColorSync |
This setting automatically adjusts printout colors to match colors on your screen. |
When you choose a Custom setting, other settings such as Print Quality, and Color are made automatically. Changes to these settings are reflected in the display on the left side of the Print dialog box.
Follow the steps below to select a Custom setting.
 | Verify that the Media Type and Ink settings in the Print dialog box are correct. For details, see Making the Media Type setting. |
 | Select the Custom radio button in the Print dialog box. This enables the Custom Settings list, located to the right of the Custom radio button. |
 | From the Custom Settings list, select the most appropriate setting for the type of document or image you will print. |
The settings in the Advanced dialog box give you complete control over your printing environment. Use these settings to experiment with new printing ideas, or to fine-tune a range of print settings to meet your individual needs. Once you are satisfied with your new settings, you can give them a name and add them to the Custom Settings list.
Follow the instructions below to make Advanced settings.
|
| Click the Custom button in the Print dialog box, then click the Advanced button. The Advanced dialog box appears. |

|
| Select the Media Type that is loaded in the printer. For details, see Making the Media Type setting. |
|
| Choose Color or Black as the Ink setting. |
 | Select a Print Quality setting. |
 | Make other settings as necessary. For details, see online help. |
| Note: |
|
|
 | Click OK to apply your settings and return to the Print dialog box. Click Cancel to return to the Print dialog box without applying your settings. To save your Advanced settings, see the next section. |
To save your Advanced settings, click Save Settings in the Advanced dialog box. The Custom Settings dialog box appears.
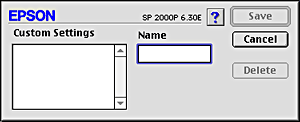
Type a unique name (up to 16 characters) for your settings in the Name box, then click Save. Your Advanced settings will be added to the Custom Settings list. You can save up to 10 different custom settings.
| Note: |
|
|
To delete a setting, select the setting in the Custom Settings dialog box and click Delete.
To select your settings, click the Custom button in the Print dialog box, then select your setting in the Custom Settings list, located below and to the right of the Custom button.
If you change the Media Type or Ink settings when one of your customized settings is selected in the Custom Settings list, the selection shown in the list returns to Custom Settings. The customized setting that was previously selected is not affected by the change. To return to your customized setting, simply reselect it in the list.
In the Page Setup dialog box, you can change the paper size, specify the paper orientation, reduce or enlarge your printout, and adjust the printable area.
Choose Page Setup from the File menu of your application. The Page Setup dialog box appears.
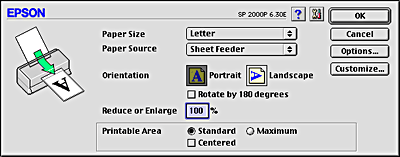
You can make the following settings in the Page Setup dialog box.
|
Paper Size |
Select the paper size you want to use. If you want to define a custom paper size, see Defining a custom paper size. |
|
Paper Source |
Select the paper source you wish to use from the following selections.
Sheet Feeder:
Sheet Feeder - No Margins:
Roll Paper:
Roll Paper - No Margins: |
|
Orientation |
Select Portrait (tall) or Landscape (wide) to change the orientation of your printout. If you need to print close to the bottom of the page, select the Rotate by 180 degrees check box. |
|
Reduce or Enlarge |
Use this setting to reduce or enlarge the size of your image, from 25% to 400%. |
|
Printable Area |
Use the options in the Printable Area box to adjust the total area available for printing when Sheet Feeder or Sheet Feeder - No Margins is selected as the paper source. This feature is not available when Roll Paper or Roll Paper - No Margins is selected. Select Centered to center the printout. To increase the printable area, select Maximum.
Note: |
|
Roll Paper Option |
The Roll Paper Option settings are only available when Roll Paper or Roll Paper - No Margins is selected as the paper source. These features are not available when Sheet Feeder or Sheet Feeder - No Margins is selected. The settings are as follows:
Banner Mode:
Cut Sheet Mode:
Save roll paper:
Print page frame: |
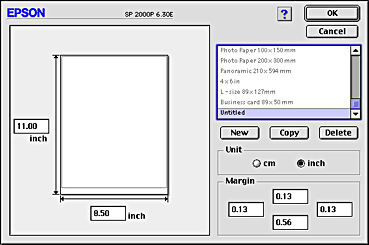
If the appropriate paper size is not included in the Paper Size list in the Page Setup dialog box, follow the steps below to define a custom paper size.
|
| In the Page Setup dialog box, click Customize. The following dialog box appears. |

|
| To define a new paper size, click New. The dialog box updates to allow you to enter a name for the new size. |
|
| Type a unique name for the paper size in the paper size list. |
|
| Specify the measurement unit as either Inches or cm. |
|
| Enter the width and the height of your paper. |
|
| Specify the margins in the Margin text boxes or using the preview image. |
 | Click OK. You return to the Page Setup dialog box. |
You can define up to 100 paper sizes. The paper size names you create will appear in the Paper Size menu in the Page Setup dialog box.
To delete a custom paper size, click Customize in the Page Setup dialog box, select the paper size you wish to delete from the list in the Custom Paper dialog box, and click Delete.
Follow the steps below to copy a paper size and use it as a template to create a new paper size.
|
| Select an existing paper size that you wish to copy, and click Copy. |
|
| Specify the measurement unit as either inches or cm. |
|
| Specify the margins in the Margin text boxes or using the preview image. |
|
| Click OK. |
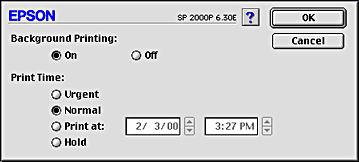
You can specify the time that you want the printer to begin printing your document. Follow these steps.
|
| Click the Background Printing icon button in the Print dialog box. The Background Printing dialog box opens. |
|
| Select On as the Background Printing setting. |
|
| Select Urgent, Normal, Print at, or Hold as the Print Time setting. |
If you select Print at, use the arrows beside the date and time boxes to specify the date and time you want to print the document.
| Note: |
| Make sure the computer and printer will be turned on at the date and time you specify. |
|
| Click OK. The Background Printing dialog box closes. |
|
| In the Print dialog box, make sure your print settings are as you want them, then click Print. |
| Note: |
| You can check or change the priority of print jobs using the EPSON Monitor3 utility. See Using EPSON Monitor3 for details. |
 Previous |
 Next |
| Copyright © SEIKO EPSON CORPORATION 2000, ALL RIGHTS RESERVED |