Printing on CDs and DVDs
Your printer includes a special tray that lets you print customized text, graphics, and photos directly on any ink-jet printable CD or DVD. The EPSON Print CD software makes it easy to import your own photos, add text, and modify your designs with a variety of special effects. You can print on both regular 12-cm CDs and 8-cm mini CDs.
Caution: Thermal printable CDs and DVDs should not be used with this printer.
You can order ink-jet printable CDs and DVDs from several websites, for example, www.pcmall.com, www.cdw.com, www.warehouse.com, www.zones.com, and www.pcconnection.com. Make sure you purchase CDs and DVDs that have an ink-jet printable surface.
Follow the steps in these sections:
Cleaning the Roller
Before you print on CDs or DVDs, it's a good idea to clean the roller inside the printer. You can do this by feeding and ejecting several sheets of plain paper.
- Make sure the printer is turned on and letter-size paper is loaded.
- Press the
 paper button to feed the paper into the printer.
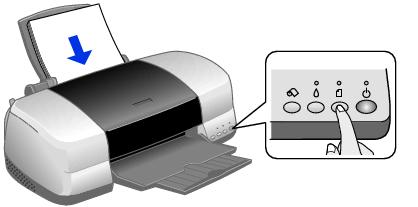
- Press the
paper button again to eject the paper.
- Repeat steps 2 and 3 several times.
Designing CDs and DVDs
You can use EPSON Print CD to create and print a design with images, graphics, and text. You can use your own photos or choose from a selection of photographic and abstract images included with the program.
Note: EPSON Print CD software is not available for Mac OS X.
The easiest way to create your own design is to start with an existing file and then personalize it for your own use.
- Start EPSON Print CD.
- Click the
 Open icon or select Open from the File menu.
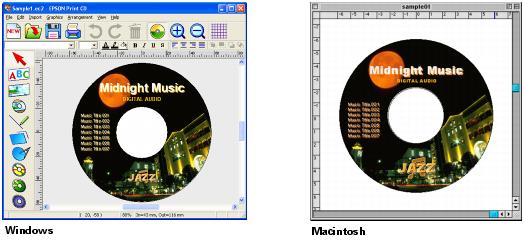
 - Select Sample1.ec2 and click OK (Windows), or sample01 and click Open (Macintosh).
You see the Midnight Music CD on the workspace:
- To change the background image, click the
 Background icon (Windows) or choose Background from the Insert menu (Macintosh). You see a window like the following:
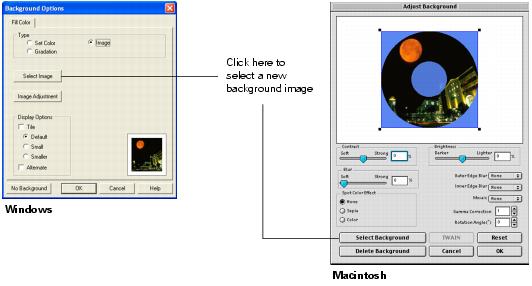
- Click Select Image (Windows) or Select Background (Macintosh).
You see the following:
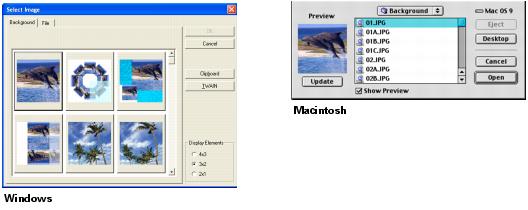
- Select one of the images included with the program, and click OK (Windows) or Open (Macintosh). (You can also click the TWAIN button to scan in an image or download one from your digital camera.)
If you want to choose one of your own images, do one of the following:
- Windows: Click the File tab, then click Browse to locate the folder where your images are stored and click OK. You see thumbnail images of all the files in the folder. Select your image and click OK.
- Macintosh: Locate the folder where your images are stored, then select the one you want and click Open.
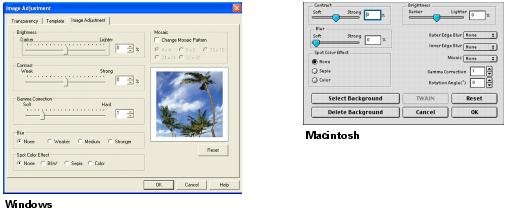
- If you want to modify the template or enhance your image, click Image Adjustment (Windows), or use any of the available editing features (Macintosh). You can adjust the brightness, contrast, and gamma, or apply mosaic, blur, or special color effects.
- To edit the text, do one of the following:
- Windows: Double-click any text block on the CD image to open the text editing window. Enter your text and use the tabs to apply formatting and special effects, then click OK.
- Macintosh: Use any of the options on the Text Settings palette. You can also use the options on the Color Settings and Object Settings palettes.
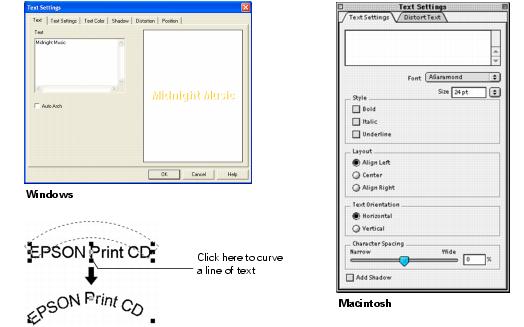
- To curve a single line of text, click the text, then drag the red "handle" up or down.
- When you're finished, choose Save as from the File menu to save your file.
Note: To check your design, it's a good idea to print it on a sheet of plain paper before printing on a CD or DVD. Make sure you have plain paper loaded in the printer, then follow the instructions in Printing Your Design to print.
When you're ready to load a CD or DVD, follow the instructions in Inserting a CD or DVD.
Inserting a CD or DVD
Make sure the data, music, or video is burned on your CDs or DVDs before you print. Otherwise, dirt or scratches on the surface may cause errors when you burn the data. If you plan to print large numbers of CDs or DVDs, it's a good idea to print a small sample, then wait a day and check the quality to make sure it is satisfactory.
If you want to check the print position or color, see the instructions for Adjusting the Print Position and Adjusting the Print Density.
Before you insert a CD or DVD, make sure the printer is turned on. Otherwise, the disc may not be positioned correctly.
Then follow these steps:
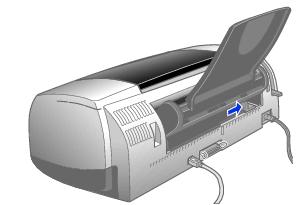
- Push in the output tray extension, but leave the tray open.
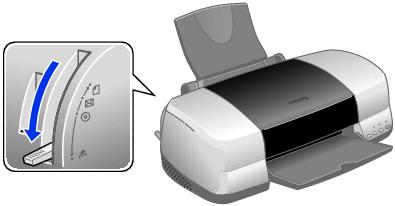
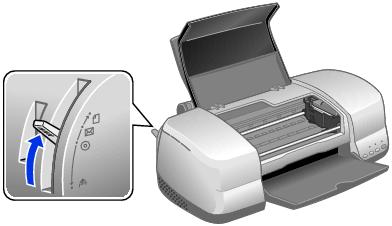
- Set the paper thickness lever to the
 position. The
paper light begins flashing rapidly.
position. The
paper light begins flashing rapidly.
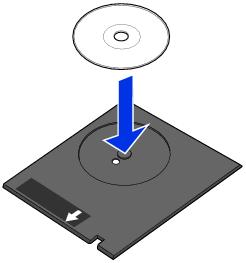
- Place the CD or DVD on the CD tray with the white or printable side face-up.
- Slide the edge guide to the right to make room for the tray.
- Insert the tray against the left side of the feeder.
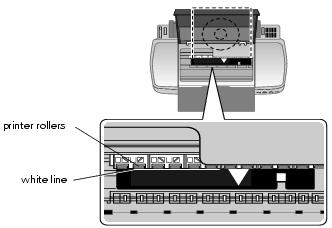
- Open the printer cover and push the tray into the printer, aligning the white line on the tray with the edges of the printer rollers.
- Slide the edge guide against the tray.

- Set the paper thickness lever to the
 position. The
paper light goes out.
position. The
paper light goes out.
- Close the printer cover. Then follow the instructions in Printing Your Design to print with EPSON Print CD.
Printing Your Design
After you have created your design and loaded a CD or DVD, you're ready to print.
- Open the File menu and select Printer Settings (Windows) or Page Setup (Macintosh).
- Make sure your EPSON Stylus Photo 900 is selected, and the Paper Source is set to Manual or Manual Feed.
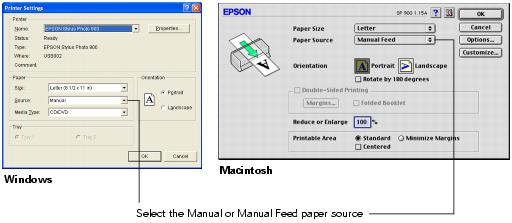
- Click OK.
- Open the File menu and select Print, or click the
 Print button. You see this screen:
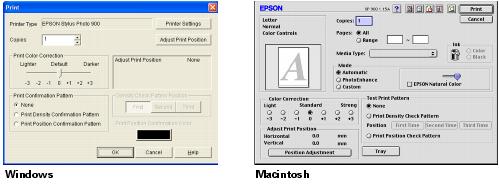
- Click OK (Windows) or Print (Macintosh).
Note: After you print, handle the CD or DVD carefully to avoid smearing the ink. Wait at least 24 hours before playing the disc or inserting it in a drive. Keep printed discs away from moisture and direct sunlight.
When you're finished printing on CDs and DVDs, make sure you return the paper thickness lever to the
position.
Caution: Don't move the paper thickness lever during printing; this could damage your printer.
If you want to check the print position or color, see the instructions for Adjusting the Print Position and Adjusting the Print Density.
Adjusting the Print Position
If your printed images and text are not centered or positioned the way you want, you may need to adjust the printing position. Use the blank cardboard check disk included with your printer, or an extra CD. You can also use these steps to check the position before you print on a CD or DVD:
- Place the position check disk (or an extra CD) on the CD tray and insert it into the printer, as described in Inserting a CD or DVD.
- Start EPSON Print CD.
- Follow the instructions in Printing Your Design to make sure your EPSON Stylus Photo 900 is selected, and the Paper Source is set to Manual or Manual Feed.
- Select Print from the File menu, or click the
Print button. You see this screen:

- Select Print Position Confirmation (or Check) Pattern and click OK (Windows) or Print (Macintosh). The confirmation pattern is printed on the check disk or CD.
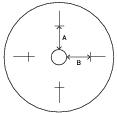
- Remove the check disk or CD and measure the distance from the edge of the hole to the small cross marks (distances labeled A and B as shown). You'll need a millimeter ruler for these measurements.
- Open the File menu and select Adjust Print Position. You see this screen:
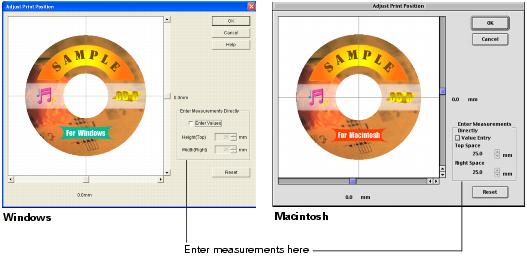
- Make sure Enter Values or Value Entry is checked, then input the A distance in the Height (Top) or Top Space box. Enter the B distance in the Width (Right) or Right Space box.
- Click OK to save the measurements to the EPSON Print CD program.
Adjusting the Print Density
If ink smears on your printed CDs or DVDs, you may need to adjust the color saturation or ink density. CDs from different manufacturers may absorb ink differently, so you may need to adjust the density for each type of disc. Follow these instructions to print a color saturation check pattern, and then make adjustments as necessary.
- Start EPSON Print CD.
- Follow the instructions in Printing Your Design to make sure your EPSON Stylus Photo 900 is selected, and the Paper Source is set to Manual or Manual Feed.
- Select Print from the File menu, or click the
Print button. You see this screen:
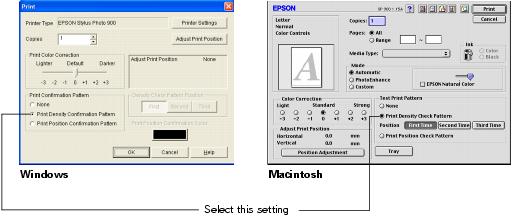
- Select Print Density Confirmation (or Check) Pattern and click OK (Windows) or Print (Macintosh).
- After the pattern is printed, examine the printed CD or DVD and make the Print Color Correction (or Color Correction) setting lighter or darker as necessary.
You can print three density patterns on one disc. Each pattern is printed in a different location.
After the first pattern is printed, adjust the setting, then repeat steps 4 through 6, selecting Second or Second Time to print the second pattern.
If you want to try a third Color Correction setting, you can repeat steps 4 through 6 again and select Third or Third Time.
- Remove the CD or DVD and let it dry for at least 24 hours. Then check the saturation levels again.
Note: You can also use the Brightness and Contrast settings in EPSON Print CD to adjust color saturation. See Designing CDs and DVDs for instructions.