|

Reference Guide
|
|
How To / Get the Most Out of the Scanner's Buttons
Using the Scan to Web Button
You can use the  Scan to Web button to scan an image and then upload it to the EPSON photo-sharing site. Scan to Web scans are saved with PRINT Image Matching data.
 |
Note:
|
|
Note for Mac OS X users:
|
 |
Press the Scan to Web button on the scanner. The following window appears.
|

EPSON Scan automatically previews the images and recognizes the image type.
 | |
Note:
|
| | |
To cancel the operation, click Cancel and then click Close.
|
|
 |
The following window appears with a progress bar to indicate the scanning progress. You can see the type of document being scanned. When scanning multiple photos, you can also see the number of scanned images.
|

Images are automatically optimized. You can scan easily and quickly without changing any complex settings. EPSON Scan automatically recognizes the image type, locates the target image, straightens the image, adjusts the exposure, and then starts scanning.
 |
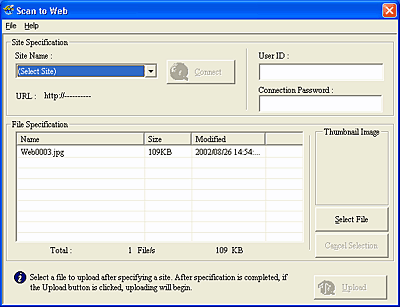
The following window appears. Click Upload.
|
 |
A progress bar appears and the scanned image is uploaded to the EPSON photo-sharing site.
|
|
Note:
|
| -
You can send up to 16 images at a time to the EPSON photo-sharing site.
|
|

[Top]
| Version 1.00E, Copyright © 2001, SEIKO EPSON CORPORATION |

