|
Close
Placing Photos and Documents on the Scanner
 Removing the integrated TPU Removing the integrated TPU
Before scanning a document, remember to respect the rights of copyright owners. Do not scan published text or images without first checking the copyright status.
 |
Caution:
|
 | |
Do not place heavy objects on the document table glass. Also, do not apply too much force to the document table glass.
|
|
 |
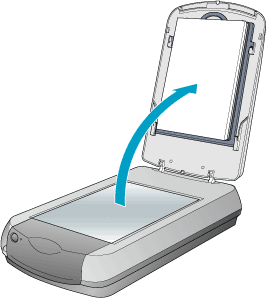
Open the integrated TPU and make sure the fluorescent lamp turns on.
|
|  |
Note:
|
| | -
The fluorescent lamp turns off if it has not received any commands from the computer for 15 minutes. The lamp turns back on once you start scanning.
|
|
| | -
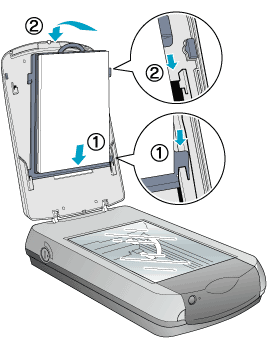
If the reflective document mat is not attached, you'll need to attach it. Hold the top of the document mat and slide it down gently along the integrated TPU. Make sure the corners of the mat are seated behind the tabs on the TPU.
|
|
 |
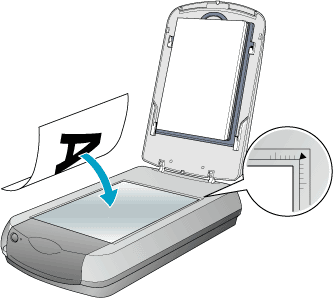
Place the document on the document table, with the side to be scanned facing down. Make sure that the document is carefully aligned with the guides, as shown below.
|
| |
Note:
|
| | -
An area with a width of maximum 2 mm from the horizontal guide and 1.5 mm from the vertical guide is not scanned.
|
|
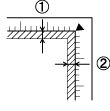
1. Maximum unreadable area of 2 mm
2. Maximum unreadable area of 1.5 mm
| | -
If you are scanning multiple photos in Full Auto Mode or previewing multiple photos in Thumbnail Mode, position photos at least 0.8 in (20 mm) apart.
|
|
 |
Close the TPU gently so that the document does not move.
|
|
Note:
|
| -
Always keep the document table clean.
|
|
| -
Do not leave photographs on the document table for an extended period of time or they may stick to the glass.
|
|
Removing the integrated TPU
When you scan the thick or large document, you can remove the document cover.
|
Note:
|
|
-
When you scan a document without the document cover, press
the document flat. Make sure you hold it still and do not
press too hard
|
|
|
|
Make sure the scanner is turned off.
|
|
|
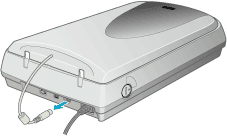
Disconnect the cable for the integrated TPU from the scanner's option connector.
|
|
|
Open the integrated TPU.
|
 |
Pull the integrated TPU straight up slowly until it stops.
|

| |
Caution:
|
| | |
Do not pull out the integrated TPU by force.
|
|
 |
Tilt the integrated TPU forward, then raise the hinges out of the scanner.
|
|
Note:
|
| |
When you are finished scanning, reattach the integrated TPU in the reverse order you removed it.
|
|

[Top]
Close
|