![]()
Reference Guide
|
|
Index |
|
Help |
|
Safety | |||||
|
|
Contents |
|
Glossary |
|
||||||
|
|
|
|||||||||||||||||||||||||||||||||
Basics Scanning Procedure
Step 1-Turn on the scanner
EPSON Scan provides three modes for you to adjust scanner settings; Full Auto Mode, Home Mode, and Professional Mode. This section describes how to scan an image in Full Auto Mode. Full Auto Mode lets you scan images using automatically-adjusted settings. For more details, see Selecting a Scanning Mode.
| Note: |
|
| Note for Macintosh users: |
|
| Caution: |
|
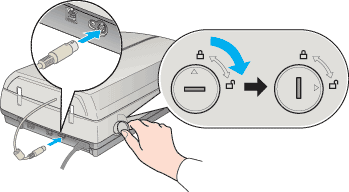
 | Before turning on the scanner, make sure the two transportation locks are unlocked and the scanner is connected to your computer. Also make sure that the document cover's cable is connected. |
 |
Make sure the cover is closed, then press the  Power button on the front of the scanner to turn it on. The indicator light blinks, then turns solid green, meaning the scanner has completed its initialization. Power button on the front of the scanner to turn it on. The indicator light blinks, then turns solid green, meaning the scanner has completed its initialization.
|

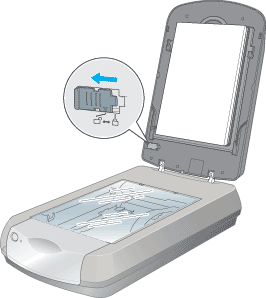
You can scan two types of documents: reflective documents (like photographs or papers) or transparent materials (like slides or film). Refer to the links below for instructions on placing documents on the document table.
 | Placing Film on the Document Table |
| Placing Documents and Photographs on the Document Table |
|
| Start EPSON Scan. |
Windows:
Double-click the EPSON Scan icon on your desktop, or click Start, point to All Programs (Windows XP) or Programs (Windows 98SE, Me, or 2000), point to EPSON Scan, and then select EPSON Scan.
Macintosh:
Click the EPSON Scan icon in the Applications folder.
The following window appears.

| Note: |
|
|

|
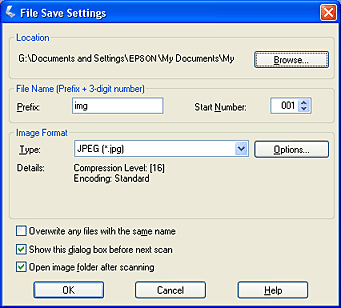
| Click Scan. The File Save Settings dialog box appears. |
| Note: |
|
|
 | Select where scanned images will be saved. If you want to change the default location, click Browse (Windows) or Choose (Macintosh), then select a folder. |
 | Specify a file name with an alphanumeric character string (prefix) and a 3-digit number (start number). |
If you want to change the file name, type an alphanumeric character string in Prefix and select a start number. The file name is generated using a combination of the prefix and number specified.
| Note: |
|
|
|
 | Select a file format from the table below. Some formats may not be available depending on the settings you selected in the Customize dialog box. |
|
Format (File extension) |
Explanation |
|
BITMAP (*.BMP) |
Standard image file format used in Windows. Most Windows applications including word processing applications can read images in this format. |
|
JPEG (*.JPG) |
Compressed file format. The compression quality can be selected; the JPEG format enables a relatively high compression ratio. However, the higher the compression ratio is, the lower the image quality becomes. (Note that the original quality cannot be restored.) In addition, the quality deteriorates every time the image is saved. The TIFF format is recommended in cases where modification and retouching are required. |
|
Multi-TIFF (*.TIF) |
TIFF format that allows multiple pages to be saved to the same file. To open the Multi-TIFF files, you need an application that supports this format. |
|
PDF (*.PDF) |
Document format that is independent of platforms. To use PDF documents, you need Adobe Acrobat Reader or Acrobat. When you save color or grayscale images in PDF, you can select a compression quality. |
|
PICT (*.PCT) |
Standard image file format for the Macintosh. Almost all of the software applications for the Macintosh (such as word processing software) support the PICT file format. |
|
PRINT Image Matching II (JPEG) (*.JPG)/ |
File format that records PRINT Image Matching. Print Image Matching is a standardized method of recording a wider range of color information to enhance the quality of your scanned images. When using a printer compatible with PRINT Image Matching, you can achieve printouts that come to life with a dynamic range of brilliant colors.
Note: |
|
TIFF (*.TIF) |
File format created for exchanging data among many applications such as graphic and DTP software. When scanning black & white images, you can specify the compression type. |
 | Click OK. EPSON Scan starts scanning your document. |
| Note: |
|
 | The scanned image is automatically saved in the specified location. |
 Previous |
| Version 1.00E, Copyright © 2003, SEIKO EPSON CORPORATION |