 |
|
|||
 |
||||
Detailed Setting Instructions
Previewing and Adjusting the Scan Area
Once you have selected your basic settings and resolution, you can preview your image and select or adjust the image area of the image(s) in a Preview window on your screen. There are two types of preview available:
Normal displays the full scan area in its entirety so you can select your scanned image area and adjust settings manually. If the Thumbnail checkbox is unchecked, clicking the Preview button opens a normal preview.
Thumbnail (Home and Professional Modes only) displays your previewed image(s) as thumbnail(s) with the scanned image area and exposure automatically selected. If the Thumbnail checkbox is checked, clicking the Preview button opens a thumbnail preview.
To preview your image, follow the steps below:
 |
Click Preview. If you want to change the preview mode, select the Normal or Thumbnail tab on Preview window if it is available.
|
 Note:
Note:|
Depending on your document type and other settings, you may not be able to change the preview type.
You can resize the Preview window. To resize the Preview window, click and drag the corner of the Preview window.
If you preview with the Preview dialog not displayed, image(s) will be displayed in the default preview mode. If you preview with the Preview dialog displayed, image(s) will be displayed in the preview mode that was displayed just before previewing.
Some of the settings that you change after preview will be initialized if you change the Preview mode.
See EPSON Scan help for details.
|
EPSON Scan prescans your image(s) and displays them in one of the following Preview windows:
Normal preview
|
Document
|
Film
|
 |  |
Thumbnail preview
|
Document
|
Film
|
 |
 |
 |
If you are viewing the normal preview, you can do the following to adjust the image(s).
|
To select your scan area, click the  auto locate icon to create a marquee that marks the edges of your image area. You can move the marquee to change the scan area. See Creating a Marquee on a Preview Image for instructions.
auto locate icon to create a marquee that marks the edges of your image area. You can move the marquee to change the scan area. See Creating a Marquee on a Preview Image for instructions.Note:|
If you are going to scan at a different size than your original, you must first select your Target Size and automatically create a marquee that is proportioned to that size. You can then copy the marquee and place it on each image you will scan at that size.
|
To enlarge or reduce the preview image in the Normal preview, resize the Preview window. The image size changes corresponding to the Preview window size.
To zoom in on an image in the Normal preview, click inside the scan area and click the Zoom button.
Note:|
Zoom button changes into Full button on Zoom display.
Full button changes into Zoom button on Full display.
|
To adjust the image quality, click the scan area(s) you want to modify and make the adjustments. See Adjusting the Color and Other Image Settings for instructions.
If you are viewing the thumbnail preview, you can do the following to adjust the image(s):
To zoom in on an image in the Thumbnail preview, double-click the thumbnail to zoom in.
You can change the size of thumbnail by using either the  Thumbnail <Large>,
  Thumbnail <Small>, or
  Full size of 1 frame buttons.
Thumbnail <Large>, Thumbnail <Small>, or Full size of 1 frame buttons.To rotate an image or flip it horizontally (like a mirror image), click its thumbnail and then click the  rotation icon or
  mirroring icon.
rotation icon or mirroring icon.To adjust the scan area to crop your image differently, you can create and move a marquee that marks the edges of your scan. See Creating a Marquee on a Preview Image for instructions.
To adjust the image quality, click the image(s) or scan area(s) you want to modify and make the adjustments. See Adjusting the Color and Other Image Settings for instructions. If you want to apply the adjustments you have made to all of your images, click All.
Creating a Marquee on a Preview Image
A marquee is a moving dotted line that appears on the edges of your preview image to indicate the scan area.
You can move the marquee and adjust its size. If you are viewing the normal preview, you can create multiple marquees (up to 50) on each image to scan different image areas in separate scan files.
Note for film or slides:|
When you use the Thumbnail preview, EPSON Scan automatically creates marquees around your image(s) for you. If you need to adjust a marquee, click inside it and click the
 delete marquee icon before completing the steps in this section. If you do not need to adjust any marquees, skip to Adjusting the Color and Other Image Settings. delete marquee icon before completing the steps in this section. If you do not need to adjust any marquees, skip to Adjusting the Color and Other Image Settings. |
|
To draw a marquee, move your cursor over a preview image. The pointer becomes a set of cross-hairs.
|
Note:|
If you are viewing the normal preview and you only have one photo on the document table, you can click the
auto locate icon to automatically draw a marquee, then skip to step 3.If you are going to scan at a different size than your original, you can first select your Target Size and automatically create a marquee proportionate to that size.
|
|
Position the pointer in the area where you want to place the corner of your marquee and click. Hold down the mouse button and drag the cross-hairs over the image to the opposite corner of the desired scan area. Then release the mouse button. You see the moving dotted line of the marquee.
|
 |
Do one of the following to adjust the marquee.
|
To move the marquee, position your cursor inside the marquee. The pointer becomes a hand. Click and drag the marquee to the desired location.
To resize the marquee, position your cursor over the edge or corner of the marquee. The pointer becomes a straight or angled double-arrow. Click and drag the edge or corner to the desired size.
 Note:
Note:|
To restrict the movement of the marquee to vertical or horizontal only, hold down the Shift key as you move the marquee.
To restrict the size of the marquee to the current proportions, hold down the Shift key as you resize the marquee.
For best results and image exposure, make sure all sides of the marquee are located inside the preview image. Do not include any of the area around the preview image in the marquee.
|
 |
Just draw them as described in steps 1 through 3, or click the
 copy marquee icon to create additional marquees of the same size. You can move and resize all the marquees as described in step 3. To delete a marquee, click inside it and click the delete marquee icon. copy marquee icon to create additional marquees of the same size. You can move and resize all the marquees as described in step 3. To delete a marquee, click inside it and click the delete marquee icon. |
 |
To adjust the image quality, click the image(s) or scan area(s) you want to modify and make the adjustments. See Adjusting the Color and Other Image Settings for details. If you want to apply the adjustments you have made to all of your image(s) or scan area(s), click All.
|
Note:|
If you draw multiple marquees, make sure you click All in the Preview window before you scan. Otherwise, only the area inside the last marquee you drew will be scanned.
|

Adjusting the Color and Other Image Settings
Once you have previewed your image(s) and adjusted the scan area, you can modify the image quality, if necessary. EPSON Scan offers a variety of settings for improving color, sharpness, contrast, and other aspects affecting image quality. Before you make adjustments, be sure to click the image or marquee for the area you want to adjust.
|
Histogram
|
Provides a graphical interface for adjusting highlight, shadow, and gamma levels individually.
 |
|
Tone Correction
|
Provides a graphical interface for adjusting tone levels individually.
 |
|
Image Adjustment
|
Adjusts brightness and contrast and the balance of red, green, and blue colors in the overall image.
 |
|
Color Palette
|
Provides a graphical interface for adjusting mid-tone levels, such as skin tones, without affecting the highlight and shadow areas of the image.
 |
|
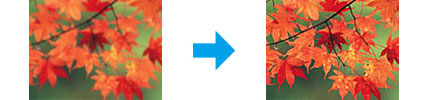
Unsharp Mask
|
Sharpens the edges of image areas for an overall clearer image.
 |
|
Descreening
|
Removes the rippled pattern that can appear in subtly shaded image areas such as skin tones.
 |
|
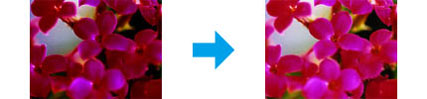
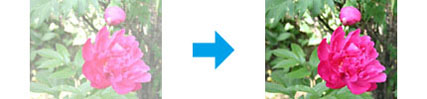
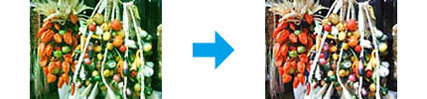
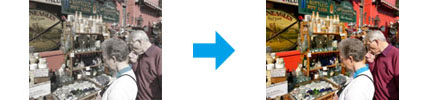
Color Restoration
|
Restores the colors in faded photos automatically.
 |
|
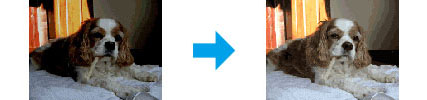
Backlight Correction
|
Removes shadows from photos that have too much background light.
 |
|
Dust Removal
|
Removes dust marks from your originals automatically.
 |
|
Text Enhancement
|
Enhances text recognition when scanning text documents.
 |
|
Auto AreaSegmentation
|
Makes Black&White images clearer and text recognition more accurate by separating the text from the graphics.
 |
|
Dropout color
|
Scan without a certain color. You can select from red, blue, or green.
 |
|
Color Enhance
|
Enhance a certain color. You can select from red, blue, or green.
 |
See EPSON Scan help for details.