 E-mail button on the scanner.
 |
|
|||
 |
||||
Scanning Directly to an E-mail
You can scan and automatically attach scanned image file(s) to an e-mail message with the E-mail button on the scanner.
E-mail button on the scanner. |
Place your original(s) on the document table. See one of these sections for instructions.
|
Documents or photos: Placing Documents or Photos
Film or slides: Placing Film or Slides
 |
Press the
E-mail button on the scanner. Epson Scan starts in Full Auto Mode and automatically scans your image as a JPEG file. |
 Note:
Note:|
If you want to restore color in or remove dust from your images before scanning, click the Pause button to return to the Full Auto Mode window. Then click Customize, select your options, click OK, and click Scan to continue.
If you want to scan in Office Mode, Home Mode or Professional Mode, click Pause to return to the Full Auto Mode window, then change the scan mode. See Changing the Scan Mode for instructions.
|
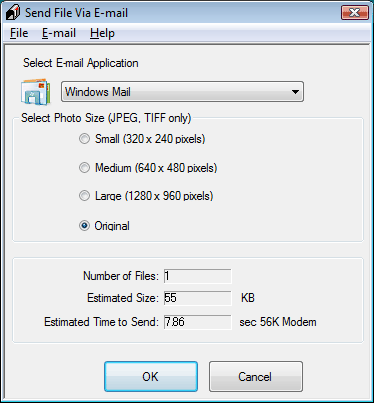
After scanning is finished, you see the Send File Via E-mail window.
 |
Select the e-mail program you use in the Select E-mail Application list.
|
 |
If you want to resize your image(s), choose an option under Select Photo Size.
|
Note:|
The box at the bottom of the window displays information about the image file(s) you are attaching to the e-mail message.
|
 |
Click OK. Your e-mail program is opened and any scanned images you selected are attached to a new e-mail message. See your e-mail program Help if you need instructions on sending your e-mail message.
|