![]()
Reference Guide
|
|
Index |
|
Search |
|
Glossary | |||||
|
|
Contents |
|
Help |
|
||||||
|
|
|
|||||||||||||||||||||||||||||||||
How to Print
Handling envelopes
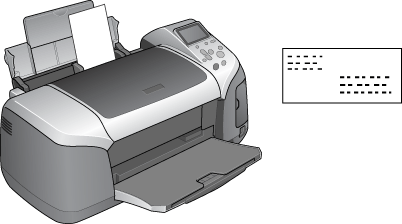
Refer to the section below for loading envelopes.
 | Loading Envelopes |
Refer to the section below for the printable area. See Printable area
 | Access the printer driver. |
| Accessing the Printer Software for Windows |
 |
Click the Main tab, then choose a Quality Option setting. See the following section for details on Quality Option settings. See Quality Option
|
 | Select Sheet as the Source setting. |
 | Select Plain Paper as the Type setting. |
 | Select the appropriate envelope size from the available Size settings. You can also define a custom paper size. For details, see the following section. |
| Making User Defined Paper Sizes for Windows |
 | Select Landscape as the Orientation setting. |
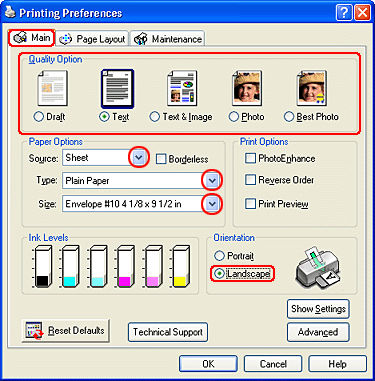
 | Click OK to close the printer driver settings dialog box. |
 | Print your file. |
| Note: |
|
|
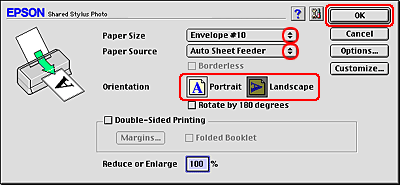
| Access the Page Setup dialog box. |
| Accessing the Printer Software for Mac OS 8.6 to 9.x |
|
| Select the appropriate envelope size from the available Paper Size settings. You can also define a custom paper size. For details, see the following section. |
| Making User Defined Paper Sizes for Mac OS 8.6 to 9.x |
|
| Select Auto Sheet Feeder as the Paper Source. |
|
| Select Landscape as the Orientation setting. |
|
| Click OK to save the settings and close the Page Setup dialog box. |
|
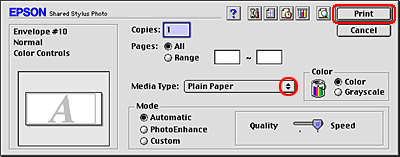
| Access the Print dialog box. |
| Accessing the Printer Software for Mac OS 8.6 to 9.x |
|
| Select Plain Paper as the Media Type setting. |
|
| Click Print to start printing. |
| Note: |
|
|
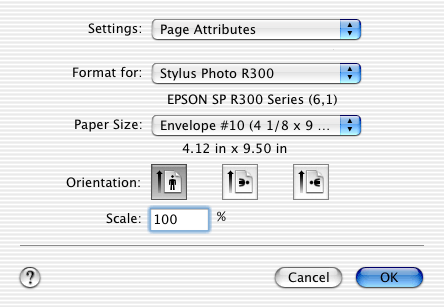
| Access the Page Setup dialog box. |
| Accessing the Printer Software for Mac OS X |
|
| Select Stylus Photo R300 for the Format for setting. |
|
| Select the appropriate envelope size as the Paper Size setting. |
|
| Select the middle button for the Orientation setting. |
|
| Click OK to close the Page Setup dialog box. |
|
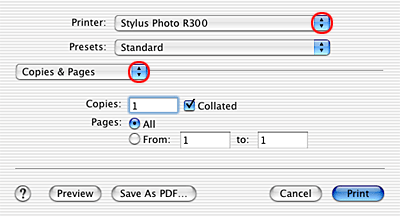
| Access the Print dialog box. |
| Accessing the Printer Software for Mac OS X |
|
| Select Stylus Photo R300 as the Printer setting, then choose the Copies & Pages settings. |
| Note: |
|
|
|
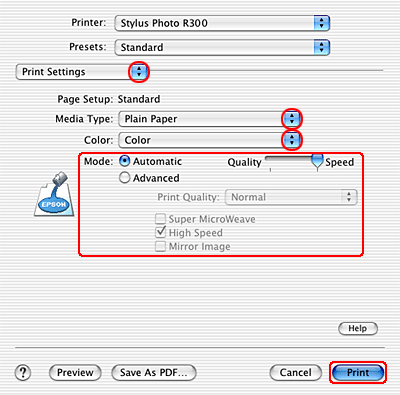
| Select Print Settings from the pop-up menu. |
 |
Select Plain Paper as the Media Type setting, then choose the appropriate Color and Mode settings. See Print Settings
|
 | Click Print to start printing. |
 Previous |
| Version 1.00E, Copyright © 2001, SEIKO EPSON CORPORATION |