Using a Memory Card
Supported Memory Cards
You can use the following types of memory cards with your printer:
|
CompactFlash®
|
Microdrive
|
SD Card
|
|
miniSD Card*
|
SDHC Memory Card
|
miniSDHC card*
|
|
microSD card*
|
microSDHC card*
|
Memory Stick
|
|
Memory Stick Duo*
|
Memory Stick PRO
|
Memory Stick PRO Duo*
|
|
Magic Gate Memory Stick
|
Magic Gate Memory Stick Duo*
|
xD-Picture Card
|
|
xD-Picture Card Type H
|
xD-Picture Card Type M
|
MultiMediaCard
|
* adapter required
For specifications of memory cards that can be used with your printer, see Memory Card Slots.
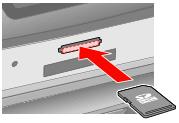
Inserting a Memory Card
Caution:
If a digital camera is connected to the printer, disconnect it before you insert your memory card.
- Turn on the printer.
- Open the memory card slot cover.

Caution:
If your card requires an adapter, make sure you insert it into the adapter before you insert it in the slot. Otherwise, the card may get stuck in the slot. Do not insert more than one card at a time and do not force the card into the slot.
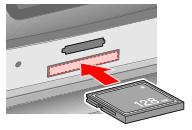
- Make sure no cards are in any of the slots. Then insert your memory card as shown below:
|
Slot
|
Type of Card
|
|
|
xD-Picture Card
xD-Picture Card Type M
xD-Picture Card Type H
|
|
|
SD Memory Card
SDHC Memory Card
MultiMediaCard
miniSD card*
miniSDHC card*
microSD card*
microSDHC card*
|
|
|
Memory Stick
Memory Stick PRO
MagicGate Memory Stick
Memory Stick Duo*
Memory Stick PRO Duo*
MagicGate Memory Stick Duo*
|
|
|
CompactFlash
Microdrive
|
* Adapter required
The memory card light flashes and then stays on.
- Close the memory card slot cover.
Caution:
Insert your memory card only as shown above or you may damage your printer, memory card, or both. If you insert a card incorrectly, you see an error message on your screen. Click Cancel, then remove the memory card and insert it correctly.
Insert only one memory card at a time. Eject your memory card before inserting another one.
Always close the memory card slot cover to protect your memory card from static electricity.
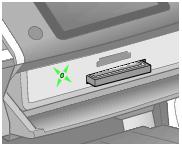
Removing a Memory Card
Caution:
Do not remove a memory card when the memory card light is flashing or you may lose data from the memory card.
On a Macintosh, always drag the memory card icon on the desktop into the trash to eject the card before you turn off the printer or unplug the USB cable. Otherwise, you may lose data from the memory card.
- Make sure the memory card light is not flashing.
- Pull the memory card out of its slot.
Copying Photos To and From a Memory Card
You can copy photo files to and from a memory card inserted in a card slot in your printer when it is connected to your computer. Make sure to follow the guidelines in Memory Card Copying Precautions before you copy photo files.
Follow the steps in these sections to copy photo files to and from the card and your computer:
When you finish copying files to or from a memory card, see Disconnecting or Turning Off Your Printer for additional instructions.
Memory Card Copying Precautions
Keep the following in mind when copying photos to and from your memory card and computer:
- Check for any handling guidelines in the documentation that came with your memory card and adapter.
- Do not eject your memory card or turn off the printer while the memory card light is flashing or you may lose data.
- Make sure that your memory card is not write-protected. Many memory cards have a write-protect switch or seal.
- Do not copy photos to or from a memory card while you're printing from the memory card.
- The LCD screen does not update information about your memory card after you copy files to it or delete files from it. To update the displayed information, wait until the memory card light stops flashing, then eject and reinsert the memory card.
Copying Photo Files to Your Computer
First install your Epson Stylus Photo R380 software and connect it to your computer as described on the Start Here sheet. Then insert your memory card following the instructions in Inserting a Memory Card.
Note:
Depending on your computer's configuration, a folder containing your photo files may open automatically when you insert your memory card. If this happens, skip to step 3.
- Do one of the following:
- Windows XP: Click Start and select My Computer.
- Windows 98SE, Me, or 2000: Double-click the My Computer icon on your desktop.
- Double-click the removable disk icon, then select the folder in which your photo files are saved.
- Select the photo files you want to copy and drag them to a folder on your computer's hard drive.
Copying Photo Files to Your Memory Card
First install your Epson Stylus Photo R380 software and connect it to your computer as described on the Start Here sheet.
Before inserting your memory card, make sure the write-protect switch or seal is set to allow writing to the memory card. Then insert your memory card following the instructions in Inserting a Memory Card.
Note:
After copying a photo to a memory card from a Macintosh computer, an older digital camera may not be able to read the memory card.
- Do one of the following:
- Windows XP: Click Start and select My Computer.
- Windows 98SE, Me, or 2000: Double-click the My Computer icon on your desktop.
- Double-click the removable disk icon, then select the folder in which you want to save your photo files.
- Select the folder on your computer's hard drive that contains the photo files you want to copy. Then select the photo files and drag them to the folder on your memory card.
Disconnecting or Turning Off Your Printer
When you finish copying files to or from a memory card, follow the steps in this section to properly handle the memory card before disconnecting or turning off the printer.
Windows XP
- Click the
 icon on the taskbar (in the lower right corner of your screen).
 - Select Safely remove USB Mass Storage Device.
- Turn off the printer or disconnect the USB cable.
Windows 2000
- Make sure that the memory card light and the
 On light are not flashing.
 - Turn off your computer.
- Turn off the printer or disconnect the USB cable.
Note:
If you turn off the printer or disconnect the USB cable before turning off your computer, you see the message "Problem Ejecting USB Mass Storage Device."
Windows Me and 98SE
- Double-click the My Computer icon on the desktop.
- Right-click the Removable Disk icon and click Eject.
- Turn off the printer or disconnect the USB cable.
Macintosh
- Drag the
 removable disk icon from your desktop into the trash.
 - Turn off the printer or disconnect the USB cable.