Using Memory Cards
Compatible Memory Cards
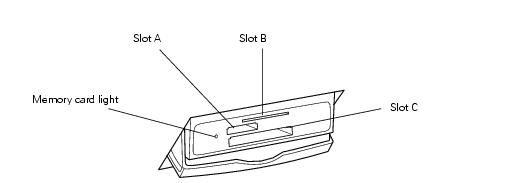
You can use the following types of cards with your Stylus Photo RX500:
|
Slot A
|
Memory Stick
Memory Stick PRO
MagicGate Memory Stick
SD (Secure Digital) Card
MultiMediaCard
Memory Stick Duo (adapter required)
miniSD Card (adapter required)
|
|
Slot B
|
SmartMedia (maximum 128MB; standard 2000 compliant)
xD-Picture Card
|
|
Slot C
|
CompactFlash Type II (CompactFlash Plus and CompactFlash specification revision 1.4 compliant)
Microdrive
|
Inserting and Removing Cards
- Make sure the Stylus Photo RX500 is turned on.
- If you will be printing from or scanning to the card, make sure your Stylus Photo RX500 is not connected to your computer (or your computer is turned off).
If you want to copy images between the card and your computer, leave the computer connected. Any images stored on the card will be automatically copied to your computer once you insert the card (see Using Your Stylus Photo RX500 as a Card Reader).
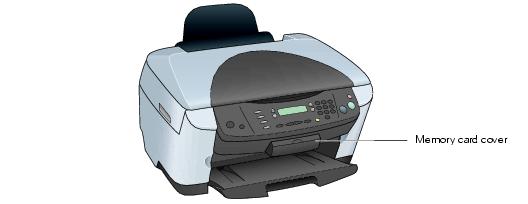
- Open the memory card cover.
- Make sure the memory card light (next to the memory card slots) is off and that no cards are in any of the slots. Then insert a card into the correct slot, as shown in Compatible Memory Cards.
After the Stylus Photo RX500 reads the card, if it finds any images saved in a compatible format (see table below), you see the following message on the LCD screen:

Press th
- Press the button next to OK (shown on the screen).
To remove the card, pull it straight out of its slot. On a Macintosh, drag the card icon on your desktop to the Trash before removing the card.
Caution: Do not remove the card or turn off the Stylus Photo RX500 while the memory card light is flashing, or you may lose data.
Your image files must meet these requirements:
|
File format
|
JPEG or TIF format image files**, DOS FAT taken with a DCF version 1.0 compliant digital camera.
|
|
Media format
|
DCF version 1.0 compliant*
|
|
Image size
|
Vertical 120 to 4600 pixels, horizontal 120 to 4600 pixels
|
|
Number of files
|
Up to 999
|
Using Your Stylus Photo RX500 as a Card Reader
You can use your Stylus Photo RX500 as an external card reader, letting you copy images from the card to your computer, or vice versa. To use this feature with Windows 98 or Me, make sure you've already installed your Stylus Photo RX500 software as described in the Start Here sheet (this automatically installs the necessary USB storage).
- Make sure your Stylus Photo RX500 is turned on and connected to your computer.
- Insert a memory card as described in Inserting and Removing Cards. (If you'll be copying images to the card, make sure the card's write-protect tab, if it has one, is set to allow writing on the card.)
Note: If this is your first time inserting a card, see Using EPSON CardMonitor to set up EPSON CardMonitor.
- Once the card is inserted, it appears as a removable drive icon on your computer. Copy images to or from the card, as needed.
Note: If you copy images to the card, the number of images on the LCD screen does not automatically change. You must remove and reinsert the card to make the Stylus Photo RX500 recognize the new images.
Using EPSON CardMonitor
You can use EPSON CardMonitor to copy images automatically to your computer whenever you insert a card. You can also select a photo-editing application to open automatically when you insert your card.
Follow the instructions below for your operating system.
Windows
- If your computer (Windows XP or 2000) asks you what you want to do when you insert a card, select Startup CardMonitor, click the checkbox for Always do the selected action, and click OK.
- If this is your first time inserting a card, you see this screen:

Click Next.
- The EPSON PhotoStarter setup assistant opens. Follow the instructions on the screen to set up EPSON CardMonitor.
Macintosh
- Open the Applications folder on your hard drive, then double-click ImageCapture. You see this screen:

- From the Image Capture menu, select Preferences. You see this screen:
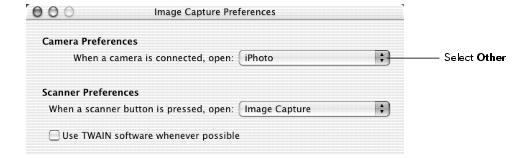
- From the Camera Preferences drop-down list, select Other. A new Applications folder opens.
- Open the EPSON CardMonitor folder, then click the EPSON CardMonitor icon.
- Click the Open button.
- Close the Image Capture utility.
- CardMonitor will now open automatically when you insert a card. Follow the instructions on the screen to make CardMonitor copy images to your computer when you insert a card and open an image-editing application, if desired.
Note: If CardMonitor doesn't open automatically, browse to the new drive icon on your desktop to view your images.