When you print, you'll also see a message on your screen telling you which cartridge is low or empty.
When a cartridge is more than six months old, you may need to replace it if printouts don't look their best. If the quality doesn't improve after cleaning and aligning the print head, you can replace the cartridge even if the red ![]() ink light is off.
ink light is off.
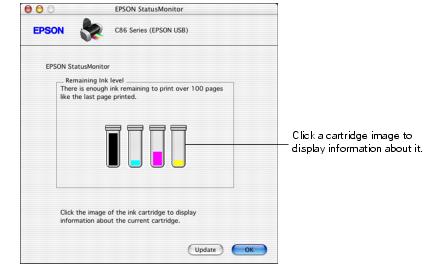
To check your ink supply, do the following:
Note: If you don't see the icon, see display the printer icon for instructions on making it appear.

You see a window like this:
Use these Epson ink cartridges within six months of installing them and before the expiration date on the package.
* The figure given is based on continuous printing after ink replacement. Cartridge yields will vary with images printed, print settings, paper types, and frequency of use.
** Availability of black ink cartridge types varies by location.
To ensure good results, use genuine Epson ink cartridges and do not refill them. Other products may cause damage to your printer not covered by Epson's warranty.
When you need new ink cartridges, contact your dealer, or call the Epson Store at (800) 873-7766 or visit www.epsonstore.com (U.S. sales only). In Canada, please call (800) 463-7766 for dealer referral.
Warning: Keep ink cartridges out of the reach of children.
If ink gets on your hands, wash them thoroughly with soap and water. If ink gets in your eyes, flush them immediately with water.
Caution: Don't remove the cartridge label, or ink will leak.
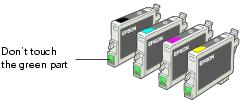
Don't remove the green IC chip from the cartridge. Installing a cartridge without an IC chip can damage the printer. Avoid touching the green IC chip, as this can damage the ink cartridge.
If you remove an ink cartridge temporarily, protect the ink supply port on the bottom of the cartridge from dirt and dust. Place it in a small box, or, if you have the original packaging, return it to its own box.
Store ink cartridges in the same environment as the printer. Stand the cartridges upright; the label identifying the color should be on top.
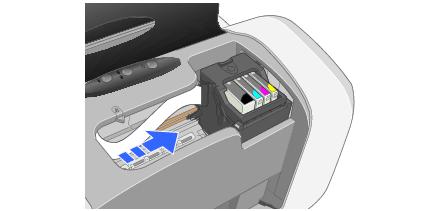
Be sure you have a new ink cartridge before you begin. Once you start replacing a cartridge, you must complete all the steps in one session.
Caution: Don't hold down the ![]() ink button for more than 2 seconds, or the printer will start to clean the print head.
ink button for more than 2 seconds, or the printer will start to clean the print head.
If the ink light is off, go to step 4.
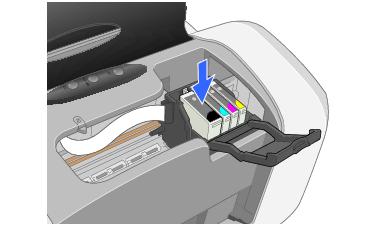
If the ink light is on or flashing, the print head moves to the left, and the cartridge that needs to be replaced stops under the ![]() ink out mark. The
ink out mark. The ![]() power light begins to flash.
power light begins to flash.
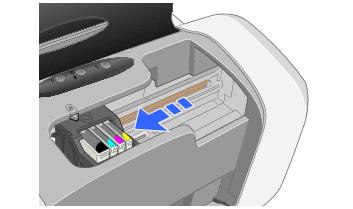
Caution: To avoid damaging the printer, never move the print head by hand.
Note: You can also use the Status Monitor to find out which cartridge is out of ink. See Checking the Ink Supply for more information.


Warning: If ink gets on your hands, wash them thoroughly with soap and water. If ink gets into your eyes, flush them immediately with water.
Caution: Don't touch the green circuit board on the front of the cartridge; you may inhibit normal operation and printing.

The green ![]() power light flashes and the printer makes noise. Charging takes about half a minute. When it's finished, the green
power light flashes and the printer makes noise. Charging takes about half a minute. When it's finished, the green ![]() power light stops flashing and stays on, and the red
power light stops flashing and stays on, and the red ![]() light goes out.
light goes out.
Caution: Never turn off the printer while the green ![]() power light is flashing, unless the printer hasn't moved or made noise for more than 5 minutes.
power light is flashing, unless the printer hasn't moved or made noise for more than 5 minutes.