![]()
Reference Guide
| Index | Search | Glossary | ||||||||
| Contents | Help |
|
||||||||
|
|
|
|||||||||||||||||||||||||||||||||
Copier
Accessing the Copy Utility
Making Copy Settings in the Copy Utility
Making Custom Settings
Copy Utility is a function within EPSON SMART PANEL. Before you can use it, you must install the EPSON Stylus Scan Software and EPSON SMART PANEL in the computer. Refer to the Setup Guide for details on installation.
Follow these steps to access the Copy Utility.
 |
For Windows: Click Start, then select Programs, and EPSON SMART PANEL to open the EPSON SMART PANEL application. For Macintosh: Click the Apple menu, then select EPSON SMART PANEL to open the EPSON SMART PANEL application. |
 | EPSON SMART PANEL appears. Click the copier icon to launch the Copy Utility. The Copy Utility dialog box appears. |
To make copy settings, see the next section.
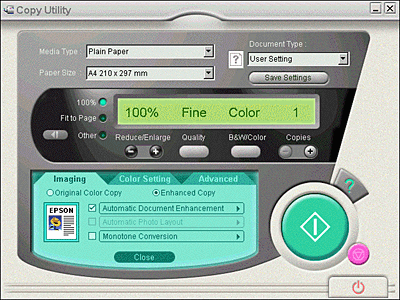
You can make copy settings in the Copy Utility dialog box.

See below to make your settings. If necessary, click the More settings button to make advanced and custom settings. After you finish making settings, click the  copy button to begin copying.
|
Help button |
Click for online help. |
|
Stop/Clear button |
Click to quit copying already in progress. |
|
Copy button |
Click to start copying. |
|
Close button |
Click to close the utility or the menus for custom settings. |
|
More settings button |
Click to make custom settings. For details, see Making Custom Settings. |

Select the type that matches the paper you have loaded into the paper feeder.
Select the size that matches the paper you have loaded into the paper feeder.
Select the type that matches the original document that you are copying.
|
Text |
Use if your document contains text only. |
|
Photo |
Use if you are copying from a photograph. |
|
Text and Image |
Use if your document includes both text and illustrations. |
|
Save Settings |
Click this button to open a dialog box where you can save your settings. |
|
Multi-page Document |
Allows you to use the ADF (Auto Document Feeder) for multi-page copies. This selection appears only when the ADF is connected to your Stylus Scan. |
 | Note: |
| Some document settings allow you to choose black + white or color options. Change the black + white or color option does not change the document setting. |

To set the reduce/enlarge ratio, do either of the following:
To set an arbitrary size, do either of the following:
Click this button to select the quality for your copy.
|
Normal: |
Print quality is lower, but print speed is higher. |
|
Fine: |
Provides high quality printout. |
Click to select between a black-and-white or color copy.
Use these buttons to select the number of copies you want to make. Press the + button to increase the number of copies, or the - button to reduce it.
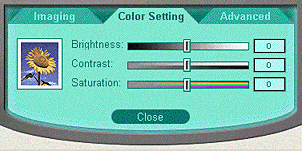
To make custom settings, click the More Settings button. Three tabs appear: Imaging, Brightness/Color, and Advanced. Click a tab to access the corresponding menu. The settings on each menu are described below.


Use this menu to select the type of image processing you want for your copy. There are two main choices.
This copies the colors of the original document exactly.
If you select Enhanced Copy, you can select the type of enhancements you want to use, and make detailed settings for each enhancement.
There are three enhancements.
- Automatic Document Enhancement
- Automatic Photo Layout
- Monotone Conversion
Select the check box next to the name of the enhancement you want to use.
To customize each type of enhancement, click the name of the enhancement.

Use this menu to change the brightness, contrast, and color saturation settings by moving the appropriate slider right or left, or by typing a value in the appropriate box on the right.
Changes the overall lightness or darkness.
Changes the difference between the bright and dark parts of your image.
Modifies the vividness of color. Lower the saturation value to make the colors duller; raise the saturation value to make the colors more vivid.
 | Note: |
| The Saturation setting has no effect on black-and-white copies. The value cannot be changed if the B&W/Color setting is set to B&W. |
Lets you choose either to print your copies in Normal Order or Collate Order.
 | Note: |
| This option is only available with the default or customized Multi-page Document type. |

Click to make the watermark/layout settings.
Select this check box to place a time stamp on the copy.
 Previous |
| Version 1.00E, Copyright © 2001, SEIKO EPSON CORPORATION |