|

Reference Guide
|
|
How To / Maintenance
Optional Automatic Document Feeder
 Cleaning or replacing the paper path guide
Cleaning or replacing the paper path guide
If you notice the quality of your scans has declined, or you simply want to keep the quality of your scans at their best, clean the Automatic Document Feeder paper path guide.
If the paper path guide is badly scratched and cleaning the guide does not improve the quality of your scans, replace the paper path guide.
Follow the instructions below to remove, clean, and reattach the paper path guide.
Removing the paper path guide
 |
Turn off the Stylus Scan.
|
 |
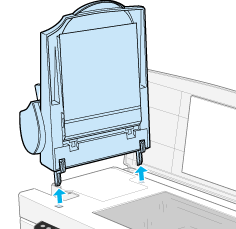
Disconnect the cable for the Automatic Document Feeder, and take the Automatic Document Feeder off the Stylus Scan.
|
 |
Take the paper support off.
|

 |
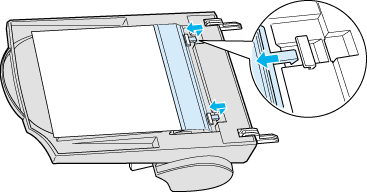
Put the Automatic Document Feeder on the document table upside down, with the front of the Automatic Document Feeder towards you.
|
 |
Pull the two white hooks up, and then back down out of the holes.
|
 |
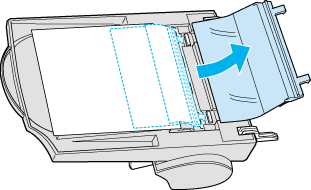
Pull the paper path guide upwards.
|
Cleaning the paper path guide
Gently wipe off dust from the transparent plastic sheet of the paper path guide with a soft dry cloth.

 |
Caution:
|
 | -
Be careful not to scratch or damage the paper path guide.
|
 | -
Be careful not to touch the rollers or metal parts of the Automatic Document Feeder. Doing so may cause damage.
|
Attaching the paper path guide
 |
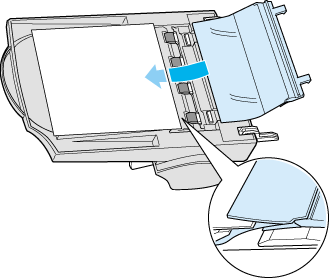
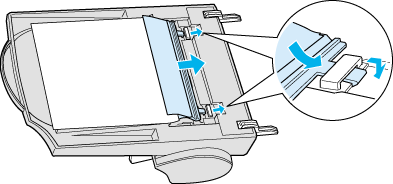
Insert the transparent plastic sheet of the paper path guide into the paper path of the Automatic Document Feeder.
|
 |
Insert the hooks into the rectangular through holes in the rear direction of the Automatic Document Feeder. Make sure that the hooks clip into place.
|

[Top]
| Version 1.00E, Copyright © 2001, SEIKO EPSON CORPORATION |
![]()
Cleaning or replacing the paper path guide


