![]()
User's Guide
|
|
Index |
|
Help | |||||||
|
|
Contents |
|
Glossary |
|
||||||
|
|
|
||||||||||||||||||||||||||||||
Using the Stylus RIP Professional with Windows
CMYK
You can make adjustments to the printed colors by changing any of the color profiles of CMYK, RGB and print media. This is done through the Color Manager dialog box. To access this dialog box, click the PS Server Edit menu, and then select Color Manager.

You can change the color profile for the CMYK simulation. Select the CMYK simulation whose setting you want to change from the CMYK drop-down menu.
Displays the ICC profile to be used for the selected CMYK simulation. To change the ICC profile, click the + button and select an ICC profile. Be sure to select a CMYK profile as the ICC profile.
Displays whether or not the Color Adjust function is enabled for the selected CMYK simulation. To enable Color Adjust, click the button to the right of the Color Adjust text box to display the Tone Curve dialog box, and then change and save the setting.
This dialog box is used to change the tone curve of cyan, magenta, yellow and black. Select the color that you want to edit from the Edit Color drop-down menu, drag the pointer of the tone curve with the mouse, and then edit the curve. When you are finished editing each color, click the Save button to save the setting.

You can change the color profile for the RGB simulation. Select the RGB simulation whose setting you want to change from the RGB drop-down menu.
Displays the ICC profile to be used for the selected RGB simulation. To change the ICC profile, click the + button and select an ICC profile. Be sure to select an RGB profile as the ICC profile.
You can change the color profile for the print media. Select the media whose setting you want to change from the Media drop-down menu.
Displays the ICC profile to be used for the selected media. To change the ICC profile, click the + button and select an ICC profile. Be sure to select a media profile to be used as the ICC profile.
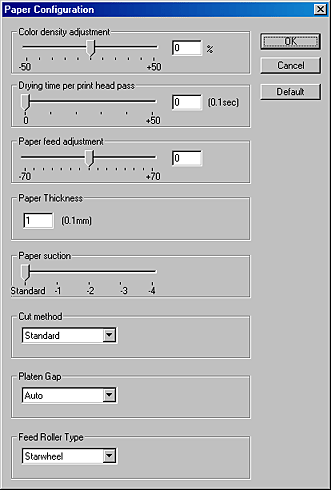
Displays the print settings for the selected media. To change the settings, click the + button to display the Paper Configuration dialog box. After changing the settings, click OK to save them.
This dialog box is used to change the print settings for the selected media. The items that can be set up vary according to the printer that is connected to the PS Server.
| Note: |
|
|
Mode |
Description |
|||||||
|
Color Density Adjustment |
Adjusts the strength of Color Density. Use a value in the range of -50% to +50%. Drag the slider with your mouse to the right (+) to deepen the color of your printout or left (-) to lighten its color. You can also type a number (-50 to +50) in the box next to the slider. Use this function when you print on paper other than EPSON special media. Set the scroll bar to the 0 position when you print on EPSON special media.
|
|||||||
|
Drying Time per Print Head Pass |
Adds a waiting time when the print head reaches the end of every pass. Set this value using the slider or text box. To improve the print quality by slow ink absorption on the media, set the value larger. The drying time per print head pass can be set in 0.1 second increments, from 0 to 5 seconds.
|
|||||||
|
Paper Feed Adjustment |
Controls the paper feeding value in 0.01% increments. If the paper feeding value is too large, white horizontal micro banding may appear. If the paper feeding value is too small, dark horizontal micro banding may appear. |
|||||||
|
Paper Thickness |
This value automatically appears according to the media specified in the Media Type setting. If you use non-EPSON media, modifying this value for your media is recommended. Refer to the paper specifications or print "Thickness Pattern" to find out the paper thickness. |
|||||||
|
Paper Suction |
Decreasing the air suction at the platen is useful to avoid wrinkling of waving of thin or saturated media, or eliminating vertical banding. The relationship of the parameter and suction power is as follows: |
|||||||
|
Standard: |
100% |
|
||||||
|
Cut Method |
Determines the best cutting method according to the paper thickness. |
|||||||
|
Standard: normal speed and normal cut pressure. |
||||||||
|
Platen Gap |
Platen Gap is the height from the media loaded into the printer to the print head. By adjusting this parameter, you may produce better print quality. This is set automatically according to the Paper Thickness specified.
|
|||||||
|
Feed Roller Type |
Select one that best fits your media.
Auto:
Double Star Wheel:
Single Star Wheel:
No Roller: |
|||||||
 Previous |
 Next |
| Version 1.00E, Copyright © 2003, SEIKO EPSON CORPORATION |