 |
|
|||
 |
||||
Scanning Using EPSON Scan
Scanning a Document
This software lets you control all aspects of scanning. You can use EPSON Scan as a standalone scanning program or use it with another TWAIN-compliant scanning program.
 Note:
Note:|
With Mac OS X, do not use the Fast User Switching function while using your scanner.
|
 |
Load your document into the input slot. See Loading a Document for instructions.
|
 |
Do one of the following to open EPSON Scan:
|
Windows:
Select or Start > All Programs or Programs > EPSON > EPSON Scan > EPSON Scan.
Select
Mac OS X:
Select Applications > EPSON Scan.
Select Applications > EPSON Scan.
You see a window like the following:

 |
Select the size of your document as the Size setting.
|
 |
Select an Orientation setting.
|
 |
Select a Resolution setting.
|
 |
Select Auto, Color, Grayscale, or Black & White as the Image Type setting.
|
Note:|
If you select Grayscale or Black & White, you can also select an Image Option setting, as described below.
Below are some examples of these features:
|
 |
Click Preview to preview your image. The scanner loads your document, and EPSON Scan prescans it and displays it in the Preview window. The scanner then ejects your document.
|
Note:|
The Preview function is not available when you select Auto or Auto (Card/Business Card) as the Size setting. If you selected one of these settings, skip to step 11.
|
 |
If necessary, you can draw a marquee (a line marking the scan area) around the portion of your document page that you want to scan. See Creating a Marquee on a Preview Image for instructions.
|
 |
Adjust settings in the Image Adjustments section of the window as necessary. See Adjusting the Color and Other Image Settings for more information.
|
 |
After checking the preview, reload your document into the scanner.
|
 |
Click Scan.
|
 |
Adjust settings in the File Save Settings window as necessary (see Selecting File Save Settings for more information), then click OK.
|
Note:|
If the Show this dialog box before next scan check box is unchecked, EPSON Scan starts scanning immediately without displaying the File Save Settings window.
|
The scanned image is saved to the folder you specified.

Selecting File Save Settings
When you see the File Save Settings window, you can select the location, name, and format of the scanned image file.
|
Click the
 File Save Settings icon on the right of the Scan button. File Save Settings icon on the right of the Scan button. |
The File Save Settings window appears.
 Note:
Note:|
If you start EPSON Scan from a TWAIN-compliant program, the
File Save Settings icon does not appear. |
|
Specify the file folder in which you want to save your scanned image.
|
Click the Documents or Pictures radio button, or the My Documents or My Pictures radio button.
If you want to select another folder, click the Other radio button, then click Browse (Windows) or Choose (Mac OS X) and select the folder. If you want to save your image on the desktop, simply click the Other radio button.
|
The image's file name, based on current naming rule settings, is shown in the File Name field. To change the naming rules, click Edit.
|
In the File Name Setting window, specify a file name prefix with an alphanumeric character string. Then specify the Number of Characters and Start Number. If you are scanning multiple images at once, each image will receive a different number.
For more details on file name settings, click Help.
Note:|
The following characters cannot be used in the prefix.
Windows: \, /, :, _, *, ?, ", <, >, | Mac OS X: : |
|
Select a Type setting to choose your file format (see the table below for more information). Depending on the format, the Options button may be available for making detailed settings.
|
|
Format (File Extension)
|
Description
|
|
BITMAP (*.bmp) (Windows only)
|
A standard image file format for Windows. Most Windows programs, including word processing programs, can read images in this format.
|
|
JPEG (*.jpg)
|
A compressed file format in which the Compression Level can be selected. The JPEG format lets you highly compress image data. However, the higher the compression, the lower the image quality. Any lost image quality data cannot be restored, and the quality deteriorates each time the data is saved. The TIFF format is recommended when modification and retouching are required.
|
|
Multi-TIFF (*.tif)
|
A TIFF format where multiple pages are saved to the same file. You can also edit the scanned images before saving them. See Epson Scan Help for details. To open Multi-TIFF files, you need a program that supports this format.
|
|
PDF (*.pdf)
|
A document format that can be read on both Windows and Mac OS X systems (platform independent). To use PDF documents in Windows, you need Adobe Reader or Acrobat. Multi-page documents can be saved as one PDF file. When you save color or grayscale images in PDF, you can select a Compression Level.
|
|
PICT(*.pct) (Mac OS X only)
|
A standard image file format for Mac OS X. Most Mac OS X programs, including word processing programs, can read images in this format.
|
|
TIFF (*.tif)
|
A file format created for exchanging data between many programs, such as graphic and DTP software. When scanning black & white images, you can specify the Compression type.
|
|
The check boxes at the bottom of the window give you these options.
|
Overwrite any files with the same name
Select this option if you want to reuse the selected file name and location and overwrite previous files with the same names.
Select this option if you want to reuse the selected file name and location and overwrite previous files with the same names.
Show this dialog box before next scan
Select this option if you want the File Save Settings window to appear automatically before you scan. If you deselect it, you must click the File Save Settings icon to open the window before clicking the Scan button.
Select this option if you want the File Save Settings window to appear automatically before you scan. If you deselect it, you must click the
File Save Settings icon to open the window before clicking the Scan button.
Open image folder after scanning
Select this option if you want Windows Explorer or the Mac OS X Finder to automatically open the folder where your scanned image file is saved when EPSON Scan finishes scanning.
Select this option if you want Windows Explorer or the Mac OS X Finder to automatically open the folder where your scanned image file is saved when EPSON Scan finishes scanning.
Show Add Page dialog after scanning
Select this option if you want the Add Page Confirmation window to appear automatically after each scan in PDF or multi-Tiff. The Add Page Confirmation window includes the Add page, Edit page, and Save File buttons.
Select this option if you want the Add Page Confirmation window to appear automatically after each scan in PDF or multi-Tiff. The Add Page Confirmation window includes the Add page, Edit page, and Save File buttons.
|
Click OK.
|
Previewing and Adjusting the Scan Area
Once you have selected your basic settings and resolution, you can preview your image and select or adjust the scan area.
Note:|
The Preview function is not available when you select Auto or Auto (Card/Business Card) as the Document Size or Size setting.
|
|
Click Preview.
|

EPSON Scan prescans your image and displays it in the Preview window.

|
Select the scan area. See Creating a Marquee on a Preview Image for instructions.
|
Creating a Marquee on a Preview Image
A marquee is a moving dotted line that appears on the edges of your preview image to indicate the scan area.
Note:|
Once you set the scan area using the marquee, it applies to all pages.
|

You can move the marquee and adjust its size. You can create only one marquee.
|
To draw a marquee, move your cursor over a preview image. The pointer becomes a set of cross-hairs.
|
|
Position the pointer in the area where you want to place the corner of your marquee and click. Hold down the mouse button and drag the cross-hairs over the image to the opposite corner of the desired scan area. Then release the mouse button. You see the moving dotted line of the marquee.
|
|
Do one of the following to adjust the marquee.
|
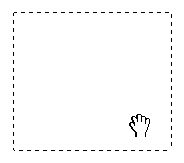
To move the marquee, position your cursor inside the marquee. The pointer becomes a hand. Click and drag the marquee to desired location.
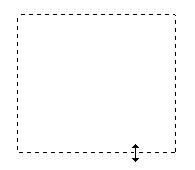
To resize the marquee, position your cursor over the edge or corner of the marquee. The pointer becomes a straight or angled double-arrow. Click and drag the edge or corner to the desired size.
 Note:
Note:|
To restrict the movement of the marquee to vertical or horizontal only, hold down the Shift key on your keyboard as you move the marquee.
To restrict the size of the marquee to the current proportions, hold down the Shift key on your keyboard as you resize the marquee.
For best results and image exposure, make sure all four sides of the marquee are located inside the preview image. Do not include any of the area around the preview image in the marquee.
To delete the marquee, press the Delete key on your keyboard.
|
Adjusting the Color and Other Image Settings
EPSON Scan offers a variety of settings for improving color, sharpness, contrast, and other aspects affecting image quality.
Image Type: Auto, Color or Grayscale
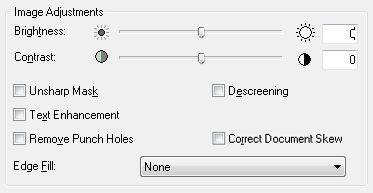
Image Type: Black & White
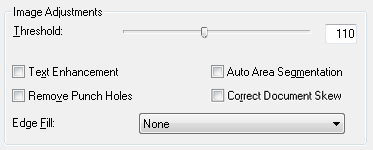
The table below describes the settings available. For details on adjusting these settings, click Help.
|
Setting
|
Description
|
|
Brightness
|
Adjusts the overall image lightness and darkness. When the Image Type is set to Black & White, this setting is available only if the Auto Area Segmentation checkbox is selected.
|
|
Contrast
|
Adjusts the difference between the light and dark areas of the overall image. When the Image Type is set to Black & White, this setting is available only if the Auto Area Segmentation checkbox is selected.
|
|
Unsharp Mask
|
Turn on to make the edges of image areas clearer for an overall sharper image. Turn off to leave softer edges. This setting is available only when the Image Type is set to Auto, Color, or Grayscale.
 |
|
Descreening
|
Removes the rippled pattern (called moiré) that can appear in subtly shaded image areas such as skin tones. Also improves results when scanning magazine or newspaper images which include screening in their original print processes. This setting is available only when the Image Type is set to Auto, Color, or Grayscale. The results of descreening do not appear in the preview, only in your scanned image.
 |
|
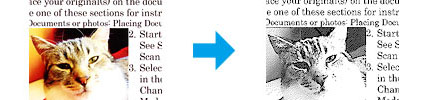
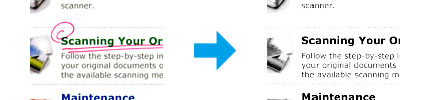
Text Enhancement
|
Enhances text recognition when scanning a text document.
 |
|
Threshold
|
Adjusts the level at which the black areas in text and line art are delineated, improving text recognition in OCR programs. This setting is available only when the Image Type is set to Black & White.
|
|
Auto Area Segmentation
|
Makes grayscale images clearer and text recognition more accurate by separating the text from the graphics. This setting is available only when the Image Type is set to Black & White.
 |
|
Remove Punch Holes
|
Removes the hole punch marks from the output image.
|
|
Correct Document Skew
|
Detects the skew of the original images and corrects them.
|
|
Edge Fill
|
Corrects shadowing around the borders (the edges of the scanned document) by filling them with the selected color.
|
If you select Grayscale or Black & White as your Image Type setting, you can also select an Image Option setting, as described below.
|
Image Option Setting
|
Description
|
|
None
|
No Image Option setting is applied.
|
|
Dropout: Red
|
Drops out red from the scan.
|
|
Dropout: Green
|
Drops out green from the scan.
|
|
Dropout: Blue
|
Drops out blue from the scan.
|
|
Color Enhance: Red
|
Enhances red in the scan.
|
|
Color Enhance: Green
|
Enhances green in the scan.
|
|
Color Enhance: Blue
|
Enhances blue in the scan.
|
Below are some examples of these features:
|
Dropout
|
Scans without the selected color.
 |
|
Color Enhance
|
Enhances the selected color.
 |
Note:|
Certain settings may not be available, or may be automatically selected, depending on the type of image you are previewing and other settings you have selected.
You can customize how certain EPSON Scan settings behave by clicking Configuration and changing settings in the window that appears. Click Help for details.
|
Scanning to a PDF File
Using EPSON Scan, you can create a PDF file and you have the following options:
Scanning multiple document pages into a single PDF file: You can scan multiple document pages and save them in a single PDF file.
Assigning document security settings: You can assign a password to the PDF file.
Creating a searchable PDF file (Windows only): You can create a PDF file with search functionality, so that you can look for words in the file.
Specifying the number of pages in a single PDF file: You can specify the maximum number of pages that can be included in one PDF file. For example, if you are scanning a 20-page document, and specify the maximum pages per PDF as 4, 5 PDF files are automatically created.
Note:
You need ABBYY FineReader (included with your scanner) to use some of these features. If you have installed your scanning software as described in the Start Here sheet, ABBYY FineReader has already been installed.
Load your document into the input slot. See Loading a Document for instructions.
Do one of the following to open EPSON Scan:
Windows:
Select or Start > All Programs or Programs > EPSON > EPSON Scan > EPSON Scan.
Mac OS X:
Select Applications > Epson Software > EPSON Scan.
You see a window like the following:
Adjust settings in the Source Settings section of the window as necessary. See Scanning a Document for more information.
Click Preview to preview your image. The scanner loads your document, and EPSON Scan prescans it and displays it in the Preview window. The scanner then ejects your document.
Note:
The Preview function is not available when you select Auto or Auto (Card/Business Card) as the Size setting. If you selected one of these settings, skip to step 8.
If necessary, you can draw a marquee (a line marking the scan area) around the portion of your document page that you want to scan. See Creating a Marquee on a Preview Image for instructions.
Adjust settings in the Image Adjustments section of the window as necessary. See Adjusting the Color and Other Image Settings for more information.
After checking the preview, reload your document into the scanner.
Click Scan. The File Save Settings window appears.
Select PDF as the Type setting. The current Paper Size, Orientation, Margin, and other settings are displayed below it.

Click Options, then adjust settings in the EPSON PDF Plug-in Settings window as necessary. See Selecting PDF Options for more information.
When you’ve finished selecting options, click OK. You return to the File Save Settings window.
Adjust any other file save settings as necessary, then click OK. EPSON Scan scans your document and displays the window below.
 Note:
Note:
If you deselect the Show Add Page dialog after scanning check box in the File Save Settings window, this window does not appear and EPSON Scan automatically saves your document.

Select one of the following options.
Add page: Click this button to scan the next page of your document. Insert the next page, then click Scan. Repeat this step for each page in your document. When you are finished, click Edit page and go to step 14.
Edit page: Click this button if you have scanned all the necessary pages and you would like to edit them before creating your PDF file. Then go to step 14.
Save File: Click this button when you’ve finished scanning and you want to save the scanned pages into one PDF without editing them. Then skip to step 16.

You see the Editing Page window displaying thumbnail images of each scanned page.
 Use the buttons at the bottom of the Editing Page window to select, rotate, reorder, and delete pages.
If you want to include all the document pages in your PDF files as they currently look, go to step 15.
If you want to rotate pages, click the pages, or click the
Use the buttons at the bottom of the Editing Page window to select, rotate, reorder, and delete pages.
If you want to include all the document pages in your PDF files as they currently look, go to step 15.
If you want to rotate pages, click the pages, or click the  odd pages,
  even pages, or
  all pages icon to select the pages, then click the
  left or
  right rotate icon to rotate them.
If you want to delete pages, click the pages, or click the odd pages, or even pages icon to select the pages, then click the
right rotate icon to rotate them.
If you want to delete pages, click the pages, or click the odd pages, or even pages icon to select the pages, then click the  delete icon to delete them.
Note:
delete icon to delete them.
Note:
The delete icon is not available when all pages are selected.
For further details on the tools in the Editing Page window, click Help.

When you have finished editing your pages, click OK. The pages are saved in one PDF file in Pictures, My Pictures, or the location you selected in the File Save Settings window, and you return to the EPSON Scan window.

Click Close to exit EPSON Scan.
Selecting PDF Options
You can select various PDF options using the EPSON PDF Plug-in Settings window.
To create a searchable PDF file, click the Text tab, select the Create searchable PDF check box, then select your language from the Text Language list.
 Note:
Note:
The Text tab is available only when ABBYY FineReader is installed.
To assign a password to the PDF file, click the Security tab and select password settings.
 To specify the maximum number of pages that can be included in one PDF file, click the General tab and adjust the Select number to make file setting.
 For more information on other settings in the EPSON PDF Plug-in Settings window, click Help.
Note:|
You need ABBYY FineReader (included with your scanner) to use some of these features. If you have installed your scanning software as described in the Start Here sheet, ABBYY FineReader has already been installed.
|
|
Load your document into the input slot. See Loading a Document for instructions.
|
|
Do one of the following to open EPSON Scan:
|
Windows:
Select or Start > All Programs or Programs > EPSON > EPSON Scan > EPSON Scan.
Select
Mac OS X:
Select Applications > Epson Software > EPSON Scan.
Select Applications > Epson Software > EPSON Scan.
You see a window like the following:
|
Adjust settings in the Source Settings section of the window as necessary. See Scanning a Document for more information.
|
|
Click Preview to preview your image. The scanner loads your document, and EPSON Scan prescans it and displays it in the Preview window. The scanner then ejects your document.
|
Note:|
The Preview function is not available when you select Auto or Auto (Card/Business Card) as the Size setting. If you selected one of these settings, skip to step 8.
|
|
If necessary, you can draw a marquee (a line marking the scan area) around the portion of your document page that you want to scan. See Creating a Marquee on a Preview Image for instructions.
|
|
Adjust settings in the Image Adjustments section of the window as necessary. See Adjusting the Color and Other Image Settings for more information.
|
|
After checking the preview, reload your document into the scanner.
|
|
Click Scan. The File Save Settings window appears.
|
|
Select PDF as the Type setting. The current Paper Size, Orientation, Margin, and other settings are displayed below it.
|
|
Click Options, then adjust settings in the EPSON PDF Plug-in Settings window as necessary. See Selecting PDF Options for more information.
|
|
When you’ve finished selecting options, click OK. You return to the File Save Settings window.
|
|
Adjust any other file save settings as necessary, then click OK. EPSON Scan scans your document and displays the window below.
|
Note:|
If you deselect the Show Add Page dialog after scanning check box in the File Save Settings window, this window does not appear and EPSON Scan automatically saves your document.
|
|
Select one of the following options.
|
Add page: Click this button to scan the next page of your document. Insert the next page, then click Scan. Repeat this step for each page in your document. When you are finished, click Edit page and go to step 14.
Edit page: Click this button if you have scanned all the necessary pages and you would like to edit them before creating your PDF file. Then go to step 14.
Save File: Click this button when you’ve finished scanning and you want to save the scanned pages into one PDF without editing them. Then skip to step 16.
|
You see the Editing Page window displaying thumbnail images of each scanned page.
|
Use the buttons at the bottom of the Editing Page window to select, rotate, reorder, and delete pages.
If you want to include all the document pages in your PDF files as they currently look, go to step 15.
If you want to rotate pages, click the pages, or click the odd pages, even pages, or all pages icon to select the pages, then click the left or right rotate icon to rotate them.
odd pages, even pages, or all pages icon to select the pages, then click the left or right rotate icon to rotate them.If you want to delete pages, click the pages, or click the odd pages, or even pages icon to select the pages, then click the delete icon to delete them.
odd pages, or even pages icon to select the pages, then click the delete icon to delete them. Note:|
The
delete icon is not available when all pages are selected. |
For further details on the tools in the Editing Page window, click Help.
|
When you have finished editing your pages, click OK. The pages are saved in one PDF file in Pictures, My Pictures, or the location you selected in the File Save Settings window, and you return to the EPSON Scan window.
|
|
Click Close to exit EPSON Scan.
|
Note:|
The Text tab is available only when ABBYY FineReader is installed.
|
For more information on other settings in the EPSON PDF Plug-in Settings window, click Help.