![]()
User's Guide
| Index | Help | Safety | ||||||||
| Contents | Glossary |
|
||||||||
|
|
|
|||||||||||||||||||||||||||||||||
Faxing (Fax Model Only)
Output paper size
Basics of receiving faxes
Receiving faxes when you hear fax tones
Receiving faxes using fax polling
The received fax can be printed in A4, B5, Letter, or Legal. However, when the output paper size does not match the received data size, the image of the received data is divided according to the output paper size as follows.
|
Cassette paper size |
Received document size |
||
|
Letter |
A4 |
Legal |
|
|
B5 |
 *1 Divided *2 Rotated |
 *1 Divided *2 Rotated |
 *1 Divided *2 Rotated |
|
Letter |
 |
 *3 Reduced |
 *1 Divided |
|
A4 |
 *4 Trimmed on both ends |
 *4 Trimmed on both ends |
 *1 Divided *4 Trimmed on both ends |
|
Legal |
 |
 |
 |
| In the list above, a shaded area indicates the printable area and a vertical line in the shaded area indicates the location of the header information (head of the original). |
| *1 Divided: Received image is output on 2 pages. |
| *2 Rotated: Received image is rotated. |
| *3 Reduced: Received image is reduced in the sub-scan direction only. |
| *4 Trimmed on both ends: Both ends of the received image are trimmed. |
| Note: |
|
When the product has an attached phone, you can select from four reception modes for receiving a call. The default is set to the Fax only mode.
|
Setting item |
Description |
|
Auto switching |
The call is received by the attached phone and the product automatically answers after the phone rings for a certain duration specified by the Attached Phone Timeout setting. |
|
Fax only |
The product automatically answers and receives the fax. |
|
Phone only |
The call is received by the attached phone. Fax reception is not performed. |
|
TAM |
When an attached phone detects a fax/phone signal while answering an incoming call, the product automatically receives the fax. |
To change the reception mode, follow the steps below.
 |
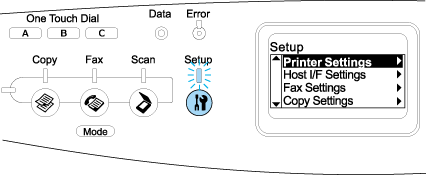
Press the  Setup button on the control panel. Setup button on the control panel.
|
The Setup light is lit and the Setup menu appears in the LCD panel.

 |
Press the  Down button twice to select Fax Settings, then press the Down button twice to select Fax Settings, then press the  Right button. Right button.
|
 |
Press the  Down button twice to select Reception Settings, then press the Down button twice to select Reception Settings, then press the  Right button. Right button.
|
 |
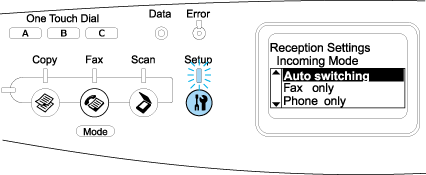
Press the  Down button to select Incoming Mode, then press the Down button to select Incoming Mode, then press the  Right button. Right button.
|
The Reception Settings menu appears.

 |
Press the  Up or Up or  Down button to select your desired reception mode, then press the Down button to select your desired reception mode, then press the  Right button. Right button.
|
 |
To exit the settings, press the  Left button several times or another mode's button. Left button several times or another mode's button.
|
This function is used to print fax data after answering the incoming call using the attached phone.
| Note: |
|
 | Answer the incoming call using the attached phone. |
 |
Press the  B&W Start or B&W Start or  Color Start button after confirming the fax tone. Color Start button after confirming the fax tone.
|
The received data are printed by page as they are received.
This function is used to get the information stored in the other party's fax machine to your product.
 |
Make sure that the product is in Fax mode. If not, press the  Fax button to enter the Fax mode. Fax button to enter the Fax mode.
|
 | Enter the other party's fax number using the numeric keypad. |
 |
Press the  Up or Up or  Down button several times until Polling Rcptn appears, then press the Down button several times until Polling Rcptn appears, then press the  Left or Left or  Right button to select On. Right button to select On.
|
 |
When you hear a beep sound or voice guidance, press the  B&W Start or B&W Start or  Color Start button to start the transmission. Color Start button to start the transmission.
|
 Previous |
 Next |
| Version 1.00E, Copyright © 2003, SEIKO EPSON CORPORATION |