If your printouts are unexpectedly light or faint, or you notice light or dark bands across your printout, you may need to clean the print head. This unclogs the nozzles so they can deliver ink properly. Print head cleaning uses ink, so clean it only if quality declines.
You can clean the print head using the ![]() ink button on the Epson Stylus CX all-in-one or using the Head Cleaning utility on your computer. You can also run a nozzle check to see if the print head needs cleaning. (To use the buttons on your Epson Stylus CX to perform these functions, see the Quick Guide.)
ink button on the Epson Stylus CX all-in-one or using the Head Cleaning utility on your computer. You can also run a nozzle check to see if the print head needs cleaning. (To use the buttons on your Epson Stylus CX to perform these functions, see the Quick Guide.)
Note:
If the red ![]() ink light comes on or flashes, you cannot clean the print head. In this case, replace the appropriate ink cartridge first.
ink light comes on or flashes, you cannot clean the print head. In this case, replace the appropriate ink cartridge first.
Caution:
If you don't use your Epson Stylus CX often, it is a good idea to print a few pages at least once a month to maintain good print quality.
Macintosh OS X: Open the Applications folder and select EPSON Printer Utility. Select your Epson Stylus CX in the printer list, click OK, and select Nozzle Check.
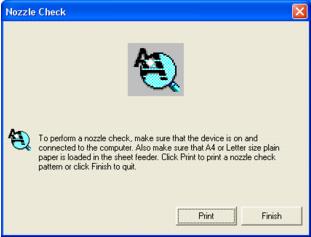
You see a screen like the following:
If there are gaps or lines, or the test patterns are faint, click Clean. Then follow the steps in Running the Head Cleaning Utility to clean the nozzles.
Macintosh OS X: Open the Applications folder and select EPSON Printer Utility. Select your Epson Stylus CX in the printer list, click OK, and select Head Cleaning.
You see a screen like the following:
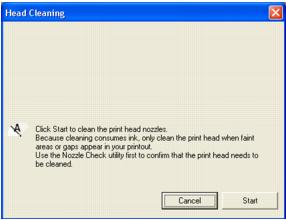
Cleaning takes several seconds. The Epson Stylus CX runs a head cleaning cycle and the ![]() On light flashes.
On light flashes.
Caution:
Never turn off the Epson Stylus CX while head cleaning is in progress. You may damage it.
Windows: Click Print Nozzle Check Pattern. Then click Print.
Macintosh: Click Confirmation, then click Next.
The nozzle check pattern prints (see Examining the Nozzle Check Pattern for details).
If there are still gaps or lines, or the test patterns are faint, click Clean to clean the print head again.
If you don't see any improvement after cleaning four or five times, refer to Problems and Solutions. You can also turn the printer off and wait overnight. This lets any dried ink soften. Then try cleaning the print head again.
Tip:
If you do not use your Epson Stylus CX often, it is a good idea to print a few pages at least once a month to maintain good print quality.
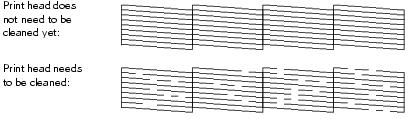
Examine the nozzle check pattern you printed. Each staggered line should be solid, with no gaps, as shown.

