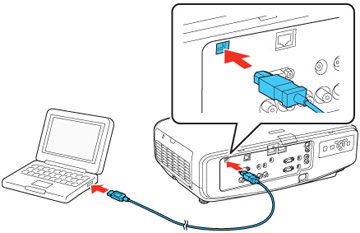
Transferring Settings From a Computer

After saving projector settings to a computer, you can transfer them to another projector of the same model (PowerLite Pro G6870/G6970WU).
Your computer must be running one of the following operating systems:
  • Windows Vista
  • Windows 7
  • Windows 8.x
  • OS X 10.5.8
  • OS X 10.6.x
  • OS X 10.7.x
  • OS X 10.8.x
  • OS X 10.9.x
  • OS X 10.10.x

Do not adjust image settings on a projector until after you transfer settings to it. Otherwise, you may have to repeat your adjustments.

  1. Turn off the projector and unplug the power cord from the projector's power inlet.
  2. Connect a USB cable to your projector's Service port.


  3. Connect the other end to any available USB port on your computer.
  4. Press and hold the Menu button on the control panel or remote control as you connect the power cord to the projector's power inlet.


  5. When the power, Lamp, and Temp lights turn orange, release the Menu button. The projector shows up as a removable disk on your computer.
  6. Copy the pjconfdata.bin file from your computer to the removable disk.
    Note: Do not copy any other files to the removable disk.
  7. Once the file has copied, do one of the following:
    • Windows: Open the My Computer, Computer, or Windows Explorer utility. Right-click the name of your projector (listed as a removable disk) and select Eject.
    • OS X: Drag the removable disk icon for your projector from the desktop into the trash.
    The power, Status, Lamp, and Temp lights start flashing to indicate that the projector's settings are being updated. When the lights stop flashing, the power light turns orange and the projector enters standby mode.
    Caution:
    Do not unplug the power cord while the lights are flashing. This could damage the projector.
Related references
Projector Light Status