Select the basic settings for the
document you want to print.
Note: The
available settings and appearance of the print window may differ
from those covered here, depending on the Windows version,
application, and printer model you are using.
- Open a document for printing.
- Select the print command in your
application.
Note: You may need
to select a print icon on your screen, the Print option in the File menu, or another
command. See your application's help utility for details.
- If necessary, select your product name
as the printer you want to use.
Note: You may also
need to select Preferences,
Properties, Print Settings, or Printer Properties to view your print
settings.
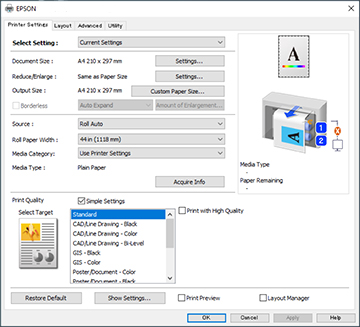
You see the Printer Settings window:
Note: The
appearance of the screen may differ from the one shown depending on
your printer model and driver version.
- Select the Current Settings option.
- Click Settings to select the Document Size setting that matches the size of
the digital document you are printing.
Note: The Document
Size should be set before selecting an Output Size.
- If you want your printout to be a
different size than the selected document size, select the
Output Size setting. Make sure to
select a paper size that is larger than the selected document size
or enlargement setting.
Note: Select
Custom Paper Size to set a
user-defined output size.
- If you are printing a borderless
photo, select Borderless. You can
select Amount of Enlargement to
access additional options for borderless printing.
Note: You must
select a compatible borderless paper type and size to print without
borders. Check the borderless paper compatibility list for
details.
- Select the Source setting that matches the paper source you
want to use.
Note: If you
select a roll paper option, select the width of the roll as the
Roll Paper Width setting.
- Select the Media Category setting that matches the paper
you loaded.
Note: If you want
to use paper settings that have been set in the printer's control
panel, select Use Printer
Settings.
Note: Click
Acquire Info to refresh the settings
if you loaded or changed paper after opening the print
window.
- Select the Media Type setting that matches the paper you
loaded.
Note: Click
Acquire Info to refresh the settings
if you loaded or changed paper after opening the print
window.
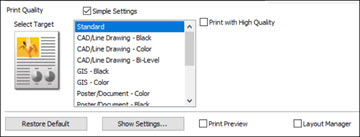
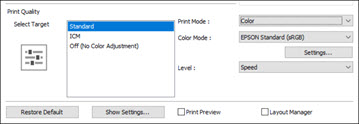
- Set the print quality.
- Select Select
Target and make the following settings according to your
model:
- SureColor T-Series: Select
Simple Settings as necessary. When
printing in high quality, select Print with
High Quality. To make detailed print quality settings,
deselect the Simple Settings
checkbox.
- SureColor P-Series: Set the
Print Mode, Color Mode, and Level as necessary.
- To see a preview of how your document
will print, select Print Preview.
(The preview appears after you click Print but before printing starts.)
- To layout multiple print data or
images for printing all at once, select Layout Manager.