To maintain
optimum print quality, perform a nozzle check before printing.
Note:
If you are using the medium grooved platen, remove spacer A.
Use only spacer B.
Make sure the Platen Gap setting
is set to Auto.
If the
platen is not in the forward position, press the moveable base button to move it
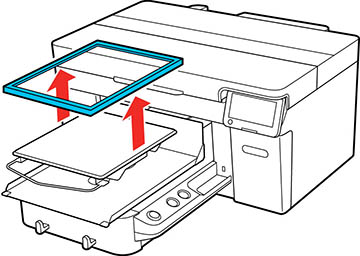
forward.
Remove
the platen frame.
Load media onto the platen you are
using:
For L, M, or S size platens, use A4- or letter-size.
For XS size platens, use one sheet in 7.1 inch × 7.9 inch (180
mm × 200 mm) size.
For sleeve platens, use one sheet in 3.9 inch × 3.9 inch (100
mm × 100 mm) size.
Note: The type of
media depends on the Printer Mode you are using. For White ink
mode, use transparent media, such as OHP film, or colored paper.
For Color ink mode, use plain paper. If you are using the medium
grooved platen, use thick paper. If you do not have thick paper,
use a different platen.
Position
the media on the platen:
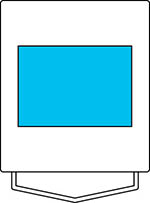
For L, M, S, and XS size platens, load media in the center.
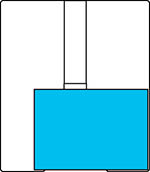
For medium grooved platens, load media on the front-right side
of the platen.
For sleeve platens, load media in the center of the raised
section.
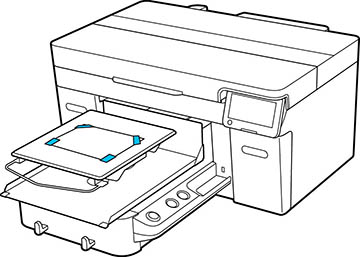
Note: Make sure to
place the media in the correct position for the platen you are
using or the platen may be soiled with ink.
Secure
the corners with tape.
Set the
height adjustment lever to position P.
Select Menu > Maintenance > Print
Head Nozzle Check.
Confirm
that the pattern and platen settings match the type of nozzle check
you want to perform. Select Print
Settings and make any changes, if necessary.
Select Start. The nozzle check pattern prints
onto the paper.
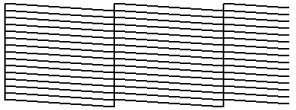
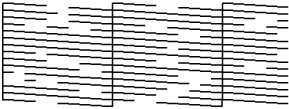
Remove
the paper and check the printed pattern:
If there are
no gaps in the pattern, the nozzles are clean.
If there are
gaps in the pattern, clean the print head.