|

User's Guide
|
|
Installing Components and Setting Up the Network Interface / How to Set UP the Network Interface
Installing the Network Interface on the Device
Follow the steps below to install the network interface on the device.
 |
Warning:
|
 | |
Before you install or uninstall the network interface, be sure to turn off the device to prevent electric shock.
|
|
 |
Make sure that the device is turned off and unplug the power cord from the wall outlet.
|
 |
Insert the network interface in an optional interface slot and tighten the screws. For more details, see the manual shipped with your device.
|
 |
Initialize the network interface. To do this, turn on the device. Then, while the status light and the data light are off, hold down the status sheet button for twenty seconds. Initialization is in progress, while the orange status light flashes and the green data light is on.
|
|  |
Note:
|
| | |
Be sure to initialize the network interface when you install or reinstall it.
|
|
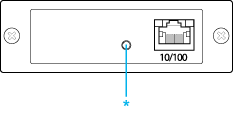
* Press the status sheet button for more than 20 seconds.
 |
Turn off the device.
|
 |
Connect an Ethernet cable (Category 5 shielded twisted-pair cable) to the RJ-45 connector on the network interface, and then connect its other end to the network.
|
|  |
Caution:
|
| | -
You must use a Category 5 shielded twisted-pair cable to connect the network interface to prevent malfunction.
|
|
| | -
Do not connect or disconnect the network cable when the device is on.
|
|
| | -
Do not connect the network interface and the computer directly. Be sure to use a hub to connect the network interface to the network.
|
|
| |
Note:
|
| | |
You can use both 10Base-T or 100Base-TX. If you print a lot of data, we recommend that you use a high-speed network of 100Base-TX with a light network traffic.
|
|
 |
Turn on the device.
|
 |
Check the lights on the network interface. The orange status light flashes and the green data light goes on. After a while, the green or orange status light turns on and the data light flashes.
|
 |
To print a status sheet, press the status sheet button on the network interface. Press the status sheet button once to print a simple status sheet, or twice to print a full status sheet.
|
If the status sheet prints, this indicates the network interface has been installed correctly.
| |
Caution:
|
| | -
Do not press the status sheet button while the orange status light flashes and the green data light is on; otherwise, the network interface will return to its factory default settings, and the network status sheet will not print correctly as well.
|
|
| | -
After turning off the device, wait until the status lights go off before turning it back on or before removing the network interface; otherwise, the network interface may not work correctly.
|
|
|
Note for Mac OS X 10.2.4:
|
| |
Since the device supports Rendezvous and is on by default, you can use the device on a network just by connecting it to the network. If you want to disable the Rendezvous setting, use EpsonNet Config.
|
|
Now, you can configure the network interface. See Configuring the network interface for Windows or Configuring the network interface for Macintosh.

[Top]
| Version 1.00E, Copyright © 2003, SEIKO EPSON CORPORATION |

