![]()
User's Guide
|
|
Index |
|
Help |
|
Safety | |||||
|
|
Contents |
|
Glossary |
|
||||||
|
|
|
|||||||||||||||||||||||||||||||||
Using the Control Panel
When to make Setup menu settings
This section describes how to use the Setup menu, and when it is appropriate to make product settings using the Setup menu screen. You can use the Setup menu in the LCD panel to access a variety of menus that allow you to make product settings.
You can make the following settings for copying, faxing, scanning, and printing on the Setup menu.
|
Setup menu |
Setting items |
|
Printer Settings |
Use this menu to make the following printer settings. |
|
Host I/F Settings |
Use this menu to make the following interface settings. |
|
Fax Settings |
Use this menu to make the following fax settings (fax model only). |
|
Copy Settings |
Use this menu to make the following copy settings. |
|
Scan Settings |
Use this menu to make the following scan settings. |
For Printer Settings:
In general, Printer Settings can be made from the printer driver, and do not need to be made using the Setup menu. In fact, printer driver settings override settings made using the Setup menu, so use the Setup menu only to make settings you cannot make in your software or printer driver.
For a complete description of the items and settings available in the Setup menu, see Setting menus.
 |
Make sure the product is turned on, and then press the  Setup button. Setup button.
|
The Setup light is lit and the LCD panel shows Setup Mode for a few seconds, and then changes to the Setup menu screen.

| Note: |
|
 |
Use the  Up and Up and  Down buttons to select your desired Setup menu, and then press the Down buttons to select your desired Setup menu, and then press the  Right button to view the items in the menu. Right button to view the items in the menu.
|
 |
Use the Up and Down buttons to scroll through the items, and then press the Right button to carry out the operation indicated by the selected item, or to view the settings available for the item.
|
| Note: |
|
|
 | Exit the Setup menu. |
To switch to another mode, use the following method.
- Press the
Copy,
Fax, or
Scan button to switch to the corresponding mode.
- Press the
Press the Up and Down buttons to scroll through the menus. The menus and menu items appear in the order as described below.
| Note: |
|
From this menu you can check the toner level and the remaining service life of consumable products. You can also print status and sample sheets showing the printer's current settings, available fonts, and a brief summary of available features.
Press the Up or Down button to select an item. Press the Right button to print a sheet or font sample.
|
Item |
Settings |
|
Status Sheet |
- |
|
Network Status Sheet (Information)*1 |
- |
|
C Toner*2 |
0 to 100% |
|
M Toner*2 |
0 to 100% |
|
Y Toner*2 |
0 to 100% |
|
K Toner*2 |
0 to 100% |
|
Photocon*2 |
0 to 100% |
|
Total Pages*2 |
0 to 99999999 |
|
Color Pages*2 |
0 to 99999999 |
|
B/W Pages*2 |
0 to 99999999 |
| *1 This item appears only when the network interface board is installed. |
| *2 This item is for display only and cannot be modified. |
Prints a sheet showing the current Printer Settings and installed options. These sheets can be useful to confirm whether options have been installed correctly.
Prints a sheet showing the working status of the network.
Displays the amount of toner left in the toner cartridges, and the remaining service life of the photoconductor unit, from 0 to 100%. The letter C, M, Y, or K indicates the colors Cyan, Magenta, Yellow, and Black respectively.
Displays the total number of pages printed by the product.
Displays the total number of pages printed in color by the product.
Displays the total number of pages printed in black and white by the product.
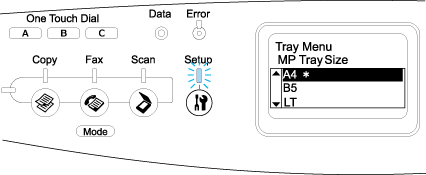
This menu allows you to specify the size and type of paper loaded in the MP tray. Accessing this menu also lets you check the size of the paper currently loaded in the optional paper cassette.
The paper type settings in this menu can also be made from your printer driver. Settings you make in your printer driver override these settings, so use your printer driver whenever you can.
|
Item |
Settings |
|
MP Tray Size |
A4, A5, B5, LT (Letter), HLT (Half Letter), LGL (Legal), GLT (Government Letter), GLG (Government Legal), EXE (Executive), F4, Mon (Monarch), C10, DL, C5, C6, IB5 (ISO B5) |
|
LC1 Size |
A4, LT (Letter) |
|
MP Type |
Plain, SemiThk (Semi-thick), Letterhead, Recycled, Color, Trnsprncy (Transparency), Labels |
|
LC1 Type |
Plain, SemiThk (Semi-thick), Letterhead, Recycled, Color |
Select your paper size from this menu.
Displays the paper size loaded in the optional paper cassette.
Lets you set the paper type loaded in the MP tray.
Lets you select the paper type loaded in the optional paper cassette.
This menu allows you to make various basic configuration settings related to paper sources, feeding modes, and error handling. You can also use this menu to select the LCD panel display language.
|
Item |
Settings |
|
Lang (Display Language) |
English, French, German, Italian, Spanish, Swedish, Danish, Dutch, Finnish, Portuguese, Simplified Chinese, Traditional Chinese, Korean |
|
Time to sleep |
5, 15, 30, 60, 120, 180 min. |
|
MP Mode |
On, Off (Normal, Last) |
|
Size Ignore |
Off, On |
|
Auto Cont (Auto Continue) |
Off, On |
|
LCD Contrast |
0 to 15 |
|
Time Setting |
YY/MM/DD, HH/MM |
|
Date Format |
DD/MM/YY, MM/DD/YY, YY/MM/DD* |
| * This item differs depending on the destination. |
Specifies the language displayed in the LCD panel and that printed on the status sheet.
This setting determines whether the MP tray has the higher or lower priority when Auto is selected as the Paper Source setting in the printer driver. When On (Normal) is selected, the MP tray has the higher priority as the paper source. If you select Off (Last), the MP tray has the lower priority.
If you want to ignore a paper size error, select On. When you turn this item on, the product keeps printing even if the image size exceeds the printable area for the specified paper size. This may cause smudges because of the toner that is not transferred onto the paper properly. When this item is turned off, the product stops printing if a paper size error occurs.
When you turn this setting on, the product automatically continues printing after a certain period of time when one of the following errors occurs: Paper Set, Print Overrun, or Memory Overflow. When this option is off, you must press the  B&W Start or Color Start button to resume printing.
Adjusts the contrast of the LCD panel. Use the Up and Down buttons or the numeric keypad to set the contrast between 0 (lowest contrast) and 15 (highest contrast.)
Specifies the date and time used in fax communications. The letters YY, MM, DD, HH, and MM indicate the Year, Month, Date, Hour, and Minute respectively. To specify the year, date, and time use either the Up and Down button, or numeric keypad.
Specifies the display format for the Time Setting. The letters DD, MM, and YY indicate the Date, Month, and Year respectively.
This menu allows you to cancel printing and reset the printer settings.
Clears a warning message that shows an error except for those that occur from consumable products or mandatory-replacement parts.
Clears all warning messages that appear in the LCD panel.
Stops printing and clears the current job received from the active interface. You may want to reset the product when there is a problem with the print job itself and the product cannot print successfully.
Stops printing, clears the printer memory, and restores the printer settings to their default values. The print jobs received from all interfaces are erased.
| Note: |
|
Restores the control panel menu settings to their default values.
Replace the indicated toner cartridge. See Toner Cartridge for details.
Reset the fuser unit service life when you replace the fuser unit.
These settings control communication between the product and the computer when using a USB interface.
|
Item |
Settings |
|
USB I/F |
On, Off |
|
USB Speed |
HS, FS |
After these settings are changed, the new settings don't take effect until after a reset or after the power is turned off and on again, even though it is shown on the Status Sheet.
Allows you to activate or deactivate the USB interface.
Allows you to select the operation mode of USB interface. Selecting HS is recommended. Select FS if HS does not work on your computer system.
These settings control communication with the CX11N when it is connected to a computer network.
|
Item |
Settings |
|
Network I/F |
On, Off |
|
Network Config |
No, Yes |
|
Get IPAddress |
Panel, Auto, PING |
|
IP (IP address) * |
0.0.0.0 to 255.255.255.255 |
|
SM (Subnet mask) |
0.0.0.0 to 255.255.255.255 |
|
GW (Gateway address) |
0.0.0.0 to 255.255.255.255 |
|
AppleTalk |
On, Off |
|
MS Network |
On, Off |
|
Rendezvous |
On, Off |
|
Link Speed |
Auto, 100 Full, 100 Half, 10 Full, 10 Half |
| Note: |
|
This menu allows you to specify the basic settings for the fax mode.
|
Item |
Settings |
|
Line Type |
PSTN, PBX, FlashStart*1 |
|
Dial Type*2 |
Tone, 10 pps, 20 pps |
|
Personal Number |
Name*3: up to 32 characters |
|
Speaker Volume |
Off, 1, 2, 3 |
|
Country/Area Setting |
Austria, Belgium, Denmark, Finland, France, Germany, Greece, Holland, Ireland, Italy, Luxemburg, Portugal, Spain, Sweden, U.K., Russia, Poland, Czech, Hungary, Switzerland, Norway, Argentine, Brazil, Mexico, Taiwan, China, Korea, Hong Kong, Singapore, Australia, New Zealand, Thailand, Malaysia, U.S.A., Canada |
|
Report Print Setup*4 |
English, French, German, Italian, Spanish, Swedish, Danish, Dutch, Finnish, Portuguese, Simplified Chinese, Traditional Chinese, Korean, Russian |
| *1 This item is only available in Germany and France. |
| *2 Available settings vary depending on the destination. |
| *3 Name can be registered only with EPSON Speed Dial Utility. |
| *4 Default value is determined according to the country/area setting. |
| Note: |
|
This menu allows you to specify the transmission settings for the fax mode.
|
Item |
Settings |
|
Auto Redial Tries |
0 to 99 |
|
Print Sender Info |
On, Off |
This menu allows you to specify the reception settings for the fax mode.
|
Item |
Settings |
|
Paper Cassette |
Auto, MP, LC |
|
Incoming Mode |
Auto switching, Fax only, Phone only, TAM |
|
Attached Phone Timeout |
1 to 99 |
|
DRPD |
On, Off (All, Normal) |
This menu allows you to specify the following setting items.
|
Item |
Settings |
|
Individual Speed Dial |
Register, Delete |
|
One-Touch Dial |
Register, Delete |
|
Clear Speed Dial |
Clears registered all speed dial information. |
This menu allows you to specify when you want to print the following reports.
|
Item |
Settings |
|
Activity Report |
On, Off |
|
Transmission Report |
On, Error Only, Off |
|
Multiple Trans Report |
On, Error Only, Off |
|
Item |
Description |
|
Factory Settings |
Changes fax settings to their factory settings. |
|
Item |
Settings |
|
Copy Function Settings |
Changes copy activity settings to their default settings. |
|
Copy Factory Settings |
Changes copy settings to their factory settings. |
|
Item |
Description |
|
Carriage Lock |
Returns the scanner's carriage to the locked position. |
 Previous |
 Next |
| Version 1.00E, Copyright © 2003, SEIKO EPSON CORPORATION |
 Left, or
  asterisk mark indicates the current setting value.