|

User's Guide
|
|
Scanning
Setting Your Originals
 Document table
Auto Document Feeder (fax model only)
Before scanning a document, remember to respect the rights of copyright owners. Do not scan published text or images without first checking their copyright status.
Document table
When using the document table, set an original one sheet at a time.
 |
Caution:
|
 | -
Do not place heavy objects on the glass surface of the document table. Also, do not press the glass surface with too much force.
|
|
| -
To scan an original correctly, set the transportation lock on the left side of the document table in the
 unlocked position. unlocked position.
|
|
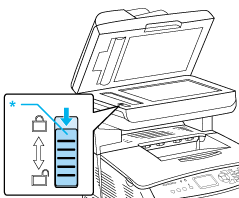
* Transportation lock
 |
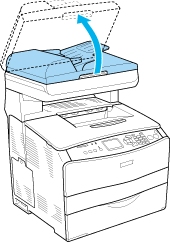
Make sure the product is turned on, and then open the document cover gently.
|
 |
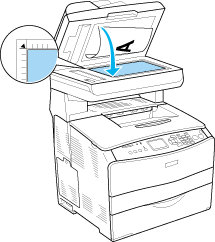
Place an original on the document table, with the side to be scanned facing down.
|
Use the document guide strip to align the horizontal edge of the document.
|  |
Note:
|
| | -
The area with a width of maximum 1.5 mm from the horizontal edge and 1.5 mm from the vertical edge is not scanned.
1. Maximum unreadable area of 1.5 mm
2. Maximum unreadable area of 1.5 mm
|
|

| | -
If you plan to preview images using the Thumbnail method, while scanning multiple photographs, position each photograph at least 20 mm apart from its adjacent photographs.
|
|
| | -
Always keep the document table clean.
|
|
 |
Close the document cover gently so that the original does not move.
|
| |
Note:
|
| | -
Do not leave photographs on the document table for an extended period of time as they may stick to the glass.
|
|
| | -
Make sure the document is flat against the glass surface, otherwise the image will appear fuzzy and out of focus. Also be sure to close the document cover to prevent interference from external light.
|
|
For the detailed scanning procedure, see Make suitable settings.
Removing the document cover for thick or large documents (base model only)
When you scan a thick or large document, you can remove the document cover.
|
Caution:
|
| |
To scan an original correctly, set the transportation lock on the left side of the document table in the unlocked position. See Scanner parts.
|
|
|
|
Open the document cover and pull it straight up to remove it.
|

|
|
Place a document on the document table, with the side to be scanned facing down, and then place the document cover onto the document.
|

| |
Note:
|
| | -
When you set a thick document such as magazines, make sure to press the document from above and make it flat.
|
|
| | -
When installing the document cover, follow the steps for removing the cover in reverse.
|
|
| |
Caution:
|
| | |
Do not use excessive force on the document cover, and do not twist it diagonally. Doing so may damage the document cover.
|
|

[Top]
Auto Document Feeder (fax model only)
The Auto Document Feeder can automatically load up to 50 sheets. You can use the following documents with the Auto Document Feeder.
|
Paper Type
|
Paper Size
|
Capacity
|
|
Plain paper, EPSON Color Laser Paper, EPSON ink jet paper, Recycled paper
Weight: 50 to 124 g/m2
|
B5*, A4, Letter, Legal
|
Up to 50 sheets (a stack 8 mm thick)
|
|
* Can not be used for fax transmission.
|
|
Caution:
|
| |
To scan an original correctly, set the transportation lock on the left side of the document table in the unlocked position.
|
|

* Transportation lock
|
Note:
|
| |
When scanning an original using the Auto Document Feeder, scanning quality may be lower than when scanning an original on the document table.
|
|
Follow the steps below to load documents in the Auto Document Feeder.
|
|
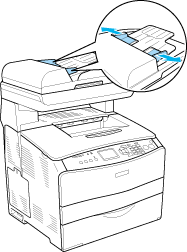
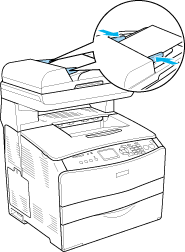
Slide the edge guides all the way outward.
|
|
|
Insert a stack of documents face-up in the Auto Document Feeder until it meets resistance, and then move the edge guides so they are flush with the edges of your documents.
|
|
Note:
|
| -
Make sure the ADF cover is closed firmly. If the ADF cover is open, the document table is preemptively scanned and a blank copy is output even if an original is set on the Auto Document Feeder.
|
|
| -
If you load multiple pages in the Auto document Feeder, the pages will be fed from the top and then ejected face-down.
|
|
[Top]
| Version 1.00E, Copyright © 2003, SEIKO EPSON CORPORATION |

