|

User's Guide
|
|
Problem Solver / Other Problems
Clearing Jammed Paper
 Precautions for clearing jammed paper
Jam C (cover C)
Jam E (cover E)
Jam F (cover F)
Jam MP (MP tray)
Jam LC/G (optional paper cassette and cover G)
When transparencies are jammed at the MP tray
Paper jams in the Auto Document Feeder
If paper becomes jammed in the product, the Print light (green) goes off and Error light (red) is lit. The product's LCD panel and EPSON Status Monitor 3 provide alert messages.
Clear the paper jam by following the order of the indicated cover names displayed on the control panel or EPSON Status Monitor 3.
Precautions for clearing jammed paper
Be sure to observe the following points when you clear jammed paper.
-
Do not remove jammed paper by force. Torn paper can be difficult to remove and might cause other paper jams. Pull it gently in order to avoid tearing.
-
Always try to remove jammed paper with both hands to avoid tearing it.
-
If jammed paper is torn and remains in the product, or if paper is jammed in a place not mentioned in this section, contact your dealer.
-
Make sure that the paper type that is loaded is the same as the Paper Type setting in the printer driver.
 |
Warning:
|
 | -
Be careful not to touch the fuser, which is marked CAUTION HIGH TEMPERATURE, or the surrounding areas. If the product has been in use, the fuser and the surrounding areas may be very hot.
|
|
| -
Do not insert your hand deep into the fuser unit as some components are sharp and may cause injury.
|
|

[Top]
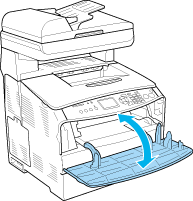
Jam C (cover C)
Follow the steps below to clear paper jams at cover C.
 |
Note:
|
| |
Before raising the scanner unit, make sure that the document cover is closed firmly.
|
|
 |
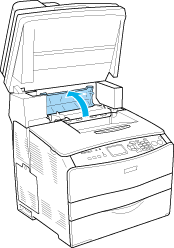
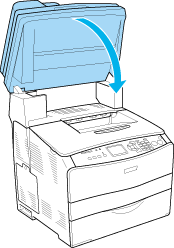
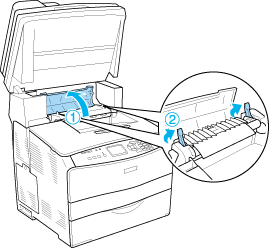
Raise the scanner unit.
|

|  |
Caution:
|
| | |
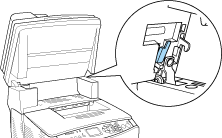
Do not touch the lever under the scanner unit when you open or close the unit. Touching it will cause the document cover of the scanner unit to fall down, which may damage the product and cause injury.
|
|

 |
Open cover C.
|
 |
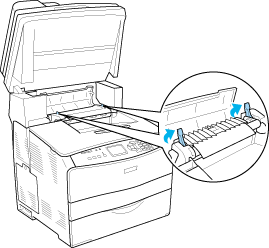
Raise the two green levers of the fuser unit to unlock it.
|
 |
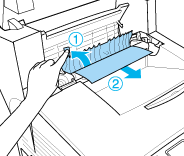
Hold the guide up by holding the green tab, and gently pull out any sheets of paper. Be careful not to tear the jammed paper.
|
| |
Warning:
|
| | |
Be careful not to touch the fuser, which is marked CAUTION HIGH TEMPERATURE, or the surrounding areas. If the product has been in use, the fuser and the surrounding areas may be very hot.
|
|
 |
Push down the two green levers of the fuser unit.
|

 |
Close cover C.
|
 |
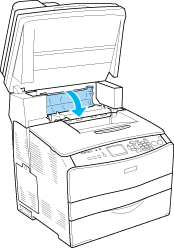
Lower the scanner unit to the original position.
|
[Top]
Jam E (cover E)
Follow the steps below to clear paper jams at cover E.
|
|
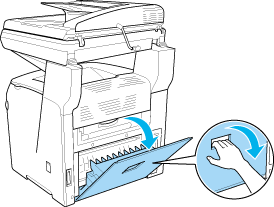
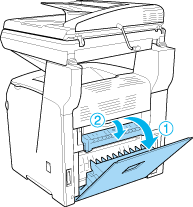
Open cover E.
|
|
|
Gently pull out any sheets of paper with both hands. Be careful not to tear the jammed paper.
|

|
|
Close cover E.
|
[Top]
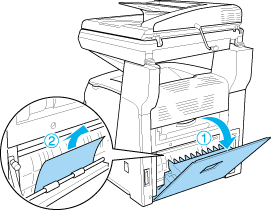
Jam F (cover F)
Follow the steps below to clear paper jams at cover F.
|
Note:
|
| |
Before raising the scanner unit, make sure that the document cover is closed firmly.
|
|
|
|
Raise the scanner unit.
|

| |
Caution:
|
| | |
Do not touch the lever under the scanner unit when you open or close the unit. Touching it will cause the document cover of the scanner unit to fall down, which may damage the product and cause injury.
|
|
|
|
Open cover C, then raise the two green levers on the fuser unit to unlock it.
|
|
|
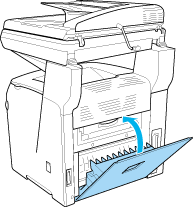
Open cover E, and then cover F.
|
|
|
Gently pull out any sheets of paper with both hands. Be careful not to tear the jammed paper.
|

|
|
Close cover F, and then cover E.
|

|
|
Push down the two green levers on the fuser unit, then close cover C.
|

|
|
Lower the scanner unit to the original position.
|

[Top]
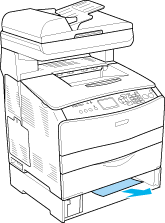
Jam MP (MP tray)
Follow the steps below to clear paper jams at the MP tray.
|
|
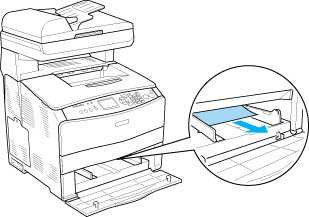
Open the MP tray cover and remove all paper that is loaded.
|

|
|
Gently pull out any sheets of paper that have fed part way into the product.
|
|
|
Reload the paper and close the MP tray cover.
|

|
|
Open and close cover A.
|

| |
Note:
|
| | |
After removing the jammed paper from the MP tray, you need to open and close any cover except the MP tray cover to clear the error message.
|
|
[Top]
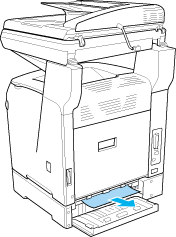
Jam LC/G (optional paper cassette and cover G)
Follow the steps below to clear paper jams at the optional paper cassette unit and cover G.
|
|
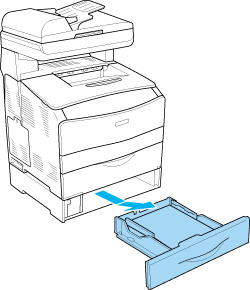
Pull out the paper cassette from the optional paper cassette unit.
|
|
|
If you find any jammed paper, gently pull out any sheets of paper that have fed part way into the product.
|
|
|
Reinsert the paper cassette.
|

If the jammed paper is not visible inside the optional paper cassette unit, or to check if there is any jammed paper inside cover G, proceed to step 4.
|
|
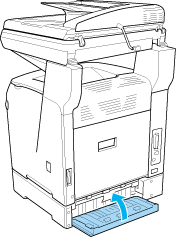
Open cover G.
|

|
|
Gently pull out any sheets of paper with both hands. Be careful not to tear the jammed paper.
|
|
|
Close cover G.
|
[Top]
When transparencies are jammed at the MP tray
When transparencies are jammed, follow the steps below to clear the jam.
|
|
Open the MP tray cover and remove all transparencies that are loaded.
|

|
|
Open cover E. Then, gently pull out any transparencies with both hands. Be careful not to tear the jammed transparency.
|
|
|
Reload the transparencies into the MP tray.
|

|
|
Open and close cover A.
|
| |
Note:
|
| | |
After removing the jammed paper from the MP tray, you need to open and close any cover except the MP tray cover to clear the error message.
|
|
[Top]
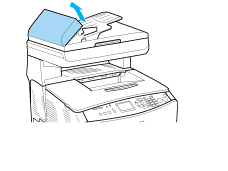
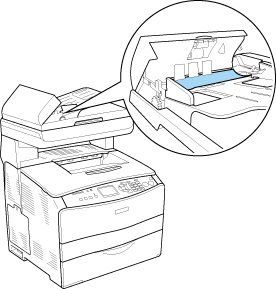
Paper jams in the Auto Document Feeder
|
|
Open the Auto Document Feeder's cover.
|
|
|
Gently pull out any sheets of paper with both hands. Be careful not to tear the jammed paper. If you cannot pull out the jammed paper, proceed to the next step.
|
|
|
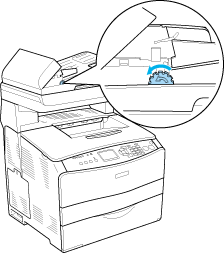
Gently pull out any sheets of paper by rolling the knob as illustrated below.
|
|
|
Close the Auto Document Feeder's cover.
|
[Top]
| Version 1.00E, Copyright © 2003, SEIKO EPSON CORPORATION |

