![]()
Reference Guide
|
|
Index |
|
Search |
|
Glossary | |||||
|
|
Contents |
|
Help |
|
||||||
|
|
|
|||||||||||||||||||||||||||||||||
Scanning / How to Scan
Turning on this product
EPSON Scan provides three modes for you to make any scanning settings; Full Auto Mode, Home Mode, and Professional Mode. This section describes how to scan an image in the Full Auto Mode. The Full Auto Mode lets you scan images using automatically-adjusted settings. For more details, see Choosing an Appropriate Scanning Mode.
| Note: |
|
| Note for Macintosh users: |
|
| Caution: |
|
 | Before turning on this product, make sure this product is connected to your computer. |
 |
Press the  On button to turn on this product. The On light on the control panel flashes then remains lit, indicating that this product has completed its initialization. On button to turn on this product. The On light on the control panel flashes then remains lit, indicating that this product has completed its initialization.
|

You can scan reflective documents (like photo or paper). See the appropriate link below to set your materials on the document table.
 | Placing Photos and Documents on the Document Table. |
You can start EPSON Scan in the following ways.
This section describes how to scan an image from EPSON Smart Panel. For details on the another way to start EPSON Scan, see Starting EPSON Scan.
|
|
Start EPSON Smart Panel. See Starting EPSON Smart Panel See Starting EPSON Smart Panel
|
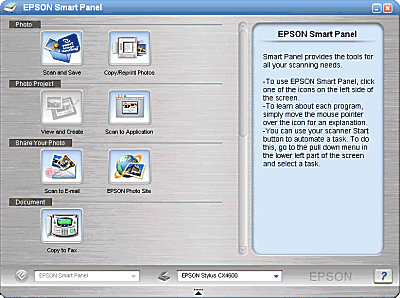
EPSON Smart Panel starts and the following window appears.
|
| Click the Scan and Save icon on the EPSON Smart Panel. |
 | Specify Location, File Name, and Image Format settings. |

 | Click Scan and Save to start scanning or Scan with Options to change the scanning settings. |
The following table lists some common image file formats. Select an appropriate format supported by your image processing application when you save image files.
|
Format (File extension) |
Explanation |
|
BMP format (*.BMP) |
BMP is a standard image file format in Windows. Most Windows applications including word processor applications can read and treat images in this format. |
|
TIFF format (*.TIF) |
TIFF is a file format which is designed for data exchange between applications such as graphics software and DTP software. |
|
JPEG format (*.JPG) |
JPEG is a compressed file format, which allows a choice in compression quality. However, if the compression is too high, the image quality deteriorates. The image quality also deteriorates every time the image file is saved in JPEG. If you edit an image file after saving it, the original image should be preserved in a file format other than JPEG. |
|
EPS format (*.EPS) |
EPS is a PostScript file format. Most illustration and DTP applications are compatible with EPS. |
|
PICT format |
PICT is a standard image file format for Macintosh. Most Macintosh applications including word processor software can read and prepare images in this format. |
|
PNG format (*.PNG) |
PNG is a portable and highly-compressed file format designed for viewing in Web browsing applications, which allows a choice in compression quality. The image quality does not deteriorate when the image file is saved in PNG. |
| Version 1.00E, Copyright © 2001, SEIKO EPSON CORPORATION |