Printing Borderless Photos
You can print your photos with no margins, extending the image all the way to the edges of the page. Although borderless printing is a bit slower, you get beautiful snapshots and enlargements, without trimming.
See Loading Paper for Borderless Photos, then see these sections for instructions on printing borderless photos:
Loading Paper for Borderless Photos
The following papers are recommended for borderless printing:
|
Paper name
|
Sizes
|
|
Epson Photo Paper
|
10 × 15 cm (4 × 6 in)
|
|
Epson Premium Glossy Photo Paper
|
A4
10 × 15 cm (4 × 6 in)
9 × 13 cm (3.5 × 5 in)
|
|
Epson Premium Semigloss Photo Paper
|
A4
|
|
Epson Matte Paper - Heavyweight
|
A4
|
|
Epson Double-Sided Matte Paper
|
A4
|
|
Epson Economy Photo Paper
|
A4
|
Note:
Borderless printing takes longer than normal printing.
Print quality may decline in the top and bottom areas of the printout, or the area may be smeared when printing on papers other than those listed above. Print a single sheet to check the quality before printing large jobs.
Load your paper as shown in Loading Paper.
Preparing the Print File
Because this option enlarges the image slightly beyond the paper size, part of the image will be cropped off.
You need to adjust the image file to the size of the paper. If your application has margin settings, make sure they are set to zero before printing.
Printing From EPSON Easy Photo Print
Using EPSON Easy Photo Print, which is included on the CD-ROM, is the easiest and quickest way to create borderless photos with this printer. EPSON Easy Photo Print also helps you enhance your photos.
Starting EPSON Easy Photo Print for Windows
Click the Start button, point to Programs or All Programs, point to EPSON Creativity Suite, then choose EPSON Easy Photo Print.
For more information, click the Help button to view instructions in the EPSON Easy Photo Print User's Guide.
Starting EPSON Easy Photo Print for Mac OS X
Double-click the Applications folder in Macintosh HD, EPSON folder, then Creativity Suite. Double-click the EPSON Easy Photo Print folder, then the EPSON Easy Photo Print for X icon.
For more information, click the Help button to view instructions in the EPSON Easy Photo Print User's Guide.
Printing From a Windows Application
- Open the File menu and select Print.
- Click the Properties or Preferences button. (If you see a Setup, Printer, or Options button, click it. Then click Properties or Preferences on the next screen.)
You see a window like this one:

- Select Photo or Best Photo as the Quality Option setting.
- Select one of the following for the paper Type option, to match the paper you are using:
- Epson Matte
- Epson Premium Glossy
- Epson Premium Semigloss
- photo papers
- Click the Borderless checkbox. Read the message and click OK.
- Select Portrait or Landscape as the orientation setting.
- Click the Page Layout tab. You see a window like this one:
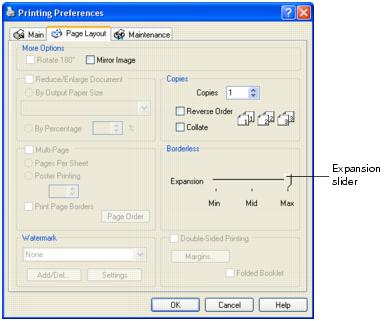
- If necessary, adjust the Expansion slider in the Borderless box to choose Min, Max, or the in-between setting.
Min retains most image area in your print, but there may be a small white edge on the borders of the print. Max expands the image to ensure that there are no unprinted edges, but the edges of the image may not appear in the print.
- Click OK.
- At the Print window, click OK or Print.
Printing From a Macintosh OS X Application
- Open the File menu and select Page Setup. You see a window like this one:
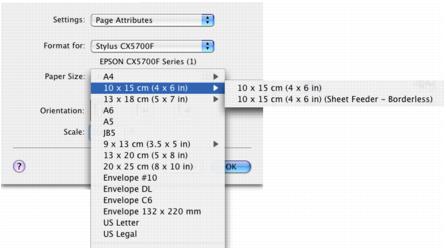
- Select Stylus CX5700F in the Format for pop-up menu.
- Select the appropriate Paper Size setting for the type of borderless printing you want.
- Select
 portrait or
  landscape as the orientation setting.
 - Click OK.
- Open the File menu and select Print.
- Select Stylus CX5700F in the Printer pop-up menu.
- Select Print Settings from the pop-up menu.
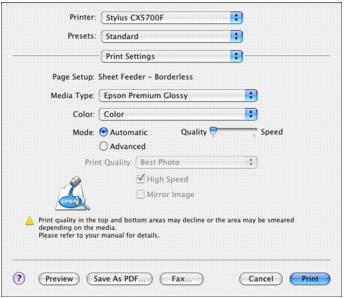
- Select one of the following for the Media Type option, to match the paper you are using:
- Epson Matte
- Epson Premium Glossy
- Epson Premium Semigloss
- photo papers
- Select Quality (for higher quality) or Speed (for faster printing) using the slider.
- Select Expansion from the pop-up menu. You see a window like this one:

- If necessary, adjust the Expansion slider to choose Min, Max, or the in-between setting.
Min retains the most image area in your print, but there may be a small white edge on the borders of the print. Max expands the image to ensure that there are no unprinted edges, but the edges of the image may not appear in the print.
- Click Print.