|

Reference Guide
|
|
Replacing Ink Cartridges
Replacing an Ink Cartridge
 Using the Control Panel
Using the EPSON Status Monitor
You can replace ink cartridges using the Control Panel or using the Status Monitor utility. Refer to the appropriate section.
 |
Note:
|
Using the Control Panel
Follow the steps below to replace an ink cartridge.
 |
Make sure this product is on.
|
 |
When the ink is empty:
Refer to the LCD panel message to see which ink cartridge is empty, and then press the  Color button. Color button.
|
When the ink is low:
Press the Setup Mode button to enter the Setup Mode and press the A button repeatedly until 5.Ink cartridge appears on the LCD panel, and then press the Color button.
The ink cartridges move to the replacement position.
 |
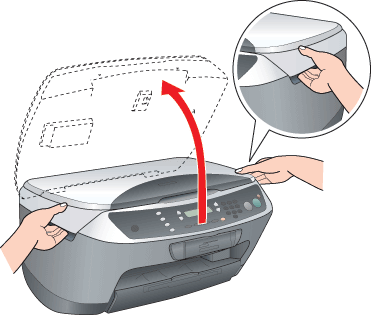
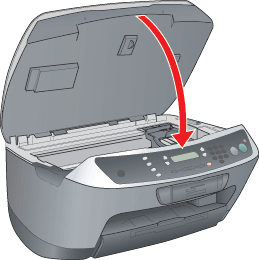
Make sure that the document cover is closed, and then open the scanner unit.
|
 |  |
Caution
|
| | -
Do not open the scanner unit when the document cover is still open.
|
|
| | -
Do not move the print head by hand. Doing so may damage this product.
|
|
| | -
Do not start replacing an ink cartridge before the print head stops.
|
|
 |
Before taking out a new ink cartridge from its package, shake it four to five times.
|

 |
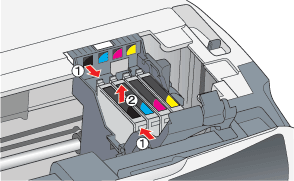
Open the cartridge cover.
|
 |
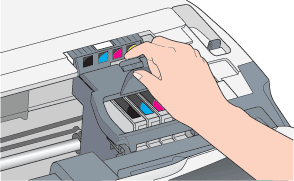
Pinch the sides of the ink cartridge that you want to replace. Lift the cartridge out of this product and dispose of it properly. Do not take the used cartridge apart or try to refill it.
|
|  |
Warning:
|
| | |
Be careful when you handle the used ink cartridges. There may be some ink around the ink supply port. If ink gets on your skin, wash the area thoroughly with soap and water. If ink gets into your eyes, flush them immediately with water. If discomfort or vision problems remain after a thorough flushing, see a doctor immediately.
|
|
| |
Caution:
|
| | |
Leave the used ink cartridge installed until just before replacement; otherwise, ink remaining in the print head nozzles may dry out.
|
|
 |
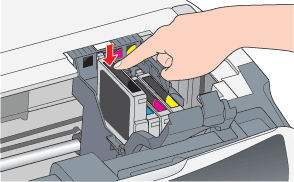
Install the new ink cartridge straight into the cartridge holder, and then press the top of the cartridge until it clicks into place.
|
If you need to replace the other ink cartridge, repeat steps 6 and 7.
 |
Close the cartridge cover.
|

| |
Note:
|
| | |
If you find it difficult to close the cartridge cover, see step 7 to make sure the ink cartridge has been installed correctly.
|
|
 |
Close the scanner unit.
|
The print head moves to its home position, and ink charging begins. Charging... appears on the LCD panel when ink charging is in progress. Charging... disappears from the LCD panel when ink charging is completed.
| |
Caution:
|
| | |
Never turn off this product while Charging... appears on the LCD panel; Otherwise, this will cause incomplete charging of the ink.
|
|
| |
Note:
|
| | |
If you install a used ink cartridge with ink level already low, it may become empty right after the replacement. In this case, replace the ink cartridge with a new one.
|
|

[Top]
Using the EPSON Status Monitor
You can monitor the remaining ink levels from your computer and view on-screen instructions for replacing a low or empty ink cartridge using EPSON Status Monitor 3 (Windows) or EPSON StatusMonitor (Macintosh).
When an ink cartridge is low or empty, click How to in the EPSON Status Monitor window. Follow the on-screen instructions to replace the cartridge.
For more information on using EPSON Status Monitor, see Using EPSON StatusMonitor for details.
Conserving black ink when the cartridge is low
The dialog box below appears when black ink becomes low and the following requirements are met:
-
Plain Paper/Bright White Paper is selected as the paper type, and Text is selected as the Quality Option.
-
There is more color ink than black ink.
-
The black ink cartridge is not empty.
-
The color ink cartridges are not low.
The dialog box gives you the option to either continue using black ink normally or conserve black ink by using a mixture of color inks to create black.
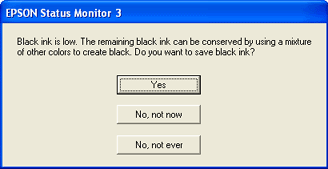
By clicking the Yes button, you can use a mixture of color inks to create black for printing black and white documents. Ink from the black ink cartridge is not used.
By clicking the No, not now button, you can continue using the remaining black ink for the job you are printing. The dialog box appears the next time you print a job that uses black ink and again gives you the option to conserve black ink.
By clicking the No, not ever button, you can continue using black ink normally. The dialog box does not appear again for the remaining life of the black ink cartridge. In this case, black ink is used normally until it runs out completely.
[Top]
| Version 1.00E, Copyright © 2001, SEIKO EPSON CORPORATION |