![]()
Online Reference Guide
|
|
Index |
|
Search |
|
Glossary | |||||
|
|
Contents |
|
Help |
|
||||||
|
|
|
|||||||||||||||||||||||||||||||||
Optimizing Scanning / Adjusting Image Quality
Making the Gray Balance Intensity setting
Color adjustments should be made after adjusting settings related to brightness and contrast. Color settings should be made in the order shown above.
This setting allows you to remove a cast (tint) from a specific color.
 |
Click the  Color Adjustment button in the Preview window. Color Adjustment button in the Preview window.
|
 | In the Color Adjustment dialog box, click the eyedropper button under Gray Balance Intensity. |
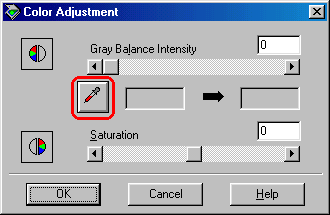
The pointer changes to an eyedropper, with movement restricted to within the Preview window.
 | Move the eyedropper to a location that contains the color whose gray balance intensity you want to adjust, and then click. |
The color you selected appears in the two boxes below the Gray Balance Intensity slider.
 | To change the gray balance intensity level of the color you selected, move the slider left or right, or enter a value in the text box. |
|
set to 100 |
|
 |
You can enter a value between 0 and 100. Changing the value causes the color in the right hand box to change accordingly. Your changes are also reflected in the image in the Preview window.
 | Note: |
| See Color Adjustment for more information on adjusting the gray balance intensity level. |
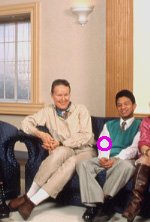
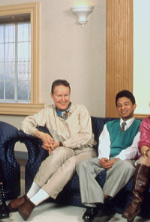
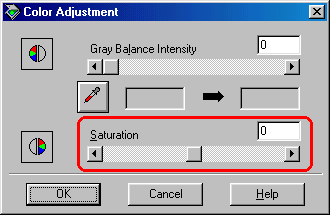
Saturation is the density of a color. Higher saturation makes the color appear richer, while lower saturation makes it appear paler.
|
original image |
set to 50 |
|
 |
 |
Follow these steps to adjust the Saturation setting.
|
|
Click the Color Adjustment button in the Preview window.
|
|
| Move the Saturation slider left or right, or input a value between -100 (lowest color density) and 100 (highest color density). |
After you have made the other color settings described in this section, you can use the tone curve to fine-tune the intensity of colors in your image.
| Note: |
| The Tone Correction feature is unavailable whenever Black & White is selected as the Pixel Depth setting and None is selected as the Halftone setting. |
Click the  Tone Correction button in the Preview window, select the Channels button for the color you want to adjust, then use the tone curve editor and Output options as explained below.
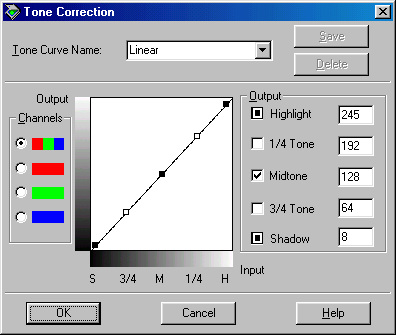
Moving the mouse pointer into the tone curve editor causes it to change to a finger. Use this pointer to drag any of the five points in the curve and change its shape. The x-axis of the curve is the brightness of the original (input values) while the y-axis is the brightness of the scanned image (output values).
To change the tone curve back to its default, select Linear from the Tone Curve Name list.
To add your settings to the Tone Curve Name list, type a name for the settings in the list, then click Save.
These are the current values for output data in accordance with the current locations of the points inside the tone curve editor. These values change when you drag points in the tone curve editor, or you can enter in values here to change the shape of the tone curve. Each value can be adjusted within a range of 0 to 255.
| Note: |
|
|
|
 Previous |
 Next |
| Version 1.00E, Copyright © 2001, SEIKO EPSON CORPORATION |