![]()
Online Reference Guide
| Index | Search | |||||||||
| Contents | Help |
|
||||||||
|
|
|
|||||||||||||||||||||||||||||||||
Scanning from the Manual Mode / Using the EPSON TWAIN Manual Mode Window
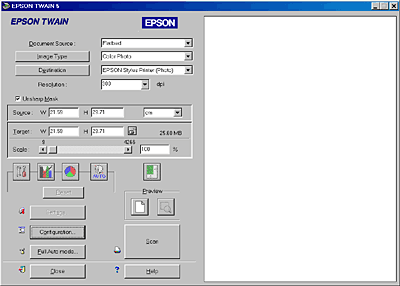
In the Manual mode, there are many more options available to give you greater control over your scanning. You can sharpen, correct, enhance or preview your images before scanning them in the Manual mode.

The Manual mode window consists of the following parts and buttons. See the table below to know the each part name and function.
|
Button |
Name |
Function |
|
- |
Document Source |
Selects a document source. See Selecting a Document Source. |
|
- |
Image Type |
Selects the type of image to be scanned. See Selecting an Image Type. |
|
- |
Destination |
Selects a destination, or output device. See Selecting a Destination. |
|
- |
Resolution |
Sets the resolution. See Setting the Resolution. |
|
- |
Unsharp Mask |
Improves image sharpness. See Selecting an Unsharp Mask. |
|
- |
Source field |
Indicates the size of the image displayed or selected in the Preview window. See Specifying Source and Target Image Sizes. |
|
- |
Target field |
Indicates size of the image when output. See Specifying Source and Target Image Sizes. |
 |
Image Controls button |
Optimizes the image. See Adjusting Brightness and Contrast. |
 |
Tone Correction button |
Optimizes the image. See Applying a preset tone curve or Making tone curve settings. |
 |
Color Adjustment button |
Optimizes the image. See Adjusting Color. |
 |
Auto Exposure button |
Automatically optimizes the exposure for an image. See Using the Auto Exposure Button. |
 |
Reset button |
Returns image control settings you modified back to their default settings. See Using the Reset Button. |
 |
Auto Locate button |
Commands the scanner to automatically locate and selects the target image. See Using the Auto Locate button. |
 |
90 Degrees Rotate button |
Rotates the selected image by 90 degrees. See Using the 90 Degrees Rotate button. |
 |
Mirroring button |
Changes the selected image to its mirror image. See Using the Mirroring button. |
 |
Full Preview button |
Previews the entire image. See Using the Full Preview Button. |
 |
Zoom Preview button |
Previews a part of the image already in the Preview window. See Preview. |
 |
Zoom Preview button |
Previews a selected thumbnail image zoomed in. See Thumbnail Preview. |
 |
Return button |
Returns the image to the thumbnail preview from the zoom preview. See Thumbnail Preview. |
 |
Scan button |
Scans the image or the active marquee in the Preview window. See Using the Scan Button. |
 |
Settings button |
Views all the settings for the currently previewed image. See Using the Settings Dialog Box. |
 |
Configuration button |
Makes settings which affect the Preview window. See Making Configuration Settings. |
 |
Full Auto mode button |
Switches to the Full Auto mode. See Scanning an Image. |
 |
Close button |
Closes the Manual mode window. |
 |
Help button |
Accesses the online help. |
 | Note: |
|
|
 | Note for Macintosh users: |
| Most illustrations shown in this section are for Windows, so they may vary in appearance from what actually appears on your screen. The instructions are the same, except as noted. |
 Next |
| Version 1.00E, Copyright © 2001, SEIKO EPSON CORPORATION |