Printing Borderless Photos on Cut Sheets


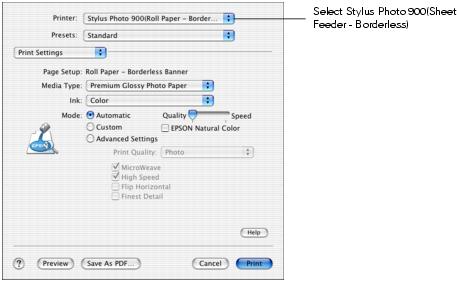
You can print your photos with no margins, extending the image all the way to the edges of the page.

Note: For instructions on printing borderless photos on roll paper, see Printing on Roll Paper.

Although borderless printing is a bit slower, you get beautiful snapshots and enlargements, without trimming, on these papers and sizes:

Paper name
Sizes
Paper type or Media Type setting
EPSON Matte Paper Heavyweight
8 × 10
Letter (8.5 × 11 inches)
Matte Paper - Heavyweight
EPSON Glossy Photo Paper
Letter (8.5 × 11 inches)
Glossy Photo Paper
EPSON Photo Paper
Letter (8.5 × 11 inches)
Photo Paper
EPSON Premium Glossy Photo Paper
4 × 6
5 × 7
8 × 10
Letter (8.5 × 11 inches)
Premium Glossy Photo Paper
EPSON Premium Semigloss Photo Paper
Letter (8.5 × 11 inches)
Premium Glossy Photo Paper
EPSON Premium Luster Photo Paper
Letter (8.5 × 11 inches)
Premium Luster Photo Paper

Load paper as shown below.

See these sections for instructions on selecting printer settings:

Windows

  1. Start your photo program and open your photo.
  2. Open the File menu and click Print.
  3. Click Properties or Preferences. You see the following:


  4. Select Photo or Best Photo as the Quality Type setting.
  5. Choose Sheet as the paper Source setting.
  6. Select one of the following paper types:
    • Matte Paper - Heavyweight
    • Photo Paper
    • Glossy Photo Paper
    • Premium Glossy Photo Paper
    • Premium Luster Photo Paper
    • Premium Semigloss Photo Paper
  7. Click the Borderless checkbox. Read the message and click OK.
  8. Select your paper Size setting
  9. Select Portrait or Landscape as the orientation setting.
  10. Click OK, then click OK or Print.

Macintosh OS 8.6 to 9.x

  1. Start your photo program and open your photo file.
  2. Open the File menu and click Page Setup. You see the following:


  3. Select your Paper Size.
  4. Choose Auto Sheet Feeder as the Paper Source.
  5. Click the Borderless checkbox. Read the message and click OK.
  6. Select Portrait or Landscape as the orientation setting.
  7. When you have finished making page setup settings, click OK.
  8. Open the File menu and click Print.
  9. Select one of the following Media Types:
    • Matte Paper - Heavyweight
    • Photo Paper
    • Glossy Photo Paper
    • Premium Glossy Photo Paper
    • Premium Luster Photo Paper
    • Premium Semigloss Photo Paper
  10. Select Quality (for higher quality) or Speed (for faster printing) using the slider.
  11. Click Print.

Macintosh OS X

  1. Start your photo program and open your photo file.
  2. Open the File menu and click Page Setup. You see the following:


  3. Select Stylus Photo 900(Sheet Feeder - Borderless) in the Format for drop-down list.
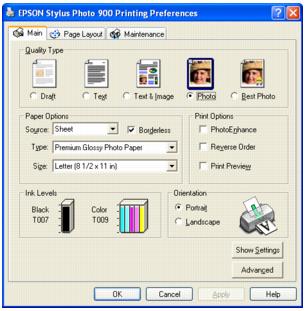
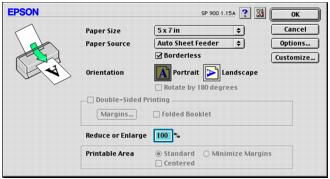
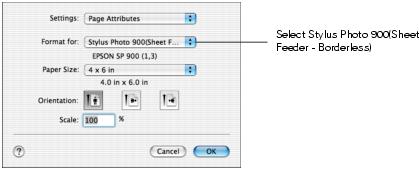
  4. Caution: When printing borderless photos, select one of the supported paper sizes listed in this table; never select a custom or unsupported paper size or ink may spray inside your printer.

  5. Select your Paper Size.
  6. Select your document or image orientation.
  7. Click OK.
  8. Open the File menu and click Print. You see the following:


  9. Select Stylus Photo 900(Sheet Feeder - Borderless) in the Printer drop-down list.
  10. Note: Make sure you chose the same printer that you selected in step 3.

  11. Select Print Settings from the list.
  12. Select one of the following Media Types:
    • Matte Paper Heavyweight
    • Photo Paper
    • Glossy Photo Paper
    • Premium Glossy Photo Paper
    • Premium Luster Photo Paper
    • Premium Semigloss Photo Paper
  13. Select Quality (for higher quality) or Speed (for faster printing) using the slider.
  14. Click Print.