|

Scanner Reference
|
|
Advanced Scanning / Using the Preview Window
Thumbnail Preview
 Using the Zoom Preview button
 Using the Return button
 Rotating
by 90 Degrees
 Mirroring
When you scan transparent materials, you can preview images
in the thumbnail layout. EPSON TWAIN automatically locates the frames of the
film and applies the Auto Exposure feature to each image. You can modify each
thumbnail image and make additional adjustments.

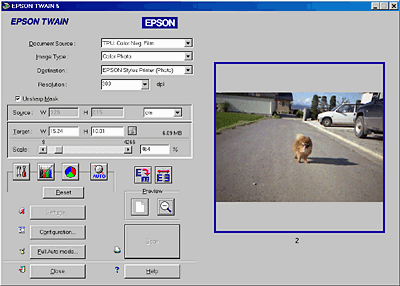
Each thumbnail image is assigned a sequential number which
appears under the image. Click the image number check box you want, and then
click Scan. At least one thumbnail image must be selected; you cannot
clear all of the image number check boxes.
To modify a thumbnail image, click to select it and then choose the appropriate settings. The selected image has a blue frame around it.
Functions available only in this Thumbnail preview are listed in the table below.
In the Thumbnail preview, you cannot create a marquee. If
you want to change the scanning area, uncheck Automatic Thumbnail
Preview for Film in the Configuration dialog box and switch to the Preview
mode to use a marquee. See Using a marquee.
 |
Note:
|
 |
- The Image Type button, Destination
button, and
 Auto
Locate button are not displayed in the Thumbnail preview.
The Source size, Lock button, and Settings button
are grayed out and not available. Auto
Locate button are not displayed in the Thumbnail preview.
The Source size, Lock button, and Settings button
are grayed out and not available.
|
|
 | -
The Image Type, Destination, Resolution, Unsharp Mask and Units menus apply to all of the images in the Thumbnail preview.
|
|
 |
- In the Thumbnail preview, the Auto Exposure
feature applies to each thumbnail image after previewing.
|
|
 | -
Color Photo and Black & White Photo are available in the Image Type list.
|
|
 |
- While the image is being previewed in high
resolution, the rotation and mirroring features work more slowly.
|
|
 |
- If you want to make more settings or scan
non-standard film sizes, uncheck Automatic Thumbnail Preview
for Film in the Configuration dialog box and switch to the
Preview mode. See Making
Configuration Settings.
|
|
 |
Note for Perfection 1660
Photo and 2400 Photo: |
 |
| If multiple slides are scanned using the optional
Film Adapter and then displayed in the Thumbnail preview, the sequence
of images does not follow the actual order of the scanned slides.
The sequence starts from the top right image and runs vertically.
|
|
Using the Zoom Preview button
To enlarge a thumbnail image, use this button. After selecting a desired thumbnail image in the Preview window, click the  Zoom Preview button. The selected image is zoomed in as shown below.

You can modify a zoomed image. To scan an image, you need
to return to the Thumbnail preview by clicking the  Return button. See Using
the Return button.
 |
Note:
|
 |
- You cannot scan a zoomed image.
|
|
 |
- Double-click a thumbnail image to zoom in.
|
|

[Top]
Using the Return button
Clicking the  Return button restores the image to its Thumbnail preview. This button is available only when the image is zoomed as described in Using the Zoom Preview button.
 |
Note:
|
 |
| Double-click a zoomed image to return to the
Thumbnail preview. |
|

[Top]
Rotating
by 90 Degrees
Click the  90 Degrees
Rotate button to turn the selected image clockwise by 90 degrees. Each click
turns the image by 90 degrees.
 |
Note for Perfection 1660 Photo
and 2400 Photo: |
 |
| 35-mm film images are automatically rotated clockwise
by 90 degrees; your film holder is positioned vertically. |
|

[Top]
Mirroring
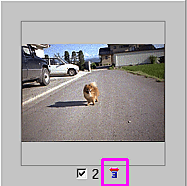
Click the  Mirroring button to change the selected image to the mirror image. A small icon appears under the mirror image in the Preview window.


[Top]
| Version 1.00E, Copyright © 2001, SEIKO EPSON CORPORATION |
![]()
Using the Zoom Preview button
Using the Return button
Rotating by 90 Degrees
Mirroring


 Zoom Preview button. The selected image is zoomed in as shown below.

 Return button. See Using
the Return button.
  Return button restores the image to its Thumbnail preview. This button is available only when the image is zoomed as described in Using the Zoom Preview button.
 90 Degrees
Rotate button to turn the selected image clockwise by 90 degrees. Each click
turns the image by 90 degrees.
  Mirroring button to change the selected image to the mirror image. A small icon appears under the mirror image in the Preview window.


