![]()
Reference Guide
|
|
Index |
|
Help |
|
Safety | |||||
|
|
Contents |
|
Glossary |
|
||||||
|
|
|
|||||||||||||||||||||||||||||||||
How to
Remove moiré patterns from scanned images
EPSON Scan provides you with a variety of settings to improve the quality of your scanned images. You can easily adjust the quality of the image by selecting from the adjustments in the setting window.
You can remove the cross-hatch pattern called "moiré" which tends to appear happen in areas of halftone color such as skin color when scanning printed documents. Follow the steps below to remove these patterns.
| Note: |
|
|
|
|
 | Select the Descreening Filter check box in the Adjustments section (you may need to scroll to the bottom of the screen). |

 | Click the + mark (Windows) or the arrow (Macintosh) to the left, then select a Screen Ruling for the image being scanned. (In the Home Mode, this function is not available.) |
|
Descreening Filter not applied |
Descreening Filter applied |
 |
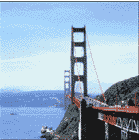 |
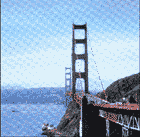
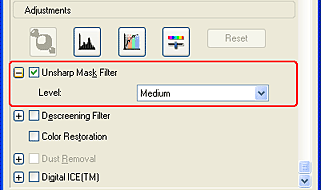
If your scanned images are not sharp enough, you can improve their sharpness by using the Unsharp Mask Filter in Professional Mode. (This feature is automatically enabled in the Home Mode.) Follow the steps below.
| Note: |
|
|
| Select the Unsharp Mask Filter check box in the Adjustments section (you may need to scroll to the bottom of the screen). |
|
| Click the + mark (Windows) or the arrow (Macintosh) to the left, then select an adjustment level. |
|
Unsharp Mask Filter not applied |
Unsharp Mask Filter applied |
 |
 |
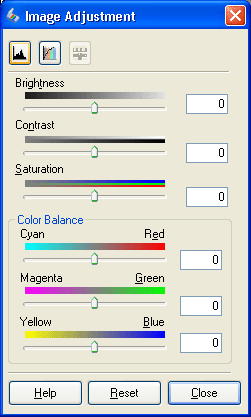
You can liven up the colors of a scanned image by adjusting the brightness, contrast, or color balance. Follow the steps below.
| Note: |
|
|
| Click the Image Adjustment button. |

|
| Adjust the items you want to change by sliding the tabs. |
|
Image Adjustment not applied |
Image Adjustment applied |
 |
 |
 | Close the Image Adjustment window by clicking the Close button. |
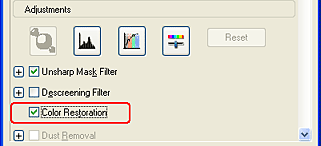
Color Restoration is a scanner software feature that restores faded color on film and photographs. Select the Color Restoration check box in the Adjustments section to restore color (you may need to scroll to the bottom of the screen).
| Note: |
|
|
EPSON Scan provides two features for removing dust and scratches: Dust Removal and Digital ICE™.
Dust Removal
Dust Removal is a scanner software feature that removes dust on scanned film. For detaileds on scanning with the Dust Removal feature, see Dust Removal.
| Note: |
|
Digital ICE
Digital ICE is a scanner hardware feature that removes dust and scratches on scanned film and photographs. For details on scanning with Digital ICE, see Digital ICE.
| Note: |
|
Compared to Dust Removal, Digital ICE gives you much higher correction quality in scanned images. However, Digital ICE requires more system resources and a longer scanning time. Therefore, use Digital ICE only when you cannot correct the scanned images using Dust Removal.
The following table lists the differences between Dust Removal and Digital ICE.
|
|
Dust Removal |
Digital ICE™ |
|
Correction quality |
Medium |
High |
|
Scanning time |
Short |
Long |
|
Required system resources |
Small |
Large |
The following table lists document types supported by Dust Removal and Digital ICE.
|
|
Dust Removal |
Digital ICE |
|
Color negative film |
 |
|
|
Color positive film |
|
|
|
Monochrome negative film |
|
N/A |
|
Monochrome positive film |
|
N/A |
|
Photograph (Reflective) |
N/A |
|
|
: Supported
|
| Note: |
|
|
| Note on Digital ICE: |
|
|
|
|
|
|
Windows |
|
|
OS |
Microsoft® Windows® 98SE/Me/2000/XP |
|
CPU |
Intel® Pentium® 233 MHz or higher (Pentium III 500 MHz or higher recommended) |
|
RAM |
128MB or more of available memory (512MB or more recommended) |
|
Interface |
USB 1.x, USB 2.0, IEEE 1394 with 6 pin-6 pin cable (USB 2.0 or IEEE 1394 recommended) |
|
Macintosh |
|
|
OS |
Mac OS X 10.2.x to 10.3.x |
|
CPU |
Power Macintosh® G3 or higher (Power Macintosh G4 500 MHz or higher recommended) |
|
RAM |
128MB or more of available memory (512MB or more recommended) |
|
Interface |
USB 1.x, USB 2.0, FireWire with 6 pin-6 pin cable (USB 2.0 or FireWire recommended) |
The following table lists an example of the hard disk space and system memory required to scan photographs and film using the Digital ICE feature:
|
|
Resolution |
HDD space |
System Memory |
|
4 x 6 inch (102 x 152 mm) photograph |
600 dpi |
157MB |
185MB |
|
4800 dpi |
626MB |
370MB |
|
|
A4 size (8.3 x 11.7 inch) photograph |
600 dpi |
631MB |
255MB |
|
4800 dpi |
2524MB |
510MB |
|
|
35mm film |
150 dpi |
1MB |
8MB |
|
300 dpi |
1MB |
15MB |
|
|
600 dpi |
4MB |
30MB |
|
|
1200 dpi |
16MB |
59MB |
|
|
2400 dpi |
63MB |
117MB |
|
|
3600 dpi |
142MB |
175MB |
|
|
12800 dpi |
251MB |
233MB |
|
|
Medium format (114 x 56 mm) film |
150 dpi |
4MB |
34MB |
|
300 dpi |
8MB |
70MB |
|
|
600 dpi |
29MB |
139MB |
|
|
1200 dpi |
116MB |
277MB |
|
|
2400 dpi |
464MB |
553MB |
|
|
3600 dpi |
1042MB |
830MB |
|
|
12800 dpi |
1853MB |
1106MB |
|
|
4 x 5 inch (94 x 118 mm) film |
150 dpi |
4MB |
36MB |
|
300 dpi |
13MB |
72MB |
|
|
600 dpi |
51MB |
144MB |
|
|
1200 dpi |
202MB |
28 MB |
|
|
2400 dpi |
805MB |
573MB |
|
|
3600 dpi |
1811MB |
859MB |
|
|
12800 dpi |
3219MB |
1145MB |
Resolutions stated in the above table are actual scanning resolutions supported by Digital ICE, which do not equal the resolutions that you specify in the scanner software. For example, if you specify 200 dpi in the scanner software, an image is scanned and processed by Digital ICE in 300 dpi, then converted to 200 dpi. Therefore, be sure that the system meets requirements listed in the table above before scanning with Digital ICE.
| Note: |
|
|
Follow the steps below to remove dust on film using Dust Removal in Professional Mode.
|
| Place your film on the document table. |
 | Placing Film on the Document Table |
| Note: |
|
|
| Start EPSON Scan and select Professional Mode. For details on selecting the scanning mode, see Changing the scanning mode. |
The following window appears.

|
| Select the Original and Destination settings that match the film you placed on the document table. Be sure to select Film (with Film Holder) or Film (with Film Area Guide) as the Document Type. |

 | Click Preview to preview the images. |
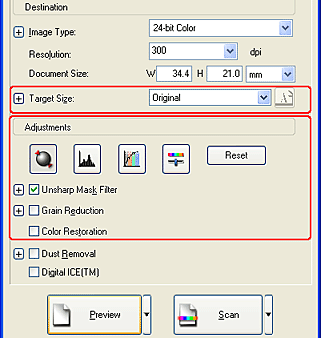
 | Use the Target Size setting to select the output size of the scanned image. Also, select Adjustments, if necessary. See Create Beautiful Reproductions for details. (You may need to scroll to the bottom of the screen.) |
 | Select the Dust Removal check box. (You may need to scroll to the bottom of the screen.) |
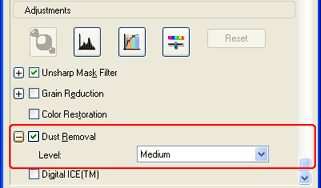
Click the + mark (Windows) or the arrow (Macintosh) to the left, then select an adjustment level.
| Note: |
|
 | Click Scan to start scanning. |
The scanned images are saved to the specified folder.
Follow the steps below to remove dust and scratches on film or photographs using Digital ICE in Professional Mode.
|
| Place your document on the document table. |
| Placing Film on the Document Table |
| Placing Documents and Photographs on the Document Table |
|
| Start EPSON Scan and select Professional Mode. For details on selecting the scanning mode, see Changing the scanning mode. |
The following window appears.
|
| Select the Original settings that match the document you placed on the document table. |
| Note: |
|
|
| Select Destination settings for your scanned image file. |

Select an image type supported by Digital ICE listed in the table below:
|
Image Type |
48-bit Color, 24-bit Color, 16-bit Grayscale, 8-bit Grayscale |
|
| Click Preview to preview the image. |
|
| Use the Target Size setting to select the output size of the scanned image. Also, select Adjustments, if necessary. See Create Beautiful Reproductions for details. (You may need to scroll to the bottom of the screen.) |
|
| Select the Digital ICE™ check box. (You may need to scroll to the bottom of the screen.) |
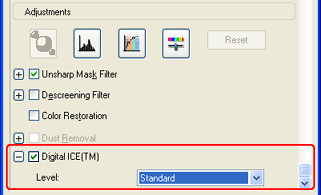
Click the + mark (Windows) or the arrow (Macintosh) to the left, then select an adjustment level..
|
Digital ICE not applied |
Digital ICE applied |
|
Film |
|
 |
 |
|
Photograph |
|
 |
 |
| Note: |
|
|
|
 | Click Scan to start scanning. |
| Note: |
|
The scanned images are saved to the specified folder.
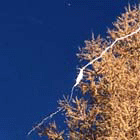
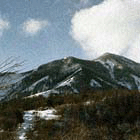
When grain appears in scanned images, select the Grain Reduction check box, then click Scan again to reduce it. Selecting a higher Grain Reduction level makes the scanned image softer.
| Note: |
|
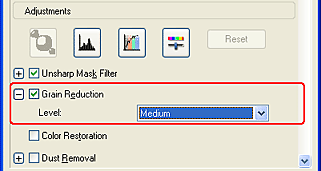
Check if the result of Grain Reduction appears on the scanned image.
|
Grain Reduction not applied |
Grain Reduction applied |
 |
 |
| Note: |
|
 Previous |
 Next |
| Version 1.00E, Copyright © 2003, SEIKO EPSON CORPORATION |