![]()
Reference Guide
|
|
Index |
|
Help |
|
Safety | |||||
|
|
Contents |
|
Glossary |
|
||||||
|
|
|
|||||||||||||||||||||||||||||||||
Maintenance
Uninstalling EPSON Scan
If you are using a scanner and are planning to upgrade your system, follow the instructions below.
 | Uninstall EPSON Scan. See Uninstalling EPSON Scan. |
 | Turn off your computer and scanner, then disconnect your scanner from the computer. |
 | Turn on the computer and upgrade the system. |
 | Make sure that the system is upgraded correctly, then shut down your computer. |
 | Start your computer and install EPSON Scan, following the instructions on the Start Here poster. |
 | Connect the scanner to the computer and turn it on. |
Follow the steps for your operating system to uninstall EPSON Scan.
| Note: |
|
|
| Turn off the scanner and disconnect the scanner from the computer. |
|
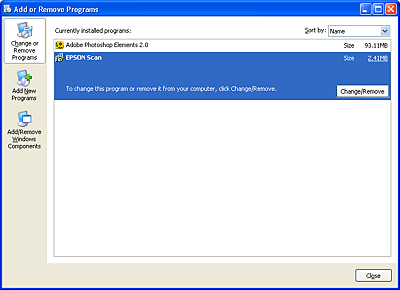
| In Control Panel, double-click the Add or Remove Programs icon (Windows XP) or the Add/Remove Programs icon (Windows Me, 98 SE, or 2000). |

|
| Select EPSON Scan from the list, then click Change/Remove (Windows XP or 2000) or Add/Remove (Windows Me or 98 SE). |
|
| A confirmation dialog box appears. Click Yes. |
|
| Follow the on-screen instructions. |
|
| Click Finish to complete the uninstall. In some cases, a message may appear prompting you to restart the computer; make sure Yes, I want to restart my computer now is selected and then click Finish. |
|
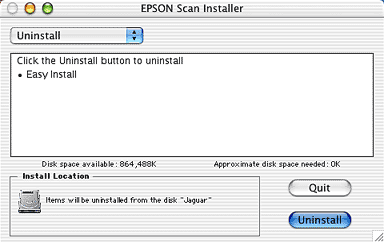
| Insert the software CD into the CD-ROM drive. |
|
| Double-click the ESCAN folder and double-click the EPSON Scan Installer icon. |
If the Authorization window opens, enter the administrator's name and password, then click OK.
|
| After the initial screen, click Accept. The Installer dialog box appears. |
|
| Select Uninstall from the pull down menu at the top left, then click Uninstall. |
 Previous |
 Next |
| Version 1.00E, Copyright © 2003, SEIKO EPSON CORPORATION |