|

Reference Guide
|
|
Printing with Mac OS 8.6 to 9.x
Basic Settings
 Making the printer driver settings
Canceling printing
Making the printer driver settings
This section describes the basic printer driver settings to print your data.
To make the basic printer driver settings, follow these steps.
 |
Note:
|
 | |
While many Macintosh applications override the settings made in the printer driver, some do not, so you must verify the settings to get the results you expect.
|
|
 |
Click Page Setup on the File menu of your application. The Page Setup dialog box appears.
|

 |
Select the paper size loaded in the printer from the Paper Size.
|
 |
Select the type of paper loaded in the printer from the Paper Source.
|
 |
Make settings for Orientation and Reduce or Enlarge as necessary.
|
When Roll Paper or Roll Paper (Banner) is selected as the Paper Source, make Roll Paper Option settings as needed. See Making the Roll Paper Option settings.
 |
After making your settings, click OK to close the Page Setup dialog box.
|
 |
Click Print on the File menu of your application. The Print dialog box appears.
|

| |
Note:
|
 |
Make the settings for Copies and Pages.
|
 |
Make the Ink setting. Select Color/B&W Photo to print color or monotone photos, or Black to print a draft or black text only.
|
| |
Note:
|
| | |
When printing on any media other than tracing paper, we recommend Color/B&W Photo even if the data to be printed is black.
|
|
 |
Make the Mode setting. Make sure that Automatic is selected.
|
| |
Note:
|
| | |
When Automatic is selected, the printer driver takes controls of all detailed settings based on the current Media Type setting and Ink settings.
|
|
 |
Adjust Speed and Quality in the Mode box if a slider appears. Drag the slider left or right depending on which is more important.
|
| |
Note:
|
| | |
According to the Media Type you choose, a slider may not appear in the Mode box.
|
|
 |
Click Print to start printing.
|

[Top]
Canceling printing
To cancel the printing in progress, follow these steps.
 |
Caution:
|
| |
When you stop printing in progress, you may need to start printing again from the beginning for best result. Otherwise misalignment or banding may appear on the printed data.
|
|
When background printing is on
|
|
Select EPSON Monitor IV from the Application menu at the right end of the menu bar.
|
|
|
Turn off the printer.
|
|
|
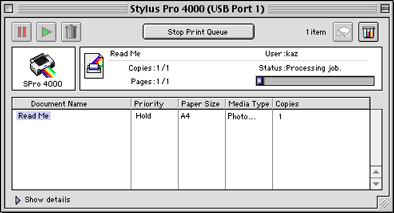
Click the name of data which is in print process on the screen, then click  Stop to cancel the print job. Stop to cancel the print job.
|
When background printing is off
|
|
Turn off the printer.
|
|
|
Hold down the  Command key on your keyboard, and press the [.] period key to cancel the print job. Command key on your keyboard, and press the [.] period key to cancel the print job.
|
[Top]
| Version 1.00E, Copyright © 2001, SEIKO EPSON CORPORATION |


