|
 Loading cut sheet media Loading cut sheet media
 Printing on thick paper (0.5 mm or thicker) Printing on thick paper (0.5 mm or thicker)
To load cut sheet media, follow the steps below. To load thick paper (0.5 mm or thicker), see Printing on thick paper (0.5 mm or thicker).
 |
Note:
|
 |
You may want to set the paper basket before printing. See Setting the Paper Basket. (In the illustrations below the paper basket is set to feed paper backwards.) |
 |
Make sure that the printer is on and the roll paper cover is closed.
|
 |
Press the Paper Source button repeatedly until the Sheet light is on.
|
 |
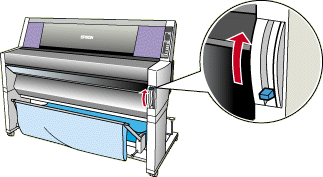
Make sure the Operate light or Pause light is not flashing, then pull the paper set lever all the way up. The Paper Out light turns on and "LOAD PAPER" appears on the LCD panel.
|
 |
Caution:
|
 |
Do not move the paper set lever up while the Operate light or Pause light is flashing. Otherwise, damage may occur.
|
 |
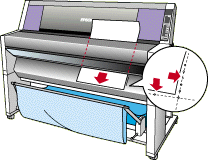
Load the sheet into the paper insertion slot until it comes out below. Make sure that the right and bottom edges of the sheet are straight and in line with the rows of punch holes.
|
 |
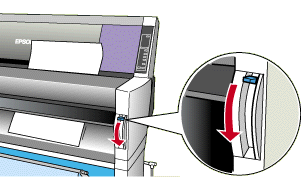
Push the paper set lever all the way down. "PRESS PAUSE BUTTON" appears on the LCD panel.
|
 |
Press the Pause button.
|
The print heads move and the sheet feeds into the printing position automatically. "READY" appears on the LCD panel.
 |
Note:
|
 |
Even if you do not press the Pause button, the print heads move and paper feeds into the printing position automatically. "READY" appears on the LCD panel.
|
 |
Note:
|
 |
Make sure that the Paper Source setting in the printer driver matches the paper loaded in the printer.
|
 |
When printing finishes, the printer supports the printed media, and "PAPER OUT" is displayed. To remove the media, hold it while pulling the paper set lever all the way up. The paper can be removed from the printer.
|
![[Top]](images/top.gif) [Top] [Top]
When you load thick cut sheets, such as cardboard, follow the steps below.
 |
Note:
|
 | -
Do not load thick paper larger in size than B1 (728 x 1030 mm); otherwise, paper jams may occur.
|
 | -
Always load B1 (728 x 1030 mm) sized thick paper long edge first. You may want to select the Landscape setting in your printer driver.
|
 |
Make sure that the printer is on.
|
 |
Press the Paper Source button repeatedly until the Sheet light is on.
|
 |
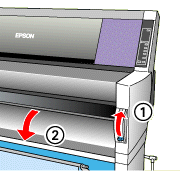
Make sure that the Operate light or Pause light is not flashing, then pull the paper set lever all the way up. The Paper Out light turns on and "LOAD PAPER" appears on the LCD panel. Open the lower cover.
|
 |
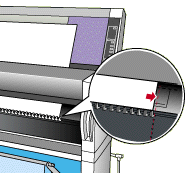
Load the sheet into the paper insertion slot so that the bottom edge of the paper rests behind the open lower cover. Make sure that the right edge is straight and in line with the vertical row of punch holes.
|
 |
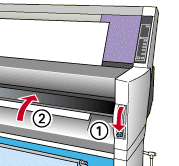
Push the paper set lever all the way down, then close the lower cover. "PRESS PAUSE BUTTON" appears on the LCD panel.
|
 |
Press the Pause button. Then follow the same procedure as for other cut sheets.
|
![[Top]](images/top.gif) [Top] [Top]
|