|
 Using the Progress Meter Using the Progress Meter
Using the EPSON Spool Manager
Using EPSON Status Monitor 2
When you send a print job to the printer, the Progress Meter appears on your computer screen.
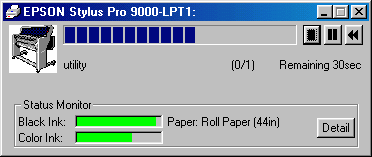
This meter shows the progress of the current print job and provides printer status information when bidirectional communication between the printer and computer is established.
 |
Note:
|
-
If the Status Monitor 2 utility is not installed, the amount of ink remaining cannot be shown, nor can you access the Detail button to see more detailed information from the Printer Status window. To install this utility, see Installing the Status Monitor 2.
-
The Progress Meter does not appear when Show Progress is turned off in the Speed & Progress dialog box. See Using Speed & Progress for information.
You can control printing from the Progress Meter using the stop, pause, and reprint buttons as explained below.
|

|
Stop
|
Cancels printing
|
|

|
Pause
|
Pauses printing until you press it again
|
|

|
Reprint
|
Reprints the page currently being printed.
|
![[Top]](images/top.gif) [Top] [Top]
The EPSON Spool Manager is similar to Windows Print Manager. If it receives two or more print jobs at one time, it puts them in a line (or print queue) in the order received. When a print job reaches the top of the line, the EPSON Spool Manager sends the job to the printer.
Click the EPSON Stylus Pro 9000 button after it appears on the taskbar. You can see the status and information on the print jobs in line. You can also cancel, pause and resume, or restart selected print jobs using the Spool Manager.
 [Top]
[Top]
If you installed the Status Monitor 2 utility, you can get detailed information on the current status of the printer.
|
Note:
|
 | -
Before using the Status Monitor, be sure to read the README file located in the EPSON Status Monitor 2 folder in the Epson folder on your hard drive.
|
To use Status Monitor 2, you need to install the software as described below:
|
Note:
|
|
If you installed Status Monitor 2 when you installed the printer software, you do not need to reinstall it.
|
 |
Make sure Windows is running. Insert the printer software CD-ROM in the CD-ROM drive. (For printer software floppy disk users, insert the floppy disk into a disk drive.)
|
 |
If a dialog box appears, click Quit.
|
 |
Click Start, and select Run.
|
 |
Type D:\STM2\SETUP. If the CD-ROM drive has a drive letter other than "D" or if you are using the floppy disk version, substitute the appropriate letter (for example, A:\SETUP).
|
 |
Click OK, then follow the instructions on the screen.
|
|
Note:
|
|
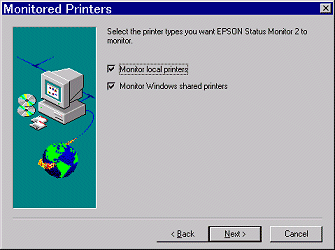
The following dialog box may appear. If your EPSON Stylus Pro 9000 is connected directly to your computer, select the Monitor local printers check box. If it is connected through a network, select the Monitor Windows shared printers check box. Then click Next.
|
There are two ways to access EPSON Status Monitor 2:
-
Double-click the printer-shaped background monitoring icon on the taskbar at the bottom of your computer screen.
|
Note:
|
|
You must restart your computer after installing EPSON Status Monitor 2 to view the background monitoring icon.
|
-
Click Start, point to Programs, click Epson, and then click EPSON Status Monitor 2.
You see the Status Monitor 2 window:

The EPSON Status Monitor 2 window displays the following information:
|
Printer icons
|
The color of the printer icon indicates the current printer status.
Green: Ready.
Yellow: Maintenance is necessary.
Red: Error has occurred
Dimmed: Communication problem between Status Monitor 2 and printer.
|
|
Printer Name
|
The name of the EPSON printer connected directly to your computer appears in this column.
|
|
Status
|
Brief messages appear regarding the current status of the printer.
|
|
Job Count
|
Shows the number of print jobs in queue.
Note:
Select Job Status on the Printer menu or click the Job Status icon on the tool bar, for more information.
|
|
Note:
|
| -
You can add or delete printers from the list. To save computer memory, delete printers you do not need to monitor. (This does not remove the printer driver from your computer.) Choose Add Printer or Delete Printer on the Settings menu.
|
| -
You can rearrange the order of the printers in the list. Click the Printer Name, Status, or Job Count title bar to change the order of the printers.
|
| -
You can control the contents of the Status Monitor 2 window using the View menu. See the Status Monitor's online help.
|
To get more detailed information, you can access the Printer Status window by double-clicking the printer name, by selecting the printer and then choosing Printer Status on the Printer menu, or by selecting the printer and then clicking the Printer Status icon on the tool bar.
The Printer Status window appears as shown below:

|
Note:
|
|
You can also access the Printer Status window from the Status Alert dialog box or the EPSON Status Monitor 2 utility. See Making monitoring preference settings for information on the Status Alert dialog box. |
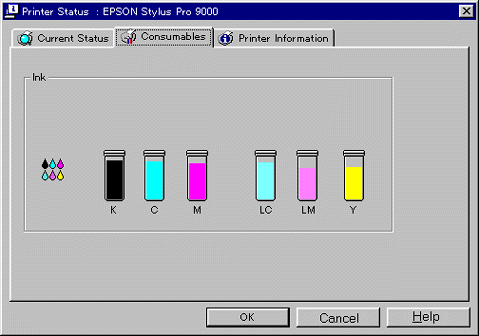
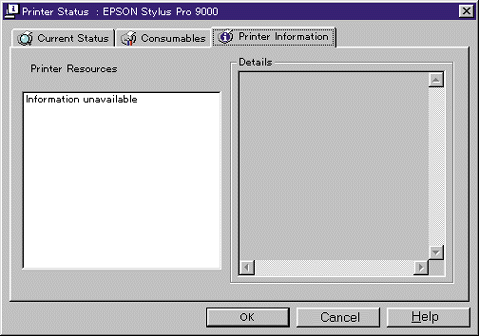
You can open the three menus described below by clicking the tabs at the top of the Printer Status window.
Provides you with detailed printer status information, a graphic display, and status messages. If a printer error occurs, troubleshooting tips appear in the bottom message box. When ink runs low, clicking the Replace Ink Cartridge button displays cartridge replacement instructions.
Provides you with detailed information on the amount of ink remaining.
Provides you with information on network connections and other printer resources (for printers connected over a network). For details, see the Status Monitor's online help.
The Monitoring Preferences dialog box allows you to turn on the background monitoring feature and specify the monitoring interval (length of time between status information updates) for the selected printer.
|
|
Make sure Status Monitor 2 is active. (It is active if a printer-shaped icon appears on the taskbar at the bottom of your computer screen.) If the Status Monitor is inactive, open the EPSON Status Monitor 2 window from Start, as described in Accessing EPSON Status Monitor 2. Then point to Background Monitoring on the Settings menu and click Monitor from restart or Monitor now. |
|
Note:
|
|
The Background Monitoring and Status Alert settings are not available while the Status Monitor is inactive.
|
|
|
Select the printer you want to monitor from the Installed Printers list, and then click Monitoring Preferences on the Settings menu. The dialog box below appears.
|

The following settings are available:
You can adjust the monitoring interval by dragging the slider.
|
Note:
|
|
Setting a short monitoring interval may slow down some applications.
|
Select this check box if you want the Status Alert dialog box to appear automatically and inform you of the printer status while you are using some application programs. Use the Status Alert options to select when you want the Alert dialog box to appear.
Select the check boxes to specify when you want the Status Alert dialog box to appear.
|
|
Click OK to save your settings.
|
|
Note:
|
|
If you want the Status Alert dialog box to appear in front of other windows on the desktop, right-click the background monitoring icon and choose Show on Top.
|
[Top]
|