 |
|
|||
 |
||||
Removing Dust Marks with the Dust Removal Feature
Using the Dust Removal feature in Epson Scan, you can virtually “clean” the dust marks from your originals as you scan them.
Before scanning your originals, carefully remove any dust that you can see on them.
|
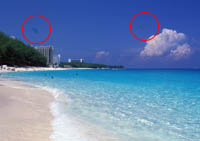
Original image
|
Dust Removal applied
|
 |
 |
 Note:
Note:|
Before scanning your originals, carefully remove any dust that you can see on them.
Do not use Dust Removal to scan your originals that do not contain dust or scratch marks; otherwise your scanned image may be distorted or blurred.
When you scan film or slides, the Dust Removal feature is available for Full Auto Mode or Professional Mode only (it is not available for Home or Office Mode). To remove dust marks from color film or slides in Home Mode, use the DIGITAL ICE Technology feature as described in Removing Dust and Scratch Marks from Originals Using DIGITAL ICE Technology.
If you still have dust marks on color film or slides after using the Dust Removal feature, try scanning it again using DIGITAL ICE Technology as described in Removing Dust and Scratch Marks from Originals Using DIGITAL ICE Technology.
This feature is not available if the DIGITAL ICE Technology check box is selected.
|
See one of these sections for instructions on removing dust marks from your original(s).
Full Auto Mode: Dust Removal in Full Auto Mode
Office Mode: This feature is not available in Office Mode. Change the scan mode to Full Auto Mode or Professional Mode. See Changing the Scan Mode for instructions.
Home Mode: This feature is not available in Home Mode. Change the scan mode to Full Auto Mode or Professional Mode. See Changing the Scan Mode for instructions.
Professional Mode: Dust Removal in Professional Mode
Dust Removal in Full Auto Mode
 |
Place your original(s) on the document table. See one of these sections for instructions.
|
Documents or photos: Placing Documents or Photos
Film or slides: Placing Film or Slides
Note for film or slides:|
You can only scan 35 mm color film strip or color positive slides in Full Auto Mode. To scan other types of film, use Home Mode or Professional Mode. To change the scan mode, see Changing the Scan Mode.
|
 |
Start Epson Scan. See Starting Epson Scan for instructions.
|
 |
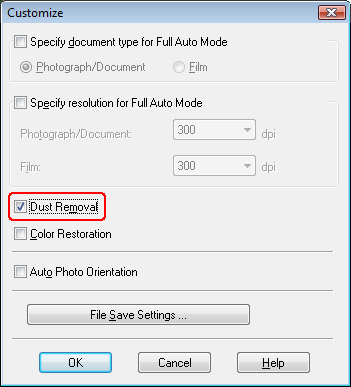
In the Full Auto Mode window, click Customize. The Customize window appears.
|
 |
Click the Dust Removal check box.
|
 |
If you want to select the file save settings, click File Save Settings. See Selecting File Save Settings for instructions.
|
Note:|
If you started Epson Scan from a TWAIN-compliant program like ArcSoft PhotoStudio, the File Save Settings button does not appear.
|
 |
When you finish making all the necessary settings, click OK to return to the Full Auto Mode window.
|
 |
Click Scan.
|
What happens next depends on how you started Epson Scan. See Finishing the Scan for instructions.

Dust Removal in Professional Mode
|
Place your original(s) on the document table. See one of these sections for instructions.
|
Documents or photos: Placing Documents or Photos
Film or slides: Placing Film or Slides
|
Start Epson Scan. See Starting Epson Scan for instructions.
|
|
In the Professional Mode window, select the Document Type, Document Source, Auto Exposure Type (for scanning documents or photos) or Film Type (for scanning film or slides), Image Type, and Resolution settings. For details, see Scanning in Professional Mode.
|
|
Click Preview to preview your image(s), then select your scan area. See Previewing and Adjusting the Scan Area for details.
|
|
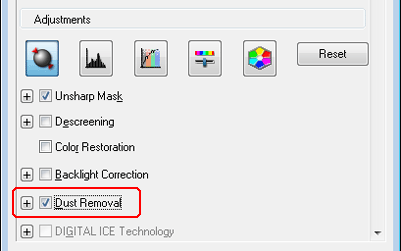
Scroll down to the Adjustments area and click the Dust Removal check box. If you want to increase or decrease the level of the dust removal effect, click the + (Windows) or
 (Mac OS X) button next to the option and select a setting in the Level list. (Mac OS X) button next to the option and select a setting in the Level list. |
 Note:
Note:|
The result of the Dust Removal does not appear in the image(s) in the Preview window.
If you are scanning multiple images at the same time and you want to apply the Dust Removal feature to all of your images or scan areas, click All in the Preview window before you click the check box.
This feature is not available if DIGITAL ICE Technology check box is selected.
|
|
Make any other necessary image adjustments. See Adjusting the Color and Other Image Settings for instructions.
|
|
Size your image(s) as necessary. See Selecting the Scan Size for instructions.
|
 |
Click Scan.
|
What happens next depends on how you started Epson Scan. See Finishing the Scan for instructions.