|

Reference Guide
|
|
Printing Without a Computer Basics
Printing on CD/DVD
 Cleaning the Printer before printing on CD/DVD
 Preparing to Print on CD/DVD
 Selecting the Layout
 Selecting the Photos to Print
 Loading a CD/DVD
 Adjusting the Print Position
 Adjusting the Print Density
This section provides information on how to use the LCD panel to print directly onto a CD/DVD, without the use of a computer. It provides step-by-step instructions on how to load the CD/DVD in the printer, how to select the print layout, and how to adjust the print settings.
Refer to the Reference Guide on the desktop if you are printing from a computer connected to the printer.
When printing on CD/DVD, keep the following points in mind:
 |
Note:
|
 | -
Use only CD/DVD media labelled as suitable for printing, for example "Printable on the label surface" or "Printable with ink jet printers".
|
|
 | -
The printed surface is easily smeared immediately after printing.
|
|
 | -
Be sure to let CDs and DVDs dry completely before using them or touching the printed surface.
|
|
 | -
Do not allow the printed CD/DVD to dry in direct sunlight.
|
|
 | -
Moisture on the printable surface may cause smearing.
|
|
 | -
If the CD/DVD tray or the internal transparent compartment are accidentally printed on, immediately wipe off the ink.
|
|
 | -
Reprinting on the same CD/DVD may not improve the print quality.
|
|
Cleaning the Printer before printing on CD/DVD
Before printing on a CD/DVD, it is necessary to clean the roller inside of the printer by feeding and ejecting A4 size plain paper. This is to prevent any dirt on the roller from adhering to the printable surface of the CD/DVD.
Clean this roller only once before printing CD/DVD. You do not need to do this each time you print on a CD/DVD.
 |
Open the paper support, then slide out the extension.
|
 |
Lower the output tray and slide out the extension.
|
 |
Make sure that the printer is on.
|
 |
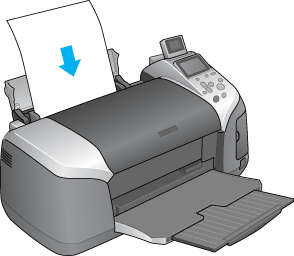
Load A4 size paper in the sheet feeder.
|
 |
Press the  Maintenance button in Advanced mode, then press the Maintenance button in Advanced mode, then press the  button to highlight Paper Feed/Paper Eject and press the OK button. Then press the OK button again to feed the paper. button to highlight Paper Feed/Paper Eject and press the OK button. Then press the OK button again to feed the paper.
|
 |
Press the OK button again. Then press the OK button again to eject the paper.
|

 |
Repeat the above steps 4 to 6 several times.
|

[Top]
Preparing to Print on CD/DVD
 |
Open the printer cover, then open the CD/DVD guide.
|
 |
The "Switching to CD/DVD print mode" message appears when you open the CD/DVD guide, and the print settings are automatically set to those for printing onto CD/DVDs.
|
 |  |
Note:
|
 |  | |
An error occurs if the CD/DVD guide is opened while printing, or if paper is loaded in the sheet feeder.
|
|
 |
Insert the memory card containing the photo data you want to print into the memory card slot.
|
Inserting memory cards

[Top]
Selecting the Layout
 |
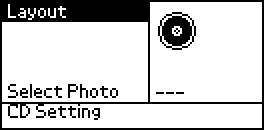
Make sure that Layout is selected in the LCD panel settings, then press the OK button.
|
 |
Press the  button to select the desired layout, then press the OK button. button to select the desired layout, then press the OK button.
|
You can select the following layout options when printing on a CD/DVD.
|

|
One photo will be printed on the CD/DVD, centered on the hole in the middle of the disc.
|
|

|
Four photos will be printed on the CD/DVD, with one image in each of four quarters.
|
|

|
12 photos will be printed on the CD/DVD, arranged in a circle around the outer edge of the disc.
|

[Top]
Selecting the Photos to Print
 |
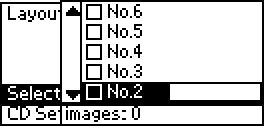
Press the  button to highlight Select Photo, then press the OK button. button to highlight Select Photo, then press the OK button.
|
 |
Press the  button to select the desired photo, checking with the preview monitor, then press the OK button. button to select the desired photo, checking with the preview monitor, then press the OK button.
|
 |  |
Note:
|
 |  | |
This screen appears when 4-photo or 12-photo has been selected in the Layout settings.
|
|
 |
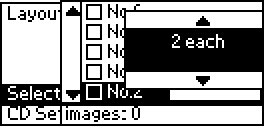
Press the  button to specify the number of prints for each photo, if you selected the 4-photo or 12-photo option for the Layout setting. button to specify the number of prints for each photo, if you selected the 4-photo or 12-photo option for the Layout setting.
|
 |  |
Note:
|
 |  | -
To select more than one photo, repeat steps 2 and 3 to select other photos and the number of times to print them.
|
|
 |  | -
The total number of images that will be printed is displayed at the bottom of the LCD display.
|
|
 |  | -
When selecting photos for the 4-photo or 12-photo layout setting, you can select a number of images less than the total. Unused areas of the layout will be left blank.If you specify a number of images greater than will fit on one CD/DVD, the extra images will be added to a layout for an extra CD/DVD and the printer will ask you to load another CD/DVD after printing the CD/DVD.
|
|

[Top]
Loading a CD/DVD
 |
Place the CD/DVD on the CD/DVD tray with the label surface up.
|
 |
Insert the CD/DVD tray into the CD/DVD guide.
|

 |  |
Note:
|
 |  | -
Align the arrow mark on the CD/DVD tray with the arrow mark on the CD/DVD guide.
|
|
 |  | -
Insert the CD/DVD tray so that the CD/DVD tray passes under the small rollers on the both sides of the CD/DVD slot.
|
|
 |
Close the printer cover.
|
 |
Press the Back button to return to the Layout screen. The selected image is displayed on the preview monitor. Then, press the Print button to print the CD/DVD.
|
 |
Note:
|
 | -
We recommend that you print a test of the layout on a test CD/DVD, before printing on a real CD/DVD.
|
|
 | -
If an error message appears on the LCD panel, follow the instructions on the LCD panel to clear the error.
|
|

[Top]
Adjusting the Print Position
Follow the steps below to adjust the print position, if necessary.
 |
Press the  or or  button to highlight CD Setting and press the OK button. button to highlight CD Setting and press the OK button.
|
 |
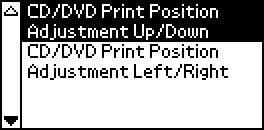
To move the image up or down; press the  button to select CD/DVD Print Position Adjustment Up/Down and press the OK button. button to select CD/DVD Print Position Adjustment Up/Down and press the OK button.
|
 |
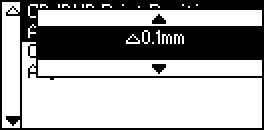
Press the  or or  button to select the direction and amount to move the image, then press the OK button. button to select the direction and amount to move the image, then press the OK button.
|
 |
To move the image left or right; press the  button to select CD/DVD Print Position Adjustment Left/Right and press the OK button. button to select CD/DVD Print Position Adjustment Left/Right and press the OK button.
|

 |
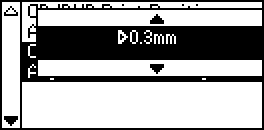
Press the  or or  button to select the direction and amount to move the image, then press the OK button. button to select the direction and amount to move the image, then press the OK button.
|
 |
Press the Back button to return to the Layout screen, then press the Print button to print the CD/DVD.
|
 |
Note:
|
 | |
The printer remembers the print adjustment setting even after it has been turned off, so you do not need to adjust the position each time you use the CD/DVD function.
|
|

[Top]
Adjusting the Print Density
Follow the steps below to adjust the amount of ink used when printing photos on a CD/DVD. This adjusts the depth of color in the printed image.
 |
Press the  or or  button to highlight CD Setting and press the OK button. button to highlight CD Setting and press the OK button.
|
 |
Select Color Density and press the OK button.
|
 |
Press the  button to select the desired color density and press the OK button. button to select the desired color density and press the OK button.
|

[Top]
| Version 1.00E, Copyright © 2001, SEIKO EPSON CORPORATION |
![]()
Cleaning the Printer before printing on CD/DVD
Preparing to Print on CD/DVD
Selecting the Layout
Selecting the Photos to Print
Loading a CD/DVD
Adjusting the Print Position
Adjusting the Print Density


 Maintenance button in Advanced mode, then press the
  button to highlight Paper Feed/Paper Eject and press the OK button. Then press the OK button again to feed the paper.


 button to select the desired layout, then press the OK button.


 button to highlight Select Photo, then press the OK button.

 button to select the desired photo, checking with the preview monitor, then press the OK button.


 button to specify the number of prints for each photo, if you selected the 4-photo or 12-photo option for the Layout setting.


 or
or  button to highlight CD Setting and press the OK button.

 button to select CD/DVD Print Position Adjustment Up/Down and press the OK button.


 or
or  button to select the direction and amount to move the image, then press the OK button.


 button to select CD/DVD Print Position Adjustment Left/Right and press the OK button.


 or
or  button to select the direction and amount to move the image, then press the OK button.


 or
or  button to highlight CD Setting and press the OK button.


 button to select the desired color density and press the OK button.
