|

Reference Guide
|
|
Printing Without a Computer Basics
Basic Printing
 Handling single sheets of paper
Printing an index
Single photo print
Print all photographs on the memory card
Print multiple selected photographs
Print the DPOF data
Print a range of photographs
Print P.I.F. Index
This printer has two print modes, Basic and Advanced. Basic mode makes it easy to select photos, print or make copies. Advanced mode enables you to edit various settings. Refer to Advanced Printing.
 |
Note:
|
 | |
When Basic Mode is selected, Paper Type, Paper Size and Layout are automatically set to Premium Glossy Photo Paper, 4 x 6 inch and Borderless or index.
|
|
Handling single sheets of paper
Refer to the section below for details on loading single sheets of paper.
When using special media, refer to the section below.

[Top]
Printing an index
You can print one or more copies of an index of all the photographs on a loaded memory card. An index can be helpful in selecting which photos you want to print.
 |
Load a memory card which contains the photos you want to print.
|
 |
Make sure that Basic Mode is selected.
|
| |
Note:
|
| | |
When Advanced Mode is selected, press the Basic/Advanced mode switch button, then press the OK button to switch to Basic Mode.
|
|
 |
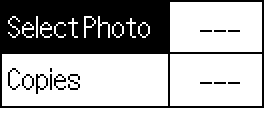
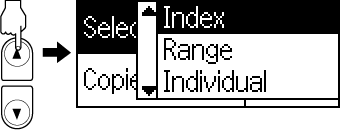
Make sure Select Photo is highlighted, then press the OK button to open the menu.
|
 |
Press the  button to select Index, then press the OK button. button to select Index, then press the OK button.
|
 |
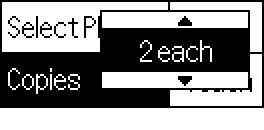
Make sure that 1 each is indicated as the Copies setting.
|

 |
Press the Print button to print the index.
|
If you need to cancel printing, press the Stop button.
When you're done printing, eject your memory card.
[Top]
Single photo print
The example here is to print a single photo on the 4 x 6 inch size of Premium Glossy Photo Paper with Borderless and normal print quality.
|
|
Index |
Photo Number |
|
|
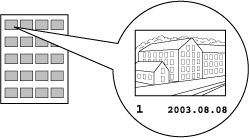
If you have printed an index, find the number of photo that you want to print from the index. The number is printed under the photo. If not, proceed to Step 2.
|
|
|
Press the or  button to select Select Photo then press the OK button. button to select Select Photo then press the OK button.
|
|
|
Press the or button to specify the photo number that you have selected from the Index, then press the OK button.
|

|
|
Select Copies, press the OK button to open the Copies counter, select the number you want to print, then press the OK button.
|
|
|
Press the Print button to start printing.
|
If you need to cancel printing, press the Stop button.
When you're done printing, eject your memory card.
[Top]
Print all photographs on the memory card
All: Print all photographs on the memory card.
|
|
Load a memory card which contains the photos you want to print.
|
Select All as the Select Photo, then press the OK button.

| |
Note:
|
| | |
The first image is displayed on the preview monitor.
|
|
|
|
Select Copies, press the OK button to open the Copies counter, select the number you want to print, then press the OK button.
|
|
|
Press the Print button to start printing.
|
If you need to cancel printing, press the Stop button.
When you're done printing, eject your memory card.
[Top]
Print multiple selected photographs
Individual: Print selected photographs from the memory card.
|
|
Load a memory card which contains the photos you want to print.
|
|
|
Select Individual as the Select Photo, then press the OK button.
|
|
|
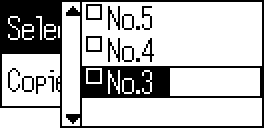
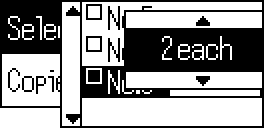
Press the or button to select the photo number you want to print, then press the OK button. The selected number is displayed on the preview monitor.
|
|
|
Press the or button to select the number of copies you want to print, then press OK button. You can select up to 10 copies.
|
|
|
Repeat steps 3 through 4 to select other photos.
|
| |
Note:
|
| | |
To reset the number of copies, select the photo and press the OK button. The number of copies resets to 0 and the check box becomes unchecked.
|
|
|
|
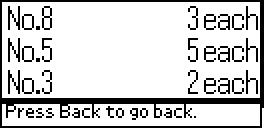
When you have finished selecting photos, press the Back button, then press the OK button to confirm your selections.
|
 |
When the numbers of all the photos you want to print have been registered, press the Print button to print the selected photographs.
|
If you need to cancel printing, press the Stop button.
When you're done printing, eject your memory card.
[Top]
Print the DPOF data
This printer conforms to DPOF (Digital Print Order Format) version 1.10. DPOF lets you set the photo numbers and the number of copies for photos on the digital camera before you print. To create DPOF data that supports DPOF, you must use a digital camera that supports DPOF. For the details about DPOF settings, see your digital camera's documentation.
|
|
Load a memory card which contains DPOF data.
|
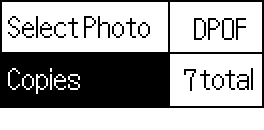
Once a memory card has been loaded, the Select Photo value becomes DPOF and the Copies value becomes the number of copies you selected on your digital camera.
|
|
Press the Print button to start printing.
|
If you need to cancel printing, press the Stop button.
When you're done printing, eject your memory card.
[Top]
Print a range of photographs
Range: Print a range of selected photographs from the memory card.
|
|
Load a memory card which contains the photos you want to print.
|
|
|
Select Range as the select Photo, then press the OK button.
|
|
|
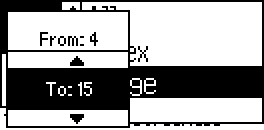
Press the or button to select the number of the first photo you want to print From:, then press the OK button. Next, select the number of the last photo you want to print To:, then press the OK button.
|
|
|
Select the number of Copies, and press the Print button to print the selected photographs.
|
If you need to cancel printing, press the Stop button.
When you're done printing, eject your memory card.
[Top]
Print P.I.F. Index
P.I.F. frames allow you to add layouts, effects, and frames to personalize your photos. If your digital camera supports P.I.F. (Print Image Framer), you can print an index of all of the PRINT Image Framer frames stored on your camera's memory card, when it is inserted in the printer.
|
|
Select P.I.F. Index from Select Photo, then press the OK button.
|
|
|
Make sure that 1 each is selected as the Copies setting.
|
|
|
Press the Print button to start printing.
|
If you need to cancel printing, press the Stop button.
When you're done printing, eject your memory card.
[Top]
| Version 1.00E, Copyright © 2001, SEIKO EPSON CORPORATION |

 See Canceling Printing Using the Control Panel

