![]()
Reference Guide
| Index | Search | Glossary | ||||||||
| Contents | Help |
|
||||||||
|
|
|
|||||||||||||||||||||||||||||||||
Printing Without a Computer Options
Main settings
More Options

| Note: |
|
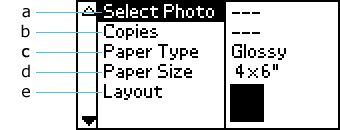
a. Select Photo
On this menu, you can select how to print data stored on a memory card.
|
All |
Print all photographs on the memory card. |
|
Index |
Print an index of all photographs on the memory card. |
|
Range |
Print a range of Photographs on the memory card. |
|
DPOF |
This option is automatically displayed when a memory card contains data whose printing instruction is set with a DPOF-compatible digital camera. Even if DPOF is selected, DPOF does not work when a memory card does not contain data set by DPOF. |
|
P.I.F. Index |
Print an index of the PRINT Image Framer frames stored on the memory card. |
|
Photo number |
Print a single, selected photograph from the memory card. |
|
Individual |
Print selected photographs from the memory card. |
b. Copies
Select the number of copies you want to print.
c. Paper Type
On this menu, the paper type can be selected.
|
Prem. Glossy |
Print on Epson Premium Glossy Photo Paper |
|
Semigloss |
Print on Epson Premium Semigloss Photo Paper or Semigloss Matte Scrapbook Photo Paper. |
|
Prem. Luster |
Print on Epson Premium Luster Photo Paper. |
|
Glossy Photo |
Print on Epson Glossy Photo Paper or Epson Photo Paper. |
|
Matte |
Print on Epson Matte Paper Heavyweight or PremiereArtTM Matte Scrapbook Paper for Epson. |
|
Plain |
Print on plain paper, Epson Photo Quality Ink Jet Paper, or Epson Premium Bright White Ink Jet Paper. |
|
ColorLife |
Print on Epson ColorLife Photo Paper. |
|
Greeting |
Print On Epson Glossy Photo Greeting Cards. |
|
Iron-on |
Print on Epson Iron-On Transfer Paper. |
d. Paper Size
On this menu, the paper size can be selected. The print size is automatically scaled up/down depending on the combination of selected paper size and layout.
|
4 x 6 inch |
Print on 4 x 6 inch size sheets of paper. |
|
5 x 7 inch |
Print on 5 x 7 inch size sheets of paper. |
|
8 x 10 inch |
Print on 8 x 10 inch size sheets of paper. |
|
Letter |
Print on letter size (8.5 x 11 inch) sheets of paper. |
e. Layout
On this menu, the print layout can be specified.
 |
Borderless |
Prints without margins. Portrait layout. |
 |
Single |
Prints with 3-mm margins on all sides. Portrait layout. |
 |
Upper half |
Prints in the upper half without a border. |
 |
Double |
Prints two images (landscape) on one page. |
 |
Quarter |
Prints four images (portrait) on one page. |
 |
8 |
Prints eight images (landscape) on one page. |
 |
20 |
Prints 20 images (landscape) on one page. |
 |
Index |
Print 80 images (landscape) on one page. |
 |
Jewel Case |
Prints to the size of a CD case without a border and with perforation lines. |
 |
Jewel Case-Index |
Prints 12 pictures on both sides of the paper to the size of CD case with perforation lines. |
When Borderless printing, note the following:
When All, Range or Individual is selected as the Select Photo, this setting allows you to specify the number of the photo that you want to enhance or correct using the More Options. The default setting here is All, which means the settings will affect all of the photos to print.
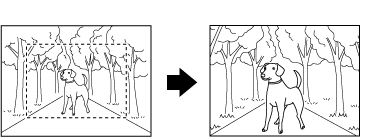
This setting allows you to zoom in on a specific point in a photo and print out the image. The printed region of the image is trimmed to the size of the original photo.
The base point can be selected from nine options: Upper Left, Center Left, Lower Left, Upper Center, Center, Lower Center, Upper Right, Center Right, and Lower Right. You can select either 1.2 or 1.5 times magnification. The preview monitor shows the trimmed area with a yellow frame.
 |
| Example. Center 1.5x |
| Note: |
|
This setting can be used to adjust the color tones used for printouts, by applying a filter before the photos are printed. The default setting is None.
|
None |
No filter is applied to the printouts. |
|
B&W |
Photos are printed in grayscale, similar to a black and white photo. |
|
Sepia |
Photos are printed with a sepia tint, similar to the brown tint seen in old photographs. |
This printer is able to correct the color of printouts automatically. There are two kinds of correction available. By default, the setting is P.I.M..
|
P.I.M. |
Print with the PRINT Image Matching function. If the photo data does not include PRINT Image Matching data, try printing with PhotoEnhance. |
|
PhotoEnhance |
Images imported from the memory card are automatically enhanced. Printing requires more time, but the image is enhanced to ensure higher picture quality. |
|
Exif |
Exif Print function. If the photo data does not include Exif Pint data, try printing with PhotoEnhance. |
|
None |
Print without automatic correction. |
This option can remove digital noise, or interference, from photos and increase the resolution for small images, so that they can be printed at larger sizes.
| Note: |
|
This setting can be used to adjust the contrast for printouts, which makes light areas of the image appear lighter and dark areas darker.
This setting allows you to adjust the brightness of your printouts. The default setting is Standard.
This setting allows you to adjust the vividness of your printouts. Then default setting is Standard.
This setting allows you to adjust the sharpness of your printouts. The default setting is Standard.
This setting is to print the date information contained in your photo data. The default setting is None.
The following examples show the format options for setting the date.
|
None |
Does not print the date. |
|
mmm.dd.yyyy |
Dec.31.2002 |
|
dd.mmm.yyyy |
31.Dec.2002 |
|
yyyy.mm.dd |
2002.12.31 |
This setting is to print the time information contained in your photo data. The default setting is None.
The following examples show the format options for setting the time.
|
None |
Does not print the time. |
|
12-hour system |
10:00 |
|
24-hour system |
22:00 |
If your photo data contains the photo information conforms to Exif standard, the information can be printed with this setting. Following information will be printed:
Exposure time/Shutter speed (Exposure time takes precedence if both values exist. ex. 1/30s)
F number (ex. F2.8)
ISO speed rate (ex. ISO100)
The default setting is Off.
|
On |
Prints photo information: Exposure time/Shutter speed/ |
|
Off |
Does not print any photo information. |
This setting automatically trims the parts of an image that extend beyond the margins of the selected print size. Either the top and bottom areas or the left and right areas of the image will be trimmed, depending on the aspect ratio of the original photo and the selected print size. The default setting is On.
|
On |
Trims the image. |
|
Off |
Does not trim the image |
Resize each photo (without trimming it) so that it fits inside the print area specified on the Layout menu. Margins may appear at the left and right of the photo, depending on the print size and aspect ratio.
This setting allows you to adjust the quality of your printouts. The default setting is High.
This setting activates bidirectional printing so your printer prints both left-to-right and right-to-left. Bidirectional printing speeds up printing, but decreases print quality. By default, this setting is On.
| Note: |
|
 | Aligning the Print Head |
The ink cartridge can be replaced by selecting this option.
 | Replacing an Ink Cartridge |
The print head can be cleaned by selecting this option.
 | Cleaning the Print Head |
A nozzle check pattern can be printed by selecting this option.
 | Checking the Print Head Nozzles |
Press the OK button in this menu, then press the OK button again to confirm. The Paper Feed/Paper Eject function is performed.
The print head can be aligned by selecting this option.
 | Aligning the Print Head |
The contrast of the preview monitor can be adjusted by selecting this option.
The contrast of the LCD panel can be adjusted by selecting this option.
This option sets whether or not writing from a computer to a memory card is allowed when the printer is connected to the computer. By default, the setting is Enable.
|
Enable |
Writing to the card from computer is allowed. Writing, deleting, formatting, and creation of files/directories are possible. |
|
Disable |
Writing to the card from computer is prohibited. Writing, deleting, formatting, and creation of files/directories are not possible. |
Adjusts the size of the gap between the platen and the print head. Select Wide if your printouts are rubbed while printing.
The language displayed on the LCD panel can be selected with this option.
These setting are available when the optional Bluetooth Photo Print Adapter is connected to the printer.
 | Using the Bluetooth Photo Printer Adapter |
 Next |
| Version 1.00E, Copyright © 2001, SEIKO EPSON CORPORATION |