![]()
Reference Guide
|
|
Index |
|
Search |
|
Glossary | |||||
|
|
Contents |
|
Help |
|
||||||
|
|
|
|||||||||||||||||||||||||||||||||
Printing with Windows
Status Monitor 3
EPSON printer utilities allow you to check the current printer status and to perform some printer maintenance from your computer.
To use the utilities, click the Utility tab in the printer software window, then click the button for the utility you wish to use. For information on how to access the printer software, see Accessing the printer software.

 | Note: |
|
|
|
Status Monitor 3 provides you with printer status information, such as the amount of ink remaining, and checks for printer errors.
This utility is only available when both of the following conditions are met:
The Nozzle Check utility checks the print head nozzles for clogging. Check the nozzles if you notice print quality has declined and after cleaning to confirm that the print head nozzles have been cleared. If the nozzle check indicates the print head needs cleaning, you can access the Head Cleaning utility directly from the Nozzle Check utility. See Checking the Print Head Nozzles.
The Head Cleaning utility cleans the print head. You may need to clean the print head when you notice print quality has declined. Use the Nozzle Check utility first to confirm that the print head needs to be cleaned. You can access the Nozzle Check utility directly from the Head Cleaning utility. See Cleaning the Print Head.
The Print Head Alignment utility aligns the print head. Use this utility if you notice a misalignment of vertical lines. Follow the on-screen instructions to use this utility.
The Ink Cartridge Replacement utility guides you through replacing an old and damaged ink cartridge before ink has run out. This utility is only available when you access the printer software through the Printers folder. Otherwise, the utility will be unavailable. To access the printer software through the Printers folder, click Start, point to Settings, then click Printers. For Windows 98 users, right click your printer's icon and select Properties from the shortcut menu, then click the Utilities tab. For Windows 2000 users, select your printer and click Printing Preferences on the File menu, then click the Utilities tab.
You can make settings related to print speed and progress in this dialog box.
The available settings are as follows:
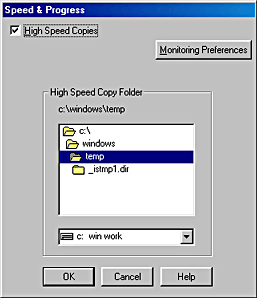
To print multiple copies of your document faster, select High Speed Copies. For more details, see Making the High Speed Copies setting.
Select this check box to have Windows NT-based clients spool documents using the RAW format instead of the EMF (metafile) format (Windows NT-based applications use the EMF format by default).
Try using this option if documents spooled in EMF format do not print correctly.
Spooling RAW datatype requires less resources than EMF, so some problems ("Insufficient Memory/Disk Space to Print", "Slow print speed", etc.) can be solved by selecting the "Always spool RAW datatype" check box.
When spooling RAW datatype, print progress as displayed by the Progress Meter may differ from actual print progress.
Click this button to open the Monitoring Preferences dialog box where you can make settings for EPSON Status Monitor 3. The settings are described in detail in the next section.
When you click the Monitoring Preferences button, the following dialog box appears.

You can make the following settings:
|
Select Notification |
Displays the current error item notification settings. In this area, you can designate whether to have general error messages, communication error messages, or ink status messages displayed during printing or copying. Select the appropriate check box to specify the error types for which you wish to receive notification. Also select the Alert check box if you wish to be notified of error messages with an audio alert. |
|
Select Shortcut Icon |
Select the Shortcut Icon check box to have a shortcut icon placed in your Windows taskbar. Click the shortcut icon in the taskbar to open EPSON Status Monitor 3. Right-click the icon to display a shortcut menu, where you can access some of the printer utilities. To select which icon will be displayed, click the icon your prefer from the choices given; your selection will be shown at the right. |
|
Allow monitoring of shared printers |
Select this check box to allow monitoring of a shared printer by other computers. |
| Note: |
| Click the Default button to revert all Select Notification settings to their defaults. |
 Previous |
 Next |
| Version 1.00E, Copyright © 2001, SEIKO EPSON CORPORATION |