|

User's Guide
|
|
Using the Stylus RIP Professional with Windows
Installing the Stylus RIP Professional Software
 Windows XP/2000 users
Windows Me/98 Second Edition users
This section explains the procedures for installing the EPSON Stylus RIP Professional 2.0 on computers running the Windows operating system.
 |
Note:
|
 | -
Before installing Stylus RIP Professional, it is necessary to connect the printer you want to use and install EPSON Standard Windows Driver. For instructions on how to install the driver, refer to your printer manual.
|
|
| -
Stylus RIP Professional uses the port set by EPSON Standard Windows Driver. For example, if the port of the print destination using EPSON Standard Windows Driver is "LPT1," Stylus RIP Professional automatically uses "LPT1" to print. Therefore, when installing EPSON Standard Windows Driver, set the port of the print destination to match the printer you are using with Stylus RIP Professional.
|
|
| -
Turn off all virus protection. For instructions on how to do this, see the documentation that came with your virus protection software or computer.
|
|
Windows XP/2000 users
Follow these steps to install the Stylus RIP Professional:
 |
Make sure that Windows is running.
|
 |
Insert the CD-ROM that shipped with EPSON Stylus RIP Professional 2.0 into the appropriate drive.
|
 |
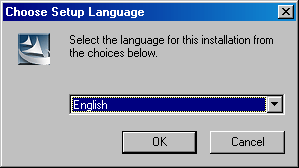
The Choose Setup Language dialog box appears automatically.
|
| |
Note:
|
| | -
Make sure to log in to the Windows XP/2000 as an administrator when you install the Stylus RIP Professional.
|
|
| | -
If the dialog box does not appear automatically, double-click Launch.exe in the root level of the CD-ROM.
|
|
| | -
You can install the Stylus RIP Professional only from the CD-ROM. Installation from files copied onto the PC's hard disk is not possible.
|
|
 |
Select English, and then click OK.
|

 |
Continue installation by following the on-screen instructions.
|
 |
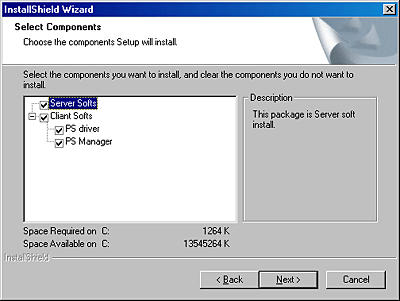
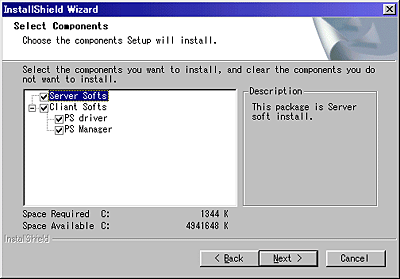
When the following InstallShield Wizard dialog box appears, select components that you want to install, and then click Next.
|
 |
Continue installation by following the on-screen instructions.
|
 |
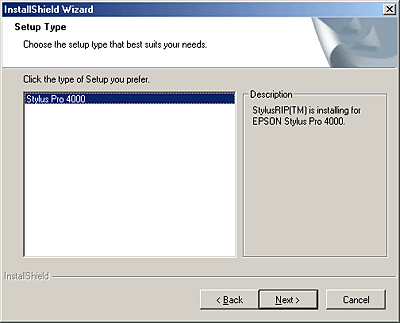
When the following InstallShield Wizard dialog box appears, select the printer attached, and then click Next.
|

 |
Continue installation by following the on-screen instructions.
|
 |
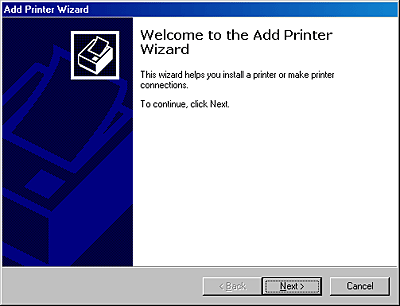
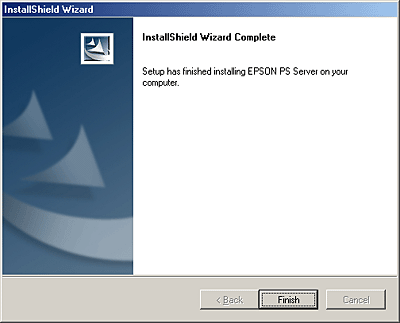
When the installation of PS Server is complete, the following dialog box appears. Click Finish. The Add Printer Wizard appears.
|

 |
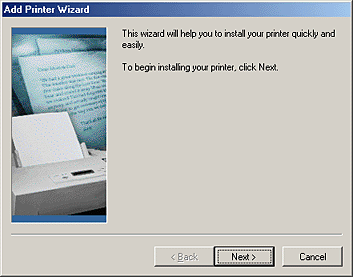
Click Next to continue the installation.
|
 |
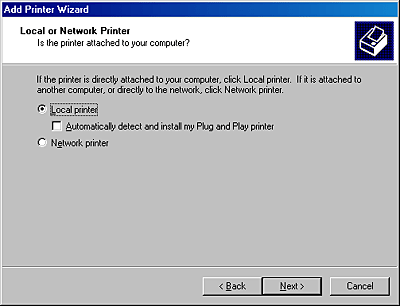
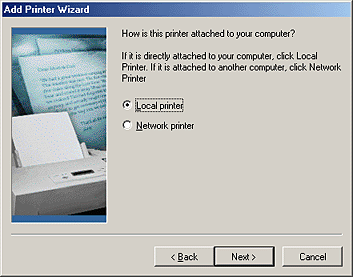
Select either the Local printer or Network printer radio button, and then click Next.
|
| |
Note:
|
| | |
Do not select the Automatically detect and install my Plug and Play printer check box.
|
|
 |
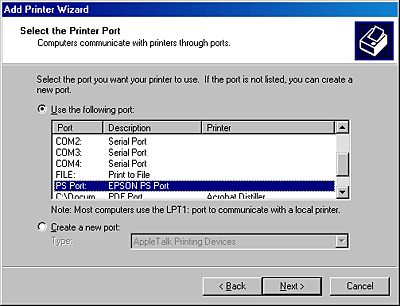
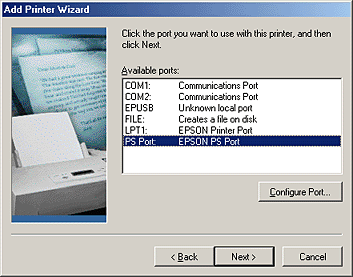
Select a printer port. Make sure that the Use the following port radio button is selected, and then select PS Port from the port list. Then, click Next.
|
 |
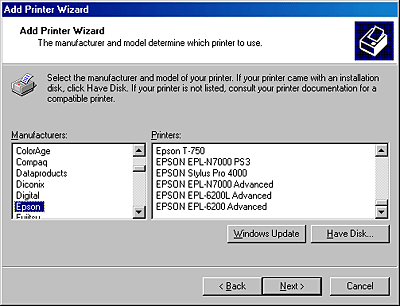
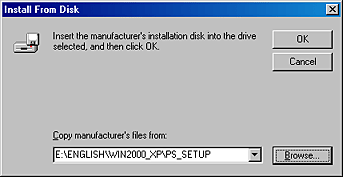
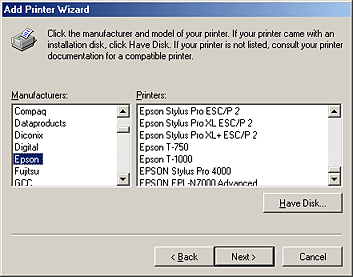
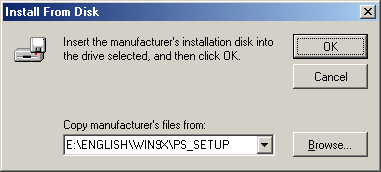
Select a printer model. Click the Have Disk button, and then click Browse to specify the location of the INF file. The INF file is saved in the following location on the CD-ROM: ENGLISH\WIN2000_XP\PS_SETUP. Select the INF file, and then click Open.
|
 |
In the dialog box that appears, click OK.
|
 |
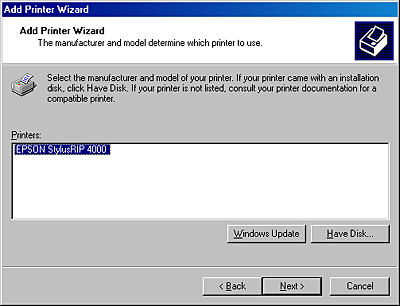
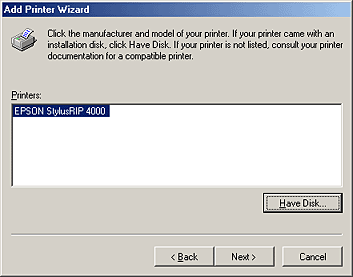
Select your printer model, and then click Next.
|
 |
Continue the installation by following the on-screen instructions.
|
 |
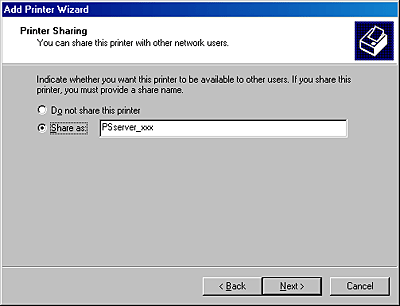
If you are sharing the printer on a network, select the Share as radio button, and then enter the network printer name. If you are not sharing the printer, select Do not share this printer. Then, click Next.
|
 |
If you are sharing the printer, enter the appropriate Location and Comment information, and then click Next.
|
| |
Note:
|
| | |
If you are not sharing the printer, skip this step as the dialog box shown below will not appear.
|
|

 |
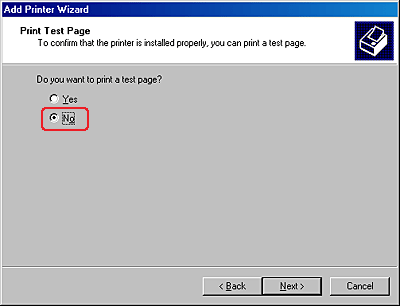
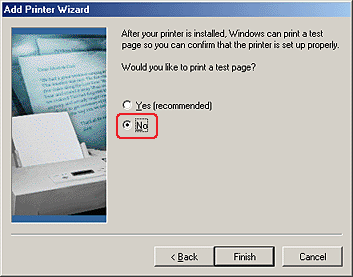
In the dialog box that appears asking if you want to print a test page, make sure to select No, and then click Next.
|
 |
When installation of the printer driver is complete, the following dialog box appears. Click Finish.
|

 |
After clicking Finish, the following dialog box appears. Click Yes.
|

 |
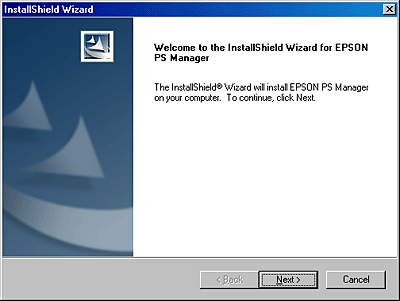
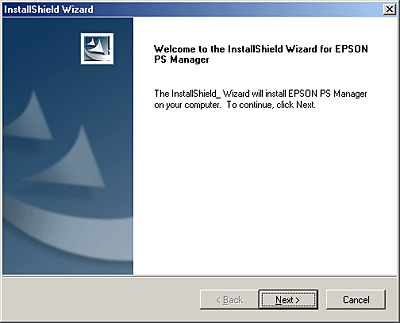
The InstallShield Wizard for installing EPSON PS Manager appears. Click Next.
|
 |
Continue the installation by following the on-screen instructions.
|
 |
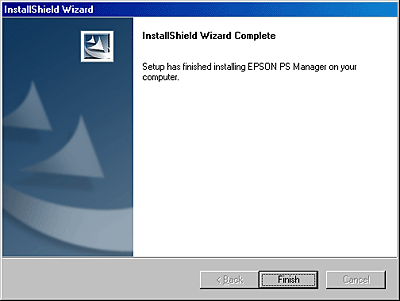
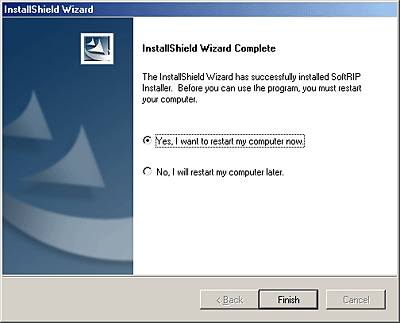
When installation of the PS Manager is complete, the following dialog box appears. Click Finish.
|
 |
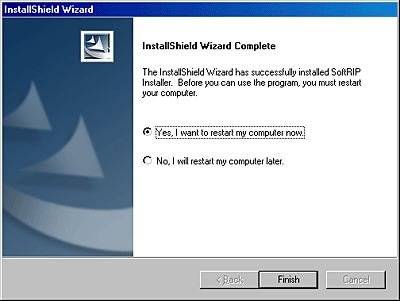
Installation of all the files necessary to use Stylus RIP Professional is now complete. Click Finish to restart your computer.
|
| |
Note:
|
| | |
You can use Stylus RIP Professional only after you restart your computer.
|
|

[Top]
Windows Me/98 Second Edition users
Follow these steps to install the Stylus RIP Professional:
|
Note:
|
| |
Turn off all virus protection before starting the installation. For instructions on how to do this, see the documentation that came with your virus protection software or computer.
|
|
|
|
Make sure that Windows is running.
|
|
|
Insert the CD-ROM that shipped with EPSON Stylus RIP Professional 2.0 into the appropriate drive.
|
|
|
The Choose Setup Language dialog box appears automatically.
|
| |
Note:
|
| | -
If the dialog box does not appear automatically, double-click Launch.exe in the root level of the CD-ROM.
|
|
| | -
You can install the Stylus RIP Professional only from the CD-ROM. Installation from files copied onto the PC's hard disk is not possible.
|
|
|
|
Select English, and then click OK.
|
|
|
Continue installation by following the on-screen instructions.
|
|
|
When the following InstallShield Wizard dialog box appears, select the components that you want to install, and then click Next.
|
|
|
Continue installation by following the on-screen instructions.
|
|
|
When the following InstallShield Wizard dialog box appears, select the printer attached, and then click Next.
|
|
|
When the installation of PS Server is complete, the following dialog box appears. Click Finish. The Add Printer Wizard appears.
|
|
|
Click Next to continue the installation.
|
|
|
Select either the Local printer or Network printer radio button, and then click Next.
|
|
|
Select a printer model. Click the Have Disk button, and then click Browse to specify the location of the INF file. The INF file is saved in the following location on the CD-ROM: ENGLISH\WIN9X\PS_SETUP. Select the INF file, and then click OK.
|
|
|
In the dialog box that appears, click OK.
|
|
|
Select your printer model, and then click Next.
|
|
|
Select PS Port as the printer port, and then click Next.
|
|
|
Continue the installation by following the on-screen instructions.
|
|
|
In the dialog box that appears asking if you want to print a test page, make sure to select No, and then click Finish.
|
|
|
The InstallShield Wizard for installing EPSON PS Manager appears. Click Next.
|
|
|
Continue the installation by following the on-screen instructions.
|
|
|
When installation of the PS Manager is complete, the following dialog box appears. Click Finish.
|

|
|
Installation of all the files necessary to use Stylus RIP Professional is now complete. Click Finish to restart your computer.
|
| |
Note:
|
| | |
You can use Stylus RIP Professional only after you restart your computer.
|
|
[Top]
| Version 1.00E, Copyright © 2003, SEIKO EPSON CORPORATION |
