
User's Guide
| Index | Help | |||||||||
| Contents | Glossary |
|
||||||||
|
|
|
||||||||||||||||||||||||||||||
Using the Stylus RIP Professional with Windows
Starting PS Server
Starting PS Server automatically
Exiting PS Server
Checking the print status
Setting preferences
Direct printing
Using the Icon in the Tasktray
PS Server is the software that makes your computer a print server. When you send a print job from your application program, the PS Server receives the job and puts it in the print queue in the order it was received. When your print job reaches the top of the queue, the PS Server sends it to the printer to be printed. To use PS Server, you must open or launch it, just like any other application.
If you are starting the PS Server for the first time, it is necessary to select a printer and enter a license key.
Follow these steps to start the PS Server:
 | Turn on the printer. Make sure the printer's power light is on. |
 | Click Start, select Programs, then EPSON, then Stylus RIP Professional, and then finally click EPSON PS Server. |
 | If you are starting the PS Server for the first time, the Select Printer dialog box appears. Select the printer attached, and then click OK. |

| Note: |
|
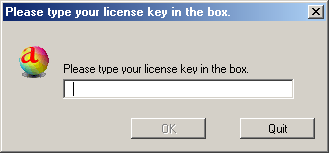
 | A dialog box asking you to enter a license key appears. Enter the license key, and then click OK. |
| Note: |
|
|
If you use the PS Server regularly, it is convenient to set it up to start automatically every time you turn on your computer.
Follow these steps to start the PS Server automatically each time the computer is turned on:
 | Open the PS Server folder. |
| Note: |
|
 | Right-click the PS Server icon, and then select Create Shortcut. |
 | Move the shortcut to the C:\Windows\Start Menu\Programs\StartUp folder (change the drive letter as needed for your system). |
| Note: |
|
Exit or close the PS Server by clicking the close box on the top-right corner of the PS Server window. Remember that you need to start the PS Server every time before printing.
| Note: |
|
The print status of the current print job is displayed in the main window of the PS Server.
You can hide the main window by clicking the Minimize button located on the left to the Close button at the top right corner of the main window. To re-display the main window, click the PS Server icon on the tasktray, or right-click the icon and select Open EPSON PS Server.
The following information appears in the main window.
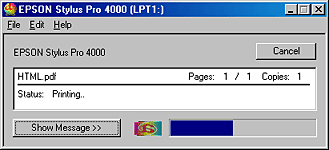
Displays the name of the print job currently being processed. If printing is being performed from an application software, the name of the file being printed appears.
Displays the total number of pages to be printed and the number of the page that is being printed.
Displays the number of copies to be printed.
Displays the status of the current print job.
Shows the progress of the current print job.
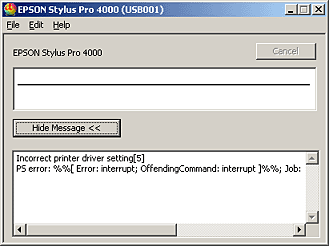
When Show Message is clicked, a message box appears. This message box displays details of errors and warnings. Click the Hide Message button to hide the message box.
| Note: |
|
You can make special preferences settings by choosing Preferences under the Edit menu. The Preferences settings apply only to the network environment.
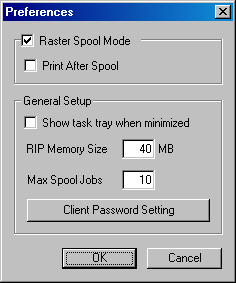
This setting turns raster image spooling on or off. The default setting is on. It is on when a check appears in the check box. Click the check box to turn it on or off.
Turning on raster image spooling is recommended to get the following benefits:
 |
Faster ripping of multiple copies When 2 or more copies of one PostScript print job are sent to the printer, Stylus RIP Professional only rips the job once. This saves time and frees up hardware resources. |
 |
Faster ripping When this setting is on, Stylus RIP Professional spools raster images to the hard drive faster than it can output the print data to the printer. Because of this, Stylus RIP Professional is ready to receive the next print job much more quickly. |
The drawback with spooling raster images is that spooling requires a lot of free space on your hard disk. The amount of free disk space that your print job requires depends on the document's size, resolution, and amount of detail. If you do not have enough space on your hard drive, Stylus RIP Professional stops spooling when the hard disk becomes full and restarts spooling as soon as the previous print job is finished. This can cause slower performance than if Raster Spool Mode is turned off.
| Note: |
|
When this function is enabled, all print data will be spooled in the hard disk and then printed.
When this setting is set to on, the icons do not appear on the taskbar when the main window is minimized, but appear on the task tray instead.
Specify the amount of memory to dedicate to the PS Server. It is recommended that you keep the default setting unless you want higher speed ripping and there is available memory to allocate to PS Server, or if you are experiencing PostScript memory errors. You can set the memory size to any number from 20 MB to 9999 MB.
| Note: |
|
Specify the maximum number of jobs to spool between 1 and 99. The default number is 10.
Click this button to display the Client Password window and input the password that PS Manager users must enter to connect to the PS Server.
| Note: |
|
Stylus RIP Professional is capable of printing directly from a selected file, such as an EPS, JPEG, PDF, PostScript, or TIFF file, without first opening it in its application.
You can also make basic print settings from within PS Server when printing files directly.
Follow these steps to select and print a file directly:
 | Select Open from the PS Server's File menu. A file selection dialog box appears. |
 | Select the file that you want to print. |
 | Click the Open button. The selected file will be printed. |
Share Folder function enables you to directly print files easily by copying a file (PDF, PS or other file types) that can be directly printed by Stylus RIP Professional to the Share Folder. The Stylus RIP Professional directly processes and prints the files copied to the Share Folder, and no other application is used. By sharing this folder on the network, you can print by simply copying a file from any computer on the network to the Share Folder.
The Share Folder dialog box is displayed by selecting Share Folder Setting under the Edit menu. Specify the location of the Share Folder and the monitoring interval in the Share Folder dialog box.

You can change basic print settings in the Default Printer Settings dialog box when you are printing a file directly from within PS Server. The Default Printer Settings dialog box is displayed by choosing Default Printer Settings under the Edit menu.
You do not need to make or change any print settings if you are printing a file from within its own application. When printing from an application, specify print settings by choosing Print under the application's File menu. Below are some of the most common settings for most printers.
| Note: |
|
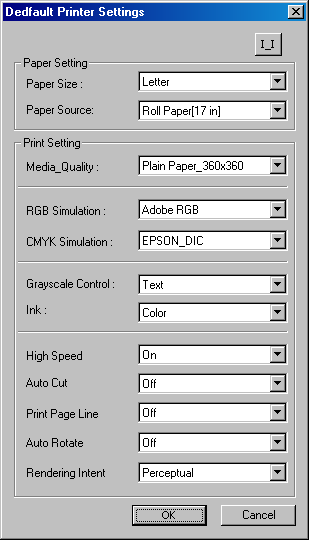
Perform settings related to paper.
Specify the size of the paper that you are printing.
If the printer has multiple paper sources, specify where paper should be fed from for this print job.
Specify the paper type and the quality of printing.
Specify the color space of RGB colors to be simulated when you are printing RGB color data.
Specify the ink colors to be simulated when you are printing CMYK color data.
Specify the type of data to be printed using only black ink when you are printing the gray part of color data.
Specify whether to print in color or grayscale.
Other settings include hardware-dependent settings that vary according to the printer model that the PS Server is connected to. The corresponding function can be enabled by clicking its drop-down menu and selecting the desired value. The items that appear on your screen may be different, depending on your printer.
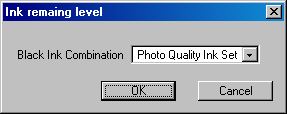
When the Ink Status button in the upper right corner of the dialog box is clicked, a dialog box like the one shown below appears. This dialog box enables you to change the combination of ink by using the Black Ink Combination drop-down menu. Options are: Photo Quality Ink Set and High Speed Ink Set. (EPSON Stylus Pro 4000 only) To close the dialog box, click the OK button.
| Note: |
|
When PS Server starts, an icon also appears on the tasktray. Right-clicking the icon on the tasktray displays the following menu.
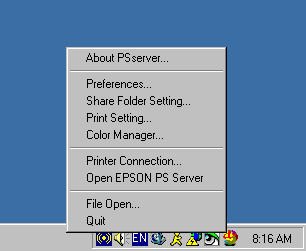
Displays the PS Server's version number and the license key.
Opens the Preferences dialog box.
Opens the Share Folder dialog box.
Opens the Print Setting dialog box.
Opens the Color Manager dialog box.
Enables you to reselect the printer. Select this item if you want to change your printer connection.
Restores the minimized PS Server main window to its original display.
Enables you to select a file for direct printing from within PS Server.
Exits PS Server.
 Previous |
 Next |
| Version 1.00E, Copyright © 2003, SEIKO EPSON CORPORATION |