Improving Print Quality
If your print quality is not as good as it used to be, if your photos are too light or faint, or if you are missing colors in your prints, you may need to clean the PictureMate print head. You can check to see if your print head needs cleaning before you actually clean it. If your prints look fuzzy or have lines running through them, you may need to align the print head.
Follow the steps in these sections to clean or align the print head using the PictureMate buttons or the PictureMate software on your computer:
Cleaning the Print Head Directly from PictureMate
If your print quality is not as good as it used to be, PictureMate's print head nozzles may be clogged. Follow these steps to clean the print head.
- On the Main Menu, press
 or
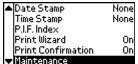
or  to highlight More Options, then press OK.
- Press
or
to highlight Maintenance, then press OK.
- Press
or
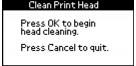
to highlight Clean Print Head, then press OK.

- When you see this message, press OK to begin cleaning the print head.
The cleaning process takes about 40 seconds. The message Cleaning print head. Please wait. appears on the screen and PictureMate makes some noise.
Caution: Never turn off PictureMate while it is cleaning its print head, unless it hasn't moved or made noise for more than 5 minutes.
When cleaning is complete, you see a message asking if you want to print a nozzle check pattern.
- To make sure the nozzles are clean, load a sheet of photo paper (see Loading Paper), then press OK to print the nozzle check.
- Check the pattern you printed.
Each staggered line should be solid, with no gaps, as shown.
- If your printout looks good, press Cancel to go back to the Main Menu.
- If you see any gaps (as shown below), press OK to clean the print head again.
If you don't see any improvement after cleaning three or four times, refer to Solving Problems.
You can also turn PictureMate off and wait overnight-this allows any dried ink to soften-and then try cleaning the print head again.
Aligning the Print Head Directly From PictureMate
If you have moved PictureMate and the print quality is not the same as it was before-for example, if your prints look fuzzy or have or dark or light horizontal lines running through them-you may need to align the print head.
Checking the Print Quality Using the Computer
You can check PictureMate's print quality from your computer and clean the print head, if necessary.
- Make sure PictureMate is connected to your computer and turned on but not printing.
- Windows: Right-click the
 printer icon on your taskbar (in the lower right corner of your screen). Select Nozzle Check.
Macintosh OS X: Open the Applications folder and select EPSON Printer Utility. Select PictureMate in the printer list, click OK, and select Nozzle Check.
- Follow the instructions on the screen to print a nozzle check pattern.
The nozzle check pattern prints. Each staggered line should be solid, with no gaps, as shown.
If you see any gaps (as shown below), you need to clean the print head. See Cleaning the Print Head Using the Computer.
Cleaning the Print Head Using the Computer
If your print quality is not as good as it used to be, PictureMate's print head nozzles may be clogged. Follow these steps to clean the print head.
- Make sure PictureMate is connected to your computer and turned on but not printing.
- Windows: Right-click the
printer icon on your taskbar (in the lower right corner of your screen). Select Head Cleaning.
Macintosh OS X: Open the Applications folder and select EPSON Printer Utility. Select PictureMate in the printer list, click OK, and select Head Cleaning.
- Follow the instructions on the screen to clean the print head.

Cleaning takes about 40 seconds. PictureMate makes some noise and its screen displays progress messages.
Caution: Never turn off PictureMate while it is cleaning its print head, unless it hasn't moved or made noise for more than 5 minutes.
- When cleaning is finished, make sure paper is loaded, then do the following:
Windows: Click Print nozzle check pattern. Then click Print.
Macintosh: Click Confirmation, then click Next.
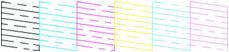
- Examine the nozzle check pattern you printed. Each staggered line should be solid, with no gaps, as shown.
- If your printout looks good, click Finish.
- If you see any gaps (as shown below), click Clean to clean the print head again.
If you don't see any improvement after cleaning three or four times, refer to Solving Problems.
You can also turn PictureMate off and wait overnight-this allows any dried ink to soften-and then try cleaning the print head again.
Aligning the Print Head Using the Computer
If you have moved PictureMate and the print quality is not the same as it was before-for example, if your prints look fuzzy or have or dark or light horizontal lines running through them-you may need to align the print head.
- Make sure PictureMate is connected to your computer, and turned on but not printing.
- Load several sheets of PictureMate Photo Paper.
- Windows: Right-click the
printer icon on your taskbar (in the lower right corner of your screen). Select Print Head Alignment.
Macintosh OS X: Open the Applications folder and select EPSON Printer Utility. Select PictureMate in the printer list, click OK, and select Print Head Alignment.
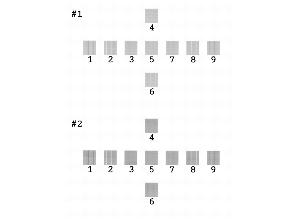
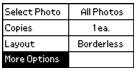
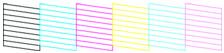
- Follow the instructions on the screen to print a test page. You see a window like this one:
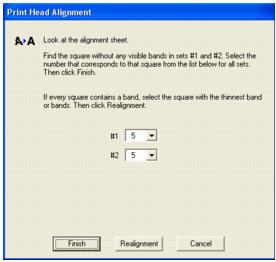
- Look at the printed squares to determine which one in each set is the most even, with no streaks or lines. You may need to use a magnifying glass. Select one square for each pattern (1 and 2).
- Enter the number of the best square in each pattern in the corresponding boxes on the screen. Then click Finish.
If you can't find a square without streaks or lines, choose the one that looks the best. Then click Realignment to print another test page and repeat this step.
Note: The numbers that you enter become the default settings (#5) the next time you align the print head.