Solving Problems
There are several ways to diagnose problems:
- If you're not sure whether the problem is coming from PictureMate or another source, run a printer check as described in Running a Printer Check.
For solutions to specific problems, see these sections:
If you need to uninstall and then reinstall your software to solve your problem, see Uninstalling PictureMate Software.
If the solutions here don't solve your problem, see Where To Get Help.
Control Panel Messages
If your PictureMate has any problems, you can check the PictureMate screen for a message. If you see one of these messages, here's what to do:
|
Message
|
What to Do
|
|
|
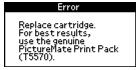
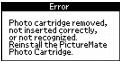
Purchase a PictureMate Print Pack and replace the photo cartridge with a new one. If the cartridge is new, check to make sure it is inserted correctly. See Replacing the Photo Cartridge.
|
|
|
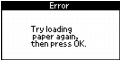
Load or remove and reload paper in the paper support, and press the OK button to clear this message. PictureMate resumes printing. See Loading Paper for instructions.
|
|
|
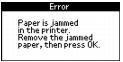
Carefully pull out the jammed paper, then reload paper and continue printing or try printing again. Don't load wrinkled sheets or plain paper. If your PictureMate is having frequent jams, see Paper doesn't feed correctly or jams inside PictureMate.
|
|
|
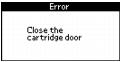
The cartridge door is not closed completely. Close the cartridge door on the back of PictureMate. Make sure the door snaps shut.
|
|
|
Reinstall a genuine PictureMate Photo Cartridge from the PictureMate Print Pack. See Replacing the Photo Cartridge.
|
|
|
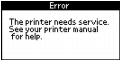
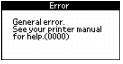
PictureMate has a hardware error that may require service. Contact Epson as described in Where To Get Help.
|
|
|
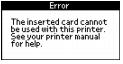
Use a compatible memory card. Format your card with your camera, not a computer. See the card types you can use in Compatible Memory Cards. The file types on the card may not be supported. See Photo Image File Requirements.
|
|
|
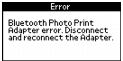
Disconnect the Bluetooth Photo Print adapter, then reconnect it to PictureMate. See Disconnecting the Bluetooth Photo Print Adapter.
|
|
|
Press the  On
On button to turn PictureMate off. Wait a few seconds, then turn it on again. If the error does not clear, see Where To Get Help.
|
Running a Printer Check
You may need to run a printer check to see if a problem comes from PictureMate itself or some other source.
- If PictureMate is connected to your computer or other USB device, make sure they are both turned off. Then disconnect the USB cable from PictureMate.
- On the Main Menu, press
 or
or  to highlight More Options, then press OK.
- Press
or
to highlight Maintenance, then press OK.
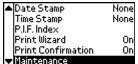
- Press
or
to highlight Nozzle Check, then press OK.

- When you see this message, press the
 Print button.
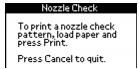
PictureMate prints a page showing a nozzle check pattern. (If the pattern has gaps, you need to clean the print head; see Improving Print Quality.)
- If the check page printed, the problem isn't with PictureMate. It may be your memory card, software settings, interface cable, or computer, or your software may not be installed correctly. Try the suggestions in Software Installation Problems and Memory Card Problems.
- If the check page did not print, PictureMate may have a problem. Try the suggestions in Printing Problems.
- After examining the check page, remember to turn off PictureMate and reconnect its cable to your computer, if desired.
Software Installation Problems
You're having problems installing the PictureMate software.
- Carefully follow the installation instructions in the Using PictureMate With a Computer booklet. Do not connect PictureMate to the computer until you are instructed to connect it. Then connect the USB cable securely to PictureMate and the computer. Also make sure your system meets the requirements listed in System Requirements.
- Close your other programs, including any screen savers and virus protection software, and install the software again.
- If you are using Macintosh OS X and you do not see PictureMate 2005 listed in the Format for menu under Page Setup, you may need to set up PictureMate in Print Center or the Printer Setup Utility. See the Using PictureMate With a Computer booklet for instructions.
- For Windows 2000, if you see an error message or your software doesn't install correctly, you may not have software installation privileges. Contact your System Administrator.
- Make sure Windows 98SE, Me, 2000, or XP was preinstalled on your system. The USB Printer Device Driver may not install correctly if you've upgraded from Windows 95.
- Make sure the USB Controller is working properly in Device Manager. See your Windows help system for details. If it's not working, contact your computer manufacturer.
- If you're printing over a network, see Setting Up Network Printing for instructions on configuring your PictureMate software for use on a network.
- If you have a previous version of PictureMate software installed, make sure you uninstall it before installing the new software. See Uninstalling PictureMate Software.
Printing Problems
PictureMate is on, but nothing prints.
- If you're printing from your computer, make sure the USB cable is connected securely at both ends and that the cable meets the requirements in System Requirements.
- If you're printing from your computer, check to see if PictureMate is causing the problem, as described in Running a Printer Check. If the check page prints, make sure your software is installed correctly.
- If you're printing on a network, see Setting Up Network Printing for instructions on configuring your PictureMate software for use on a network.
PictureMate sounds as though it is printing, but nothing prints.
- PictureMate won't operate properly if it's tilted or at an angle. Place it on a flat, stable surface that extends beyond the base in all directions.
PictureMate makes noise when you turn it on or after it has been sitting for awhile.
PictureMate is performing routine maintenance.
Printing is too slow.
Because of PictureMate's high print quality, it may take a little while to print your photos. If you are printing from a computer, check the requirements in System Requirements. If you're printing a high-resolution image, you may need more than the minimum requirements listed. You may also need to:
- Clear space on your hard drive or run a defragmentation utility.
- Close open programs that you're not using.
- Increase your system's memory (RAM).
For the fastest printing, try these tips:
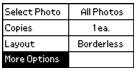
- Printing photos with borders is faster than printing borderless photos.
- When you print directly from PictureMate, JPEG files print faster than Tiff files.
- When you print directly from PictureMate, select More Options and set Auto Correct to None.
- When you print from your computer, make sure the Color Option is set to No Correction.
- If PictureMate is connected to a USB hub, disconnect any USB devices that you're not using.
Memory Card Problems
- Make sure only one card is inserted at a time.
- PictureMate recognizes and can print the first 999 photos on a memory card.
- Make sure photos are in JPEG or uncompressed Tiff format and taken with a DCF-compliant digital camera (a camera that complies with the Design rule for Camera File system).
- Make sure your photo files are in non-progressive JPEG or Tiff format. PictureMate can't read progressive JPEG or RAW files.
- Make sure you follow the instructions in the Using PictureMate With a Computer booklet to install the software, including the card utilities: Card Monitor and PhotoStarter.
- If you access the card from your computer and delete files, the card may not work correctly with your camera. Always delete pictures using your camera.
- If you copy files from Adobe Photoshop to a memory card, make sure you save them as RGB images using the standard save option (non-progressive). Files saved in the CMYK format may not print with the colors you expect.
- If you're using Windows XP, you may need to install your Windows storage device driver. See your Windows help for more information.
- Make sure you format your memory card in your camera.
Print Quality Problems
You see banding (light lines).
- Make sure the glossy, printable side of the paper is face up.
Part of your photo is cut off.
- Your digital file's image size may not match the width/height proportions (aspect ratio) of PictureMate paper or the layout you're using. Photos will be cropped to fit the paper and layout.
- When you print borderless pictures, your images are automatically expanded and cropped. If you find that too much of your pictures are cut off around the edges, you can adjust the amount of expansion and cropping when you print from your computer. See Printing From Your Computer.
- If the subject of your photo is very close to the edge of the image, you may want to select Border as the Layout setting. This reduces the automatic enlargement of your photo (to eliminate the borders) which may be causing part of your image to be cut off.
Your photo is blurry or smeared.
- Use PictureMate Photo Paper from the PictureMate Print Pack to ensure proper saturation and absorption of ink.
- Make sure the glossy, printable side of the paper is face up.
- Make sure your paper isn't damp or curled, or loaded face down (the printable side should be face up). If it's damp or curled, reload a new stack of paper.
- The photo may be out of focus.
Your photo is grainy.
- You may need to increase the image resolution or print it in a smaller size; see your software documentation.
Your photo is faint or has gaps in the image.
- Make sure your paper isn't damaged, old, dirty, or loaded face down. If it is, reload a new stack of paper with the glossy, printable side up.
Colors in your photo are incorrect or missing.
- Make sure your software is set for color printing.
- Colors may change slightly after drying. Wait for 24 hours and check your photo again to see if the colors look right.
- If you are printing from your computer, make sure the Color Option is not set to Black and White or Sepia. See Printing From Your Computer.
- If you copy files from Adobe Photoshop to a memory card, make sure you save them as RGB images using the standard save option (non-progressive). Files saved in the CMYK format may not print with the colors you expect.
Problems With Paper Feeding
Paper doesn't feed correctly or jams inside PictureMate.
- Make sure the paper support is pulled up.
- Make sure the handle is not resting on the paper.
- Make sure the paper support is all the way back and it is not resting on the handle. The handle should be all the way down in the back of PictureMate.
- If paper doesn't feed, remove it from the paper feeder, reload it against the right edge, then slide the left edge guide against the paper.
- If multiple pages feed at once, remove the paper from the feeder, separate the sheets, and carefully reload it.
- If paper jams, remove paper, then press the OK button to clear the message.
If your paper loads incorrectly or jams frequently:
- Use new paper, loaded printable side up. Load a maximum of 20 sheets.
- Place the paper against the right edge and slide the left edge guide against it, but not too tight.
- Store paper flat to prevent curling.
- Don't load plain paper; this can damage PictureMate.
Miscellaneous Printout Problems
PictureMate prints blank pages.
- If you are printing from your computer, make sure PictureMate 2005 is selected, or is the active printer in the Print Center.
The margins are incorrect.
- If you have a border on one side of your photo but not on the other, make sure the paper is positioned correctly in the feeder, all the way to the right. Slide the left edge guide against the paper.
- If you are printing without a computer, make sure the Crop setting is set to Off. See Cropping Your Photo for instructions. Also check your Layout setting. See Choosing a Layout for instructions.
- When you print borderless pictures, your images are automatically expanded and cropped. If you find that too much of your pictures are cut off around the edges, you can adjust the amount of expansion and cropping when you print from your computer. See Printing From Your Computer.
- If the subject of your photo is very close to the edge of the image, you may want to select Border as the Layout setting. This prevents the automatic enlargement of your photo (to eliminate the borders) which may be causing part of your image to be cut off.
Image size or position is incorrect.
- Make sure paper and layout options in your printer settings (on the computer) or on the PictureMate Main Menu (printing without a computer) are set correctly.
- Your photo size may not match the width/height proportions (aspect ratio) of the paper or layout. Photos may be cropped to fit the paper and layout.
The wrong photo is printed.
The photo numbering on the proof sheet may not match the numbering in your camera.
- If you're printing without a computer, first print a proof sheet to identify your photos by number. If you deleted photos from your card or took new photos, you may need to print a new proof sheet. See Printing a Proof Sheet With the PictureMate Wizard.
- If your camera supports DPOF, you can pre-select photos so PictureMate knows exactly what to print. See Camera-selected DPOF Photos for more information.
- If your camera is PictBridge-enabled, you can connect it to PictureMate and control printing from the camera. See Printing From a Digital Camera for details.
Too many copies are printing.
Make sure that the Copies option in your software (printing from computer) or on the PictureMate Main Menu (printing without computer) is not set for multiple copies.