|

Reference Guide
|
|
Basic Scanning Procedure
Scanning an Image
 Step 1. Turning on the scanner
 Step 2. Placing your materials on the document table
 Step 3. Starting the software and scanning an image
EPSON Scan provides three modes for you to make any scanning settings: Full Auto Mode, Home Mode, and Professional Mode. This section describes how to scan an image in the Full Auto Mode. The Full Auto Mode lets you scan images using automatically-adjusted settings. For more details, see Choose the Appropriate Scanning Mode.
 |
Note:
|
 | -
You cannot scan an image with a size that exceeds the available memory or disk space. If you try to scan the image, an alert appears on the screen.
|
|
 | -
Most illustrations shown in this section are for the Perfection 2480 Photo, so they may be different in appearance from the Perfection 2580 Photo. The instructions are the same, except as noted.
|
|
 |
Note for Macintosh users:
|
 | |
Most illustrations shown in this section are for Windows, so they may vary in appearance from what actually appears on your screen. The instructions are the same, except as noted.
|
|
 |
Caution:
|
 |
| Before starting the following steps, make
sure that all the necessary software including EPSON Scan has been
installed. To install the software, see the Start Here poster. |
|
Step 1. Turning on the scanner
 |
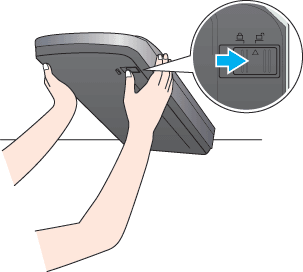
Before turning on the scanner, make sure the transportation lock is in
the unlocked position. |
The transportation lock is located on the bottom of the scanner on the right side. To release the lock, lift the scanner straight up and then slide the lock to the unlocked position.
 |  |
Caution:
|
 |  | |
Do not turn the scanner over; this may damage the scanner.
|
|

 |
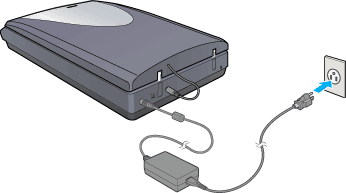
Connect the cover cable.
|

 |
Turn on the scanner by plugging in the power cord. The  Start
light blinks and stays on in green, meaning the scanner is ready. Start
light blinks and stays on in green, meaning the scanner is ready. |

 |  |
Note:
|
 |  |
| Do not disconnect the cover cable after you
turn on the scanner. |
|
 |
Use the USB cable that comes with your scanner. Plug the square end of the USB cable into the scanner's USB port and then plug the flat end into any available USB port on your computer.
|

 |  |
Note:
|
 |  | |
Your scanner may not work correctly if you use a USB cable other than the one supplied by Epson, or if you connect your scanner through more than one hub system.
|
|
 |  |
Caution:
|
 |  | |
The interface cable connectors have only one correct orientation. Ensure the correct orientation of a connector before inserting it into the appropriate port.
|
|

[Top]
Step 2. Placing your materials on the document table
You can scan two types of materials: transparent materials
(like film) or reflective documents (like photos or letters). See the appropriate
link below to place your materials on the document table.

[Top]
Step 3. Starting the software and scanning an image
 |
Note for Mac OS X users:
|
 | |
Depending on your application, you may not be able to start EPSON Scan as described here.
|
|
You can start EPSON Scan in the following ways:
- Start EPSON Scan directly as a stand-alone application
For details, see Start
Scanner Software (EPSON Scan) Directly.
-
Start EPSON Scan from a TWAIN-compliant application
To start EPSON Scan from EPSON Smart Panel, see Overview
of EPSON Smart Panel.
This section describes how to start EPSON Scan from ArcSoft PhotoImpression.
 |
Note for Mac OS X 10.3 users:
|
 | |
Do not use the Fast User Switching function while using the scanner.
|
|
 |
Start ArcSoft PhotoImpression.
|
Double-click the PhotoImpression 5 (PhotoImpression
for Macintosh users) icon on your desktop.
You can also start the ArcSoft PhotoImpression as
follows:
For Windows users:
Click Start, point to All Programs (for Windows XP users) or Programs
(for Windows Me, 98 SE, or 2000 users), and select ArcSoft PhotoImpression
5. Finally, click PhotoImpression 5.
For Macintosh users:
Double-click the Applications folder in Macintosh HD and double-click
the ArcSoft PhotoImpression 5 folder. Finally, double-click
PhotoImpression.
 |
Click the Get Photo button, then click the Camera/Scanner
button on the main screen. |
 |
In the Save my acquired photos section on the right side of the main
screen, select a file format from the File Format list. See File
formats lists for details. |
Specify a location. If you want to change the default
location, click the Browse icon and select a folder.
 |
Click the EPSON Perfection 2480/2580 button.
|
 |  |
Note for Windows XP users:
|
 |  |
| Do not choose WIA-EPSON Perfection 2480/2580
from the menu. If you select it, you cannot fully use the Epson scanner
function. |
|
 |
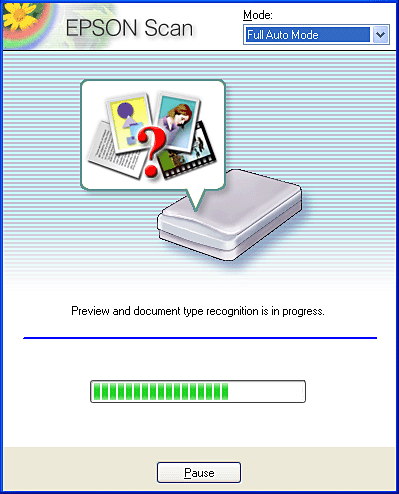
EPSON Scan automatically previews the image, and recognizes the document source and type.
|

If you want to make more settings, click Pause
and click Options to open the Options dialog box. For details on the
settings, see the online help by clicking the Help button in the Options
dialog box.
 |
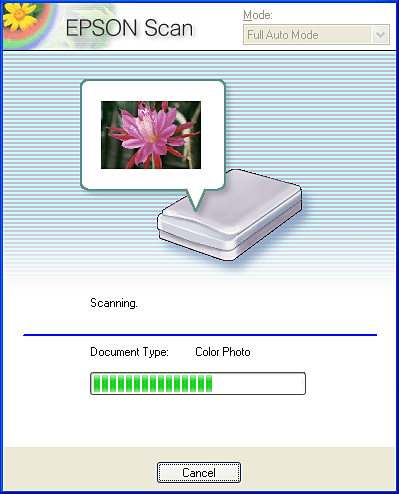
After EPSON Scan has previewed and recognized the document type, the following window appears. You can see the previewed image in the window.
|

EPSON Scan automatically locates the target images
and modifies their skew, then scans them.
 |  |
Note:
|
 |  |
| Clicking Cancel on this screen terminates
EPSON Scan. |
|
 |
The scanned image is sent to ArcSoft PhotoImpression and saved to the specified folder.
|
 |
Note:
|
 |
- Depending on your image, you may not get
the expected results. In this case, scan the image in Home or
Professional Mode.
|
|
 |
- For information on editing of scanned images,
refer to your application's documentation.
|
|
File formats lists
The following table lists image file formats available in ArcSoft PhotoImpression. Select an appropriate file format before scanning images.
|
Format (File extension)
|
Explanation
|
|
BITMAP (*.BMP)
|
A standard image file format for Windows. Most Windows applications including word processing applications can read and prepare images in this format.
|
|
JPEG (*.JPG)
|
A compressed file format. The compression quality
can be selected. The JPEG format enables relatively high compression
ratio. However, the higher the compression ratio is, the lower the image
quality becomes. (Note that the original data cannot be restored.) In
addition, the quality deteriorates every time the data is saved. The
TIFF format is recommended in cases where modification and retouching
are required.
|
|
PNG format (*.PNG)
(for Windows only)
|
PNG is a portable and highly-compressed file format
designed for viewing in Web browsing applications. The image quality
does not deteriorate when the image file is saved in PNG.
|
|
TIFF (*.TIF)
|
A file format created for exchanging data among many applications, such as graphic and DTP software. When scanning black & white images, you can specify the compression type.
|

[Top]
| Version 1.00E, Copyright © 2001, SEIKO EPSON CORPORATION |
![]()
Step 1. Turning on the scanner
Step 2. Placing your materials on the document table
Step 3. Starting the software and scanning an image


 Start
light blinks and stays on in green, meaning the scanner is ready.


